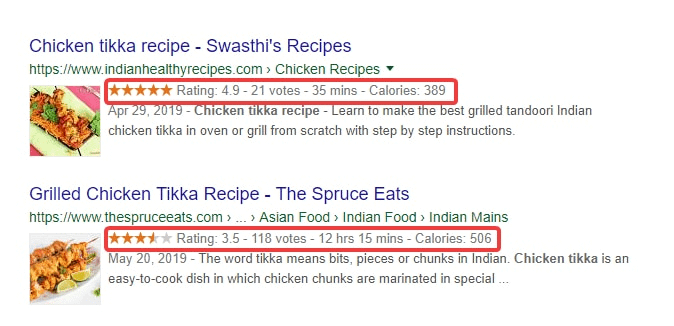
When Google started, its results used to be pretty dull. Every page looked the same, and only the ads broke the monotony, and even the ads looked just like the results.
Over time, Google has evolved and made their results richer to serve its users better. But, what do rich results mean? Here are some examples.
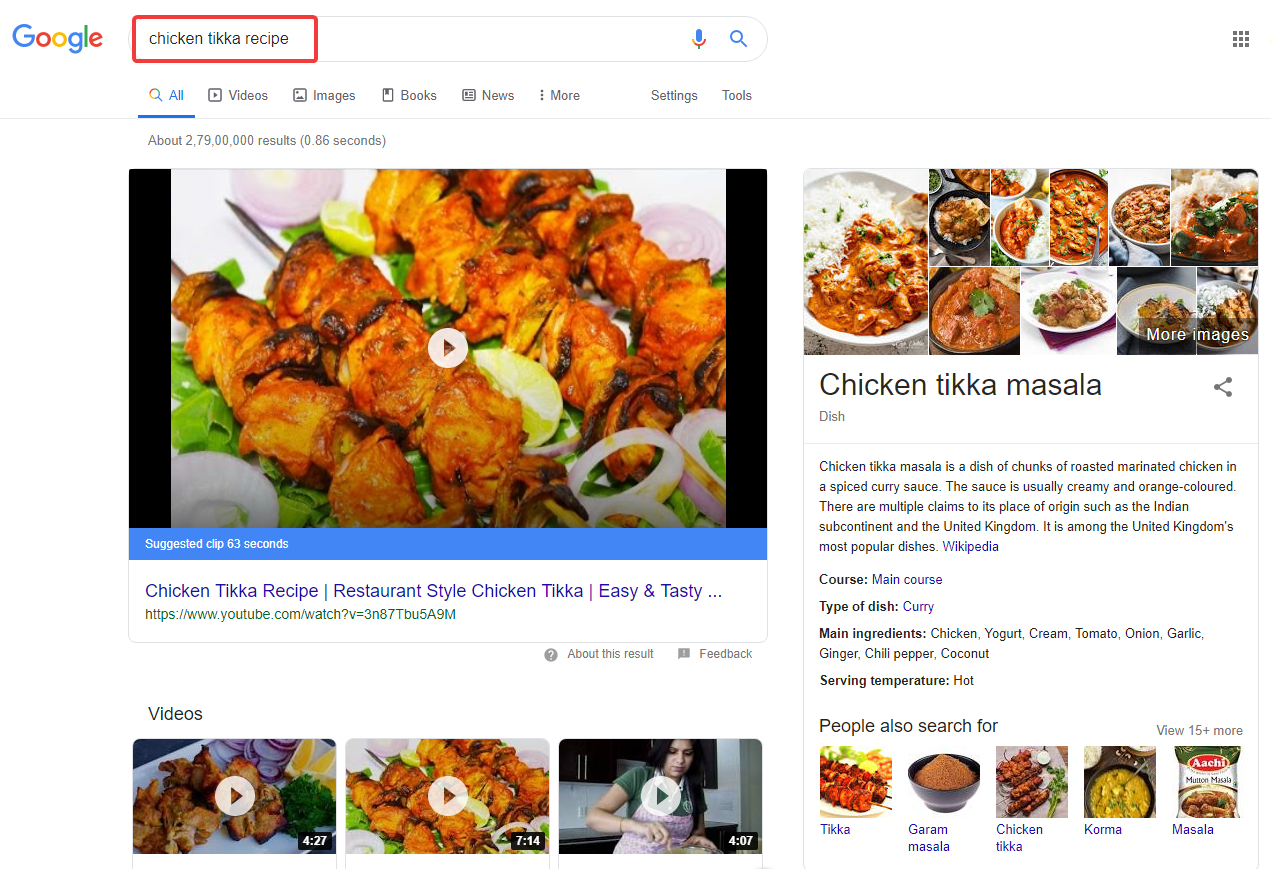
When you search for “Chicken Tikka Masala”, or any recipe for that matter, Google mostly displays rich results similar to the one above. Instead of simple text results, you have a video suggestion, a rich card that shows some details about the recipe, and even more suggested videos below.
Not only that, but the regular results below the video suggestions are also rich.
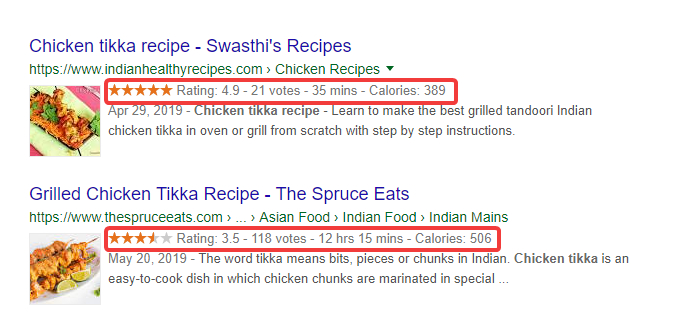
As you, not only can you see a star rating alongside the recipe, you can also see the number of votes, the time it takes to make the recipe, and even the number of calories in the recipe. Pretty amazing, right?
This phenomenon is not limited to recipes. Here is an example of another query.
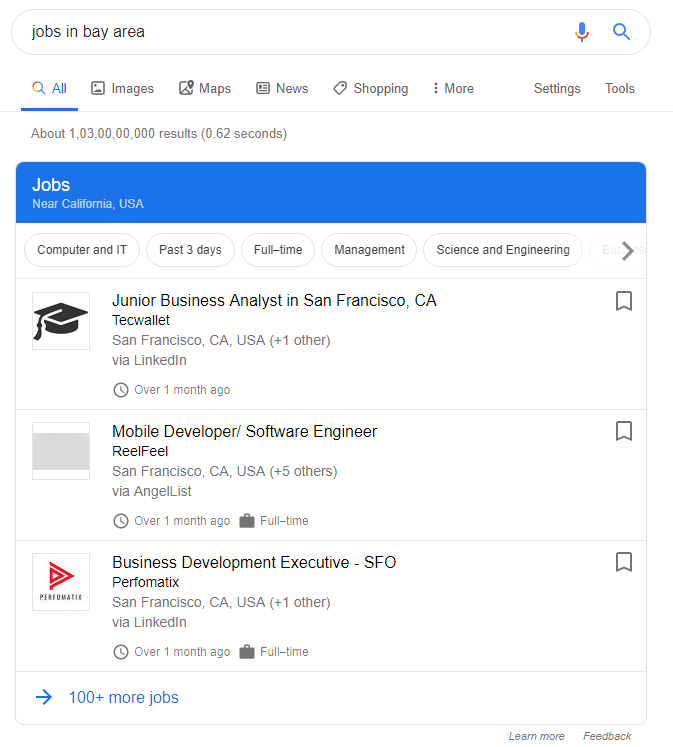
And another one.
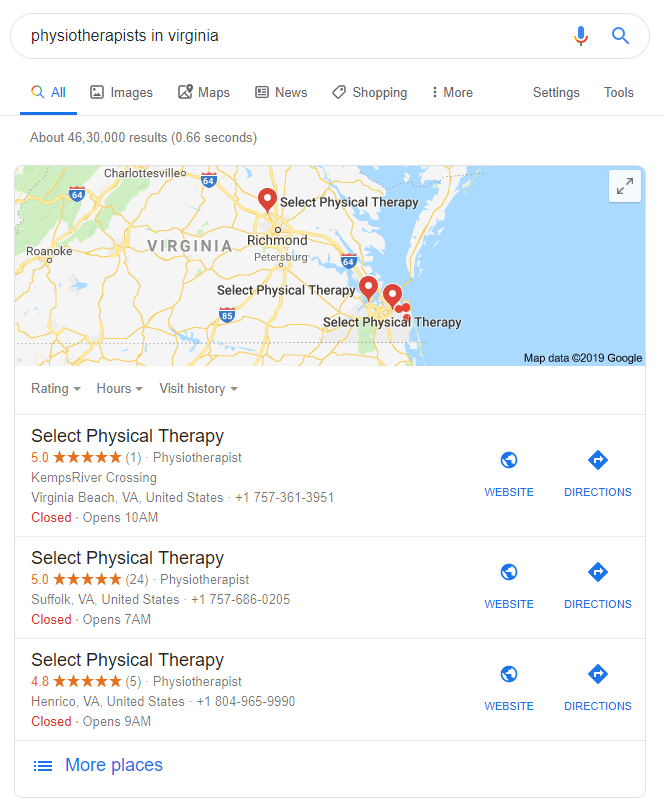
What is happening here is that Google is understanding the user’s query and then showing relevant results. Also, Google includes the information in the search results that the users find useful.
The question is, how is Google fetching all this information? Has Google become so smart that it is able to interpret all the data from the web and then show results to the users? Is Google becoming Skynet?
Fortunately, Google is not becoming Skynet. And, it has not become that smart, at least not yet.
The way that Google is able to fetch all this information from websites is that rich snippets.
So, what are rich snippets?
Rich Snippets, or rich data, or rich meta, or metadata, are chunks of code that are embedded into a page of a website that gives Google some additional data about the page. Google parses this information and uses it to display rich results.
For the Chicken Tikka example, here is how the page and the rich data look.
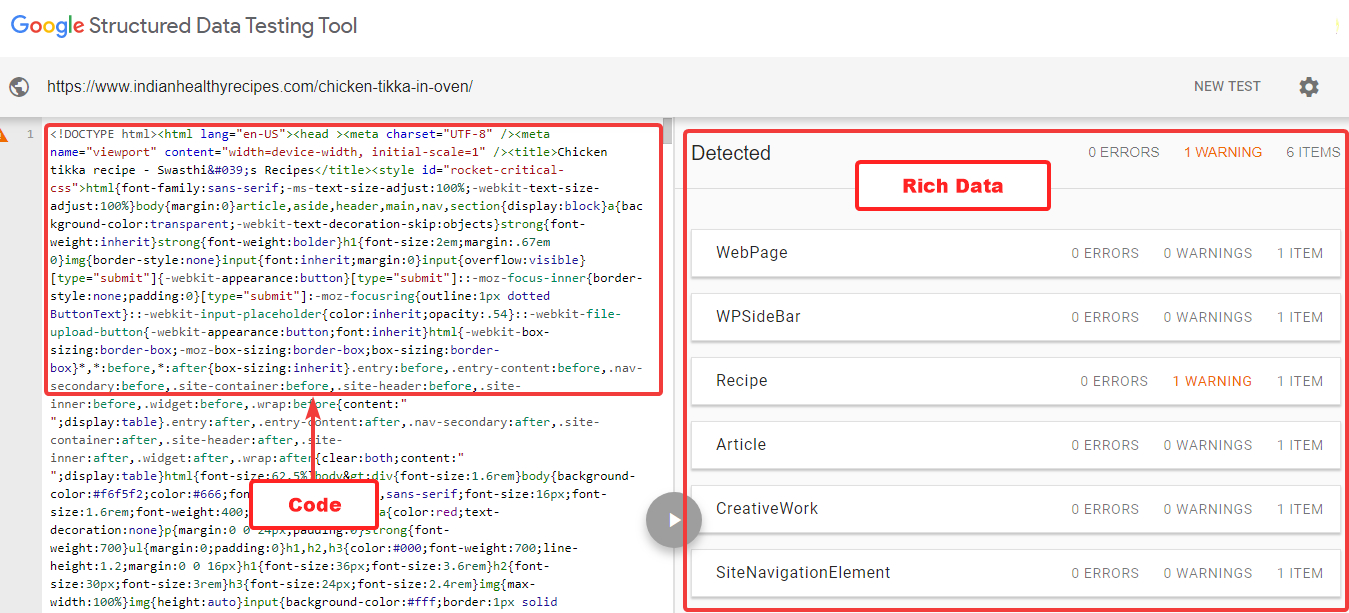
If you noticed, Google is detecting many types of rich data on the page, including one for recipes. If we click the recipe, here is what we see.
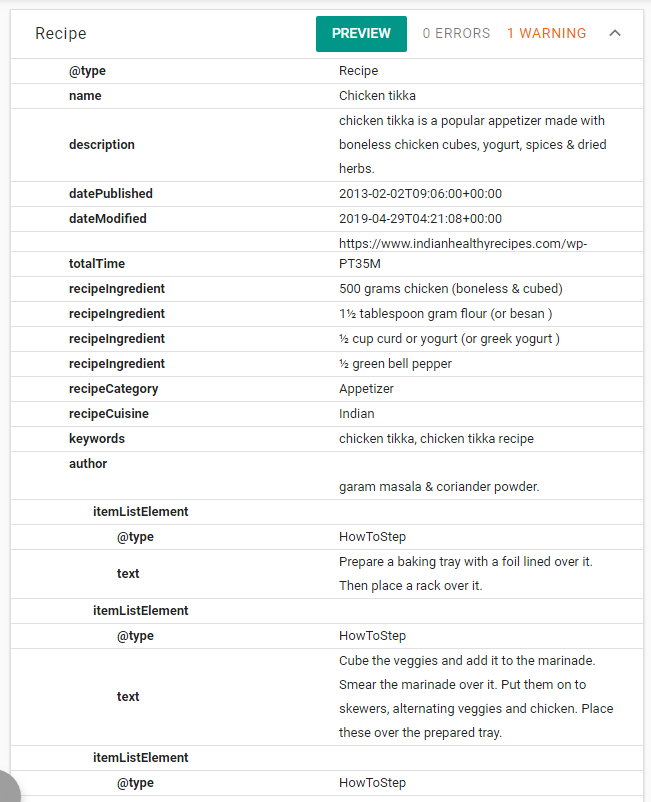
If you look closely, it mentions the ingredients, the author, and even the individual steps you need to take to prepare delicious chicken tikka.
This is the information that Google sees, interprets, and then showcases in the search results, and this makes the results rich.
This brings up 2 important questions.
- Is there a standard to add this information to your pages?
- How can you start adding this information to your pages?
The answer to the first question is yes; there is a standard for adding rich data to your pages. In fact, there are many standards, but the most popular one is from Schema.
Schema is a collaborative, community product that was created by the combined effort of Google, Microsoft, Yahoo, and Yandex, and now is the most popular way of adding rich data to the web-pages.
The answer to the second question is Rank Math. Using Rank Math’s Rich Snippet capabilities, you can start adding rich data to your posts, pages, and even custom posts easily.
Configuring Rich Snippet – The Basics
If you’ve read the article on Rank Math’s Title and Meta Settings, you might remember that we discussed Rich Snippets in posts, pages, and other post types. Here is an image that shows exactly that.
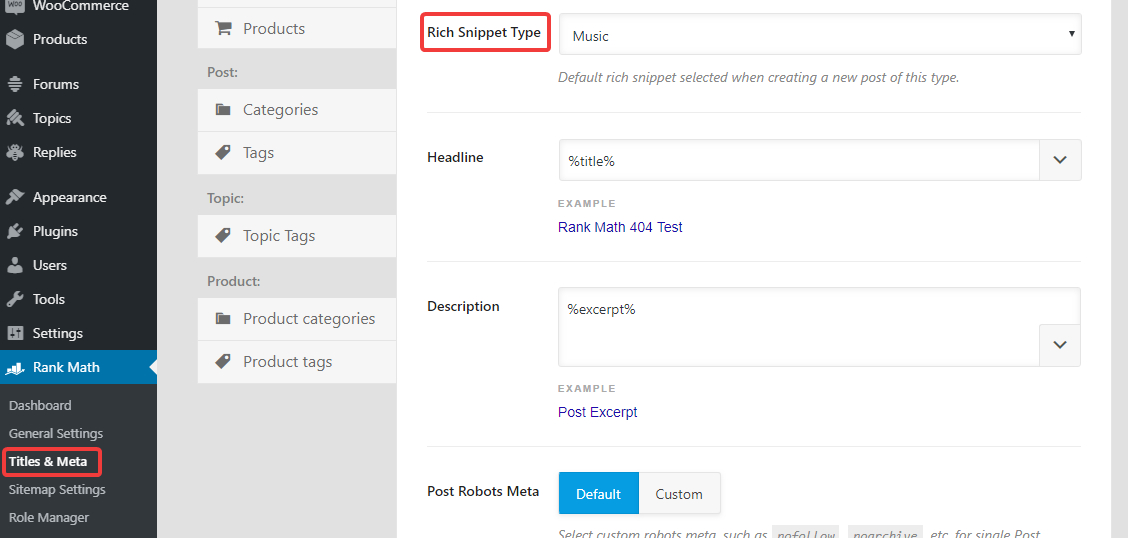
It is important to understand that there you set the default values for your rich snippets. In simple words, there you configure which rich snippet type your post will use, not what data the rich snippet will actually have.
The actual process of configuring rich snippets is done inside the post itself. Let us discuss the process.
Configuring Rich Snippets
Start by creating a new post or editing an existing post. For this example, we will create a new post.

Here is how the new post screen looks like. If you’re using the classic editor, then your screen would appear a little different.
Note the Rank Math’s Meta Box just below the post editing area. The third option you see there should be “Rich Snippet”. Click on it.
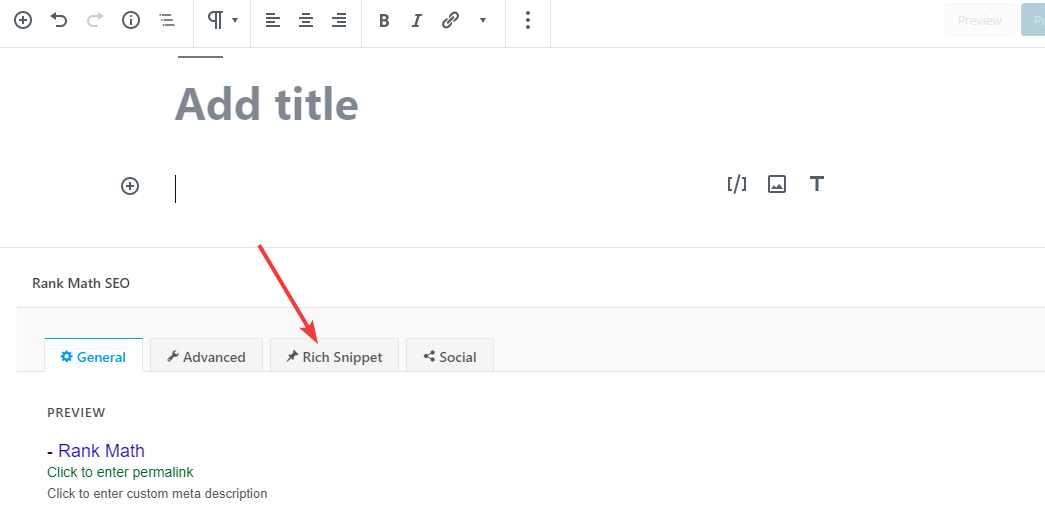
On the classic editor, it should look something like this.
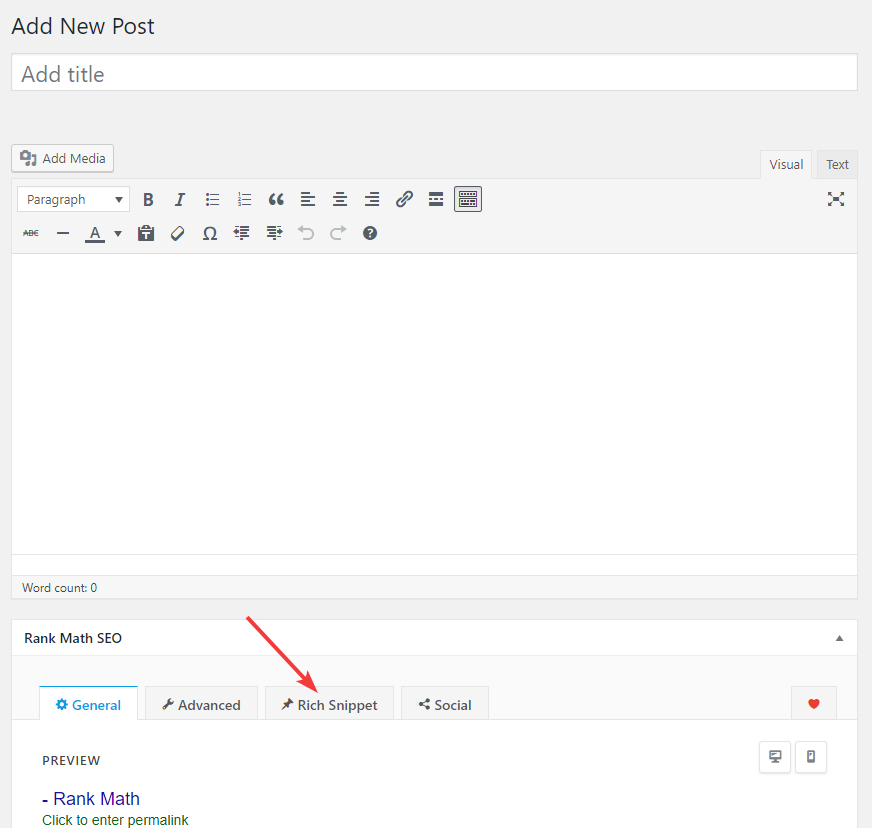
We will be using the block editor exclusively for the examples. The process of setting the rich snippet is the same for the old editor, and you should have no trouble following along.
Here is what you would see in the Rich Snippet Column.
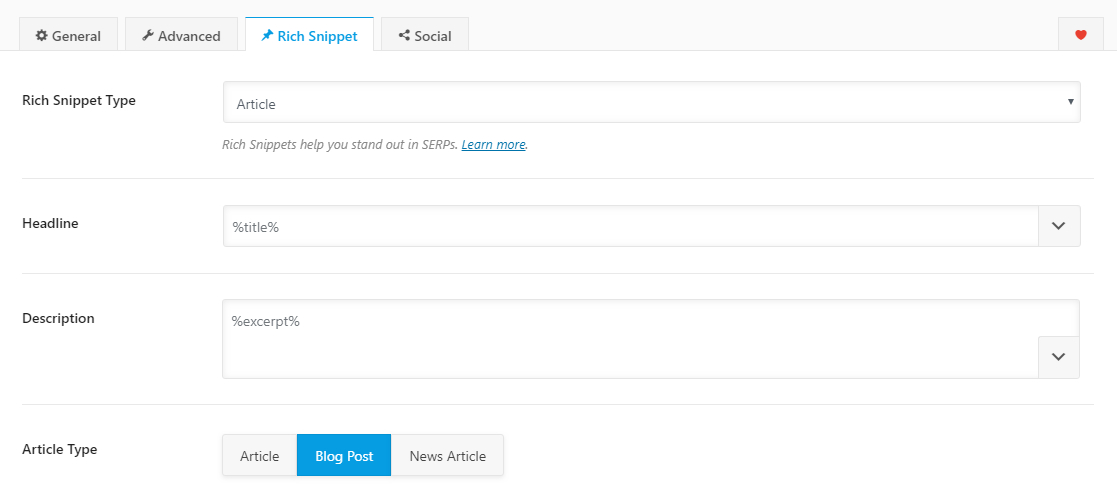
The Rich Snippet Type is already selected, as it was set as the default value in the Title and Meta settings. The next few settings are also inherited from Meta settings.
If you click the Rich Snippet Type field, you will see all the Rich Snippet Types Supported by Rank Math.
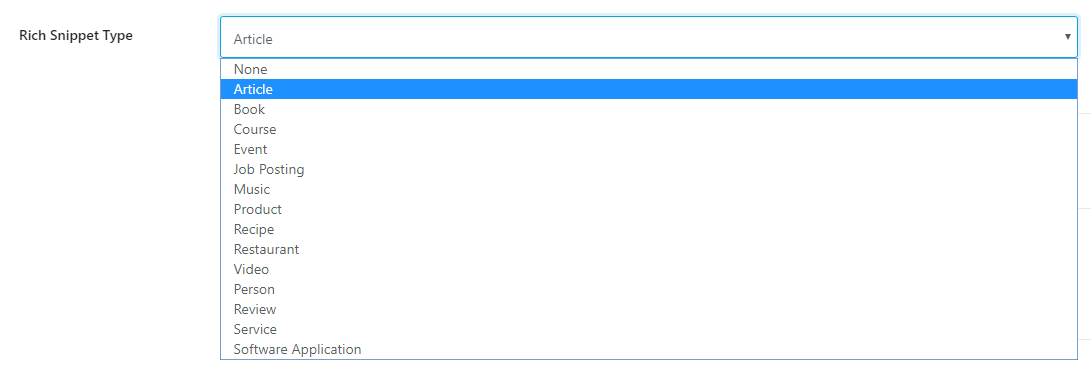
As you see, there are plenty of supported Rich Snippets types, and we will discuss each of them with you. Here is a list of all the Rich Snippet Types.
Table of Contents
The idea behind configuring Rich Snippets is that you configure a default value that will be used for every post that you put up on your website, and then you customize and optimize the data based on the post itself.
When you select different types of Rich Snippets, different types of metadata will appear for you to configure. By understanding what each of the fields means, you will be able to enter the appropriate information for the Rich Snippet.
Let us start by discussing each of the Rich Snippet Types.
None
The “None” option is pretty self-explanatory. It means that you don’t intend to use rich data for the post. If you select the None option, the rest of the fields disappear.

Article
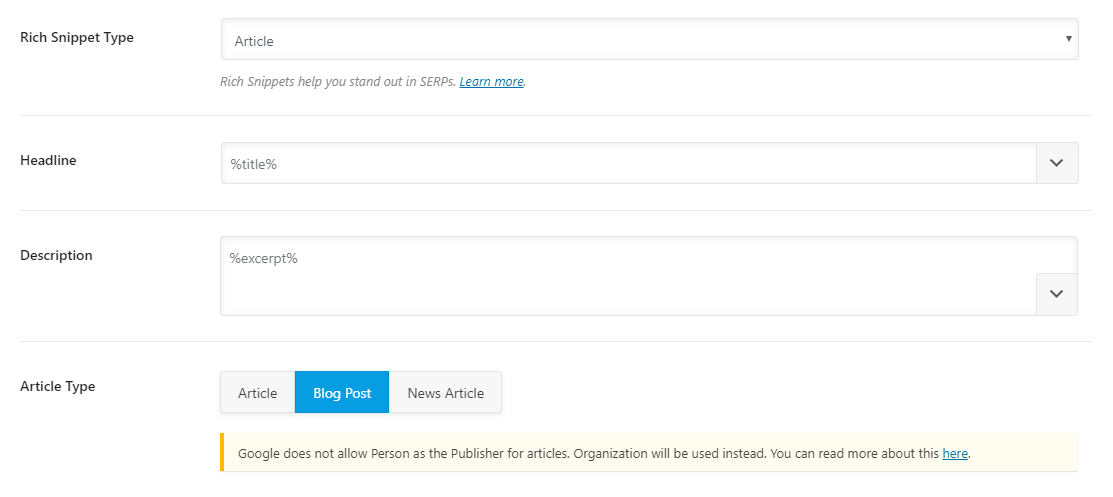
The Article Rich Snippet Type is the simplest of the Rich Snippet Types as it can apply to all articles. Here are the options that you would see if you select the Article Rich Snippet Type.
Headline
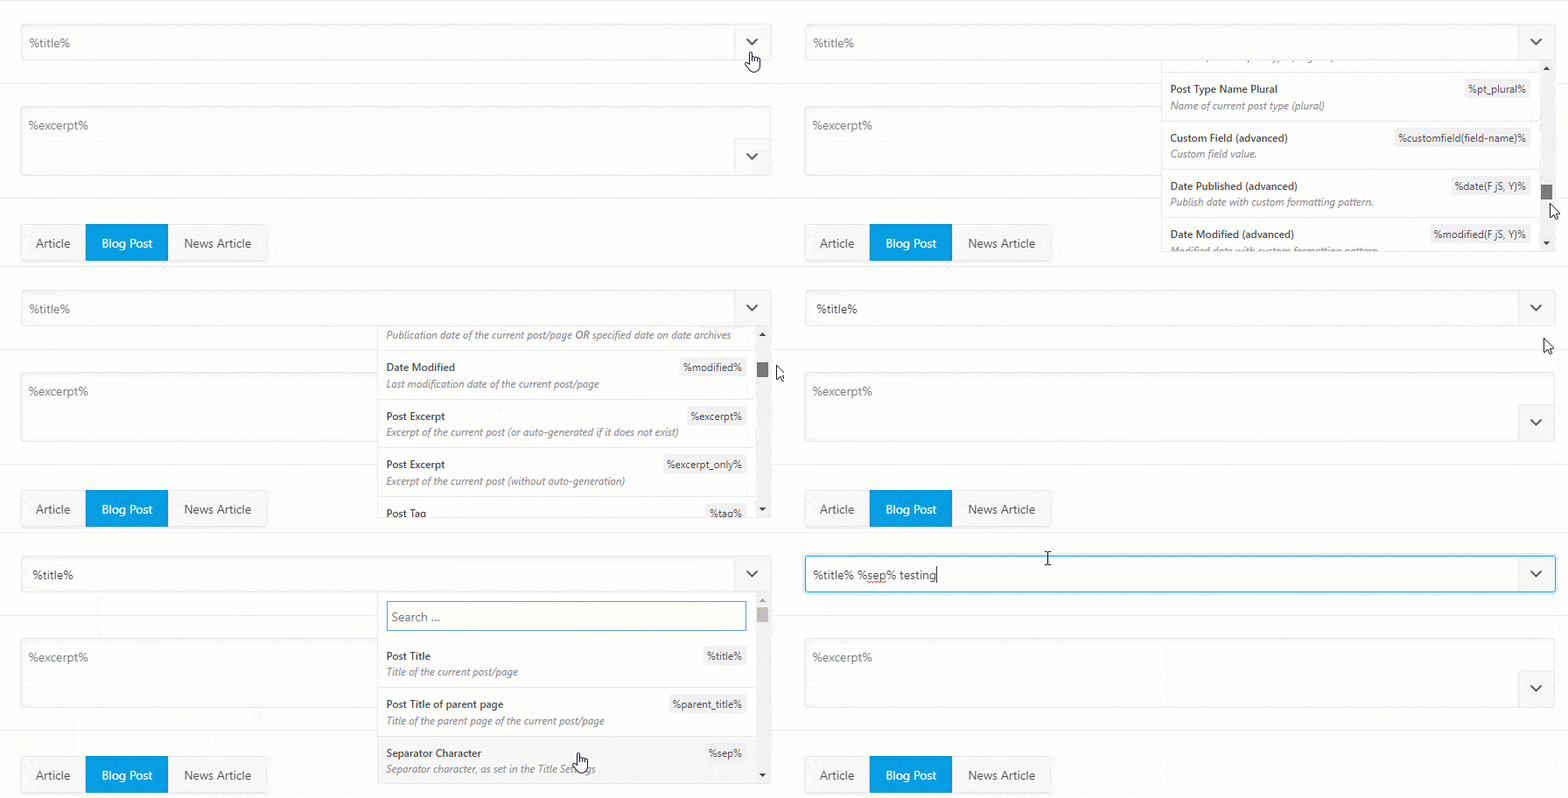
The Headline field is where you write a meta-headline for the post. You can either write one from scratch or use variables to create a title dynamically. There are many variables available to use, and you can check them out by clicking the drop-down button at the end of the text area.
Description
In the Description field, you enter the meta-description of the post that you want the search engines to see. The same variables that you have access to in the Title field are also available to you in the Description field as well.
Article Type
In the Article Type field, you have access to 3 options.
- Article
- Blog Post
- News Article
These options let you select the type of article your blog post is. The Article and Blog Post field can be used interchangeably, but the News Article should only be used for factual news content.
Book
The Book Rich Snippet Type should be used if you are talking about Books. Once you select the books option, here are the fields that you will see.
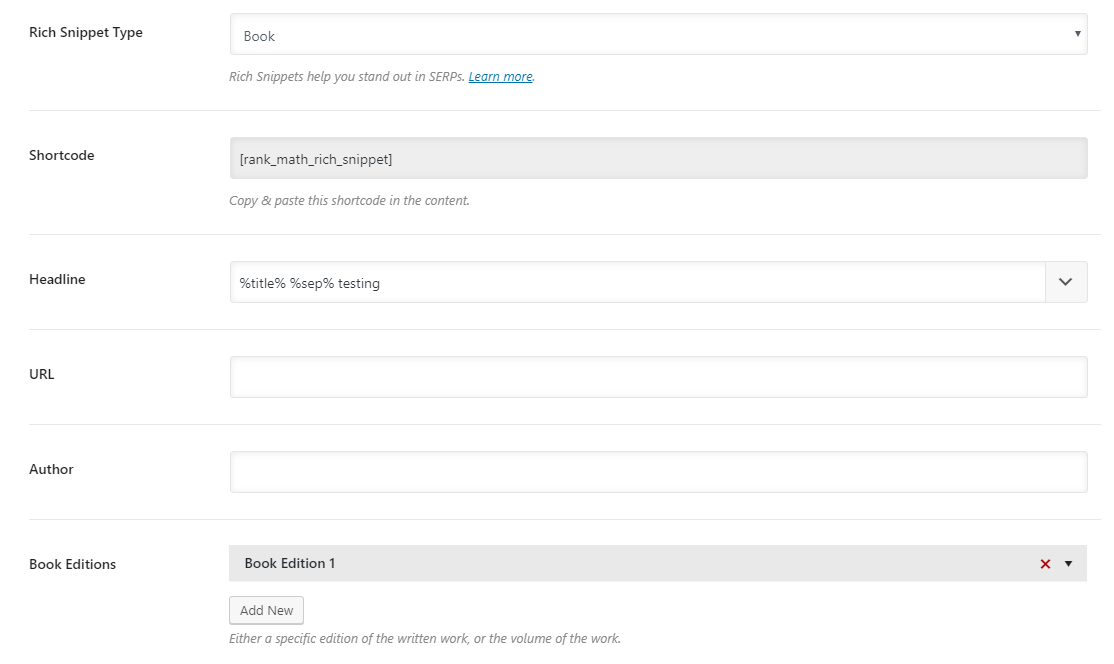
Here is how you would configure each of the settings.
Shortcode
If you’d like to display some information about the book on the post in addition to the rich data, then you can paste this shortcode in your post at the position of your choice. Using this shortcode is optional and does not affect the inclusion of rich-data about your book in the post.
Headline
The headline here represents the meta-headline of the post. You can either create a static headline or create a dynamic one using variables.

URL
Enter the URL here where the book is available for purchase
Author
Enter the author’s name here.
Editions
As a single book can have multiple editions, the Schema format supports that too. Even if you’re talking about a book that has a single edition, you should still fill out the details in the Book Editions section. When you click the editions section, here are the options you would see.
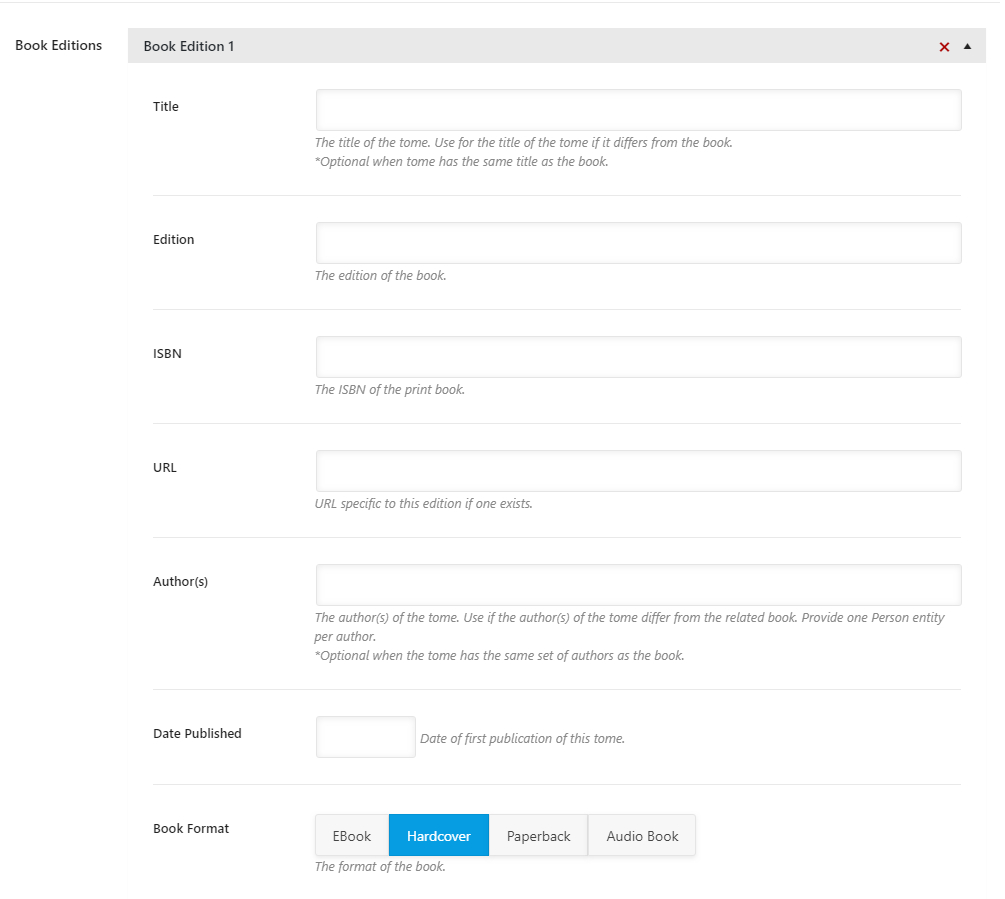
Here is how you would fill the fields.
Title
If this specific edition has a different title from the book, then you can enter the title here. If the title is the same, then you can leave this blank.
Edition
Mention the edition of the book here.
ISBN
Enter the ISBN of the book. The ISBN is a unique identifier for every book and varies with each edition, so make sure to enter the correct ISBN.
URL
If this edition is available online, enter the URL here. This field is optional and can be left blank as well.
Authors
Enter the name of the author here if it is different from the related book.
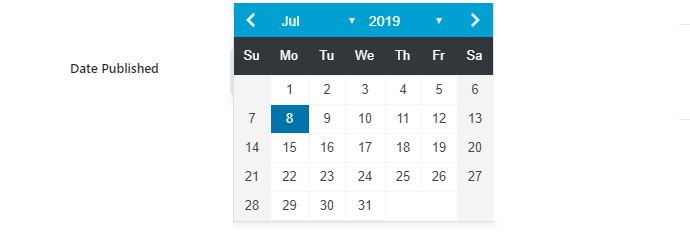
Date Published
se the date picker to select the date of this edition’s first publication.
Book Format
Here you can select the format this particular edition is available in. If the book is available in multiple formats, create an edition for each of the book types.

As you can see, 4 types of formats are supported.
- EBook
- Hardcover
- Paperback
- Audio Book
To add another book-edition to the rich data, click the “Add New” button.
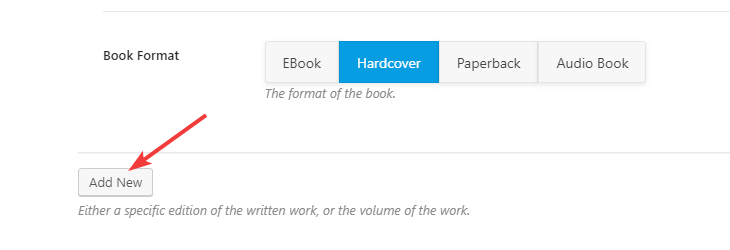
After adding additional editions, the screen looks like this:

To delete a specific edition from the collection, click the red “X” next to the edition.

Course
If you’re reviewing or talking about an online course, then you can use the Course Rich Snippet. Here are all the options that you would see if you select the Course Rich Snippet.
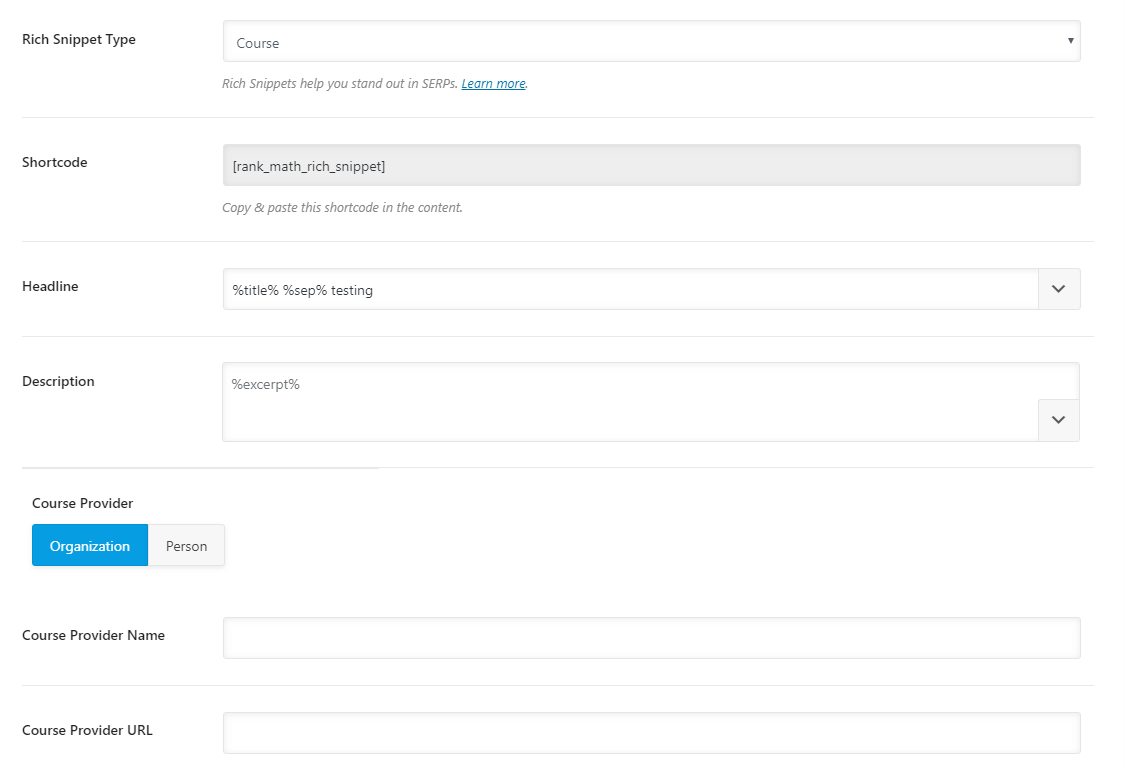
Here is how to configure the options.
Shortcode
Rank Math adds the rich data you configure to your page’s metadata, and it is not viewable by humans. However, if you want to include the data on the post for your viewers to read, then you can paste the shortcode on the page. Make sure to paste the shortcode in the location where you want the information to show up. Note that using this shortcode is optional and does not affect the metadata that will be added to the post.
Headline
Here you enter the meta-headline for the course you’re talking about. You can write a static title, or use variables to create a dynamic title. There are plenty of variables available, and you see them by clicking the drop-down button next to the text field.

Description
Here you add the meta-description for the course that you’re talking about in the post. Similar to the Headline, you can use variables to create a dynamic description, or type in a static one.
Course Provider
Is the course made available through an organization or a person? Choose the correct option here.
Course Provider Name
Enter the name of the person or organization that is providing your course.
Course Provider URL
Enter the URL where the course is available.
Event
Is your post or page about a public event? Then use the event type to markup your metadata.
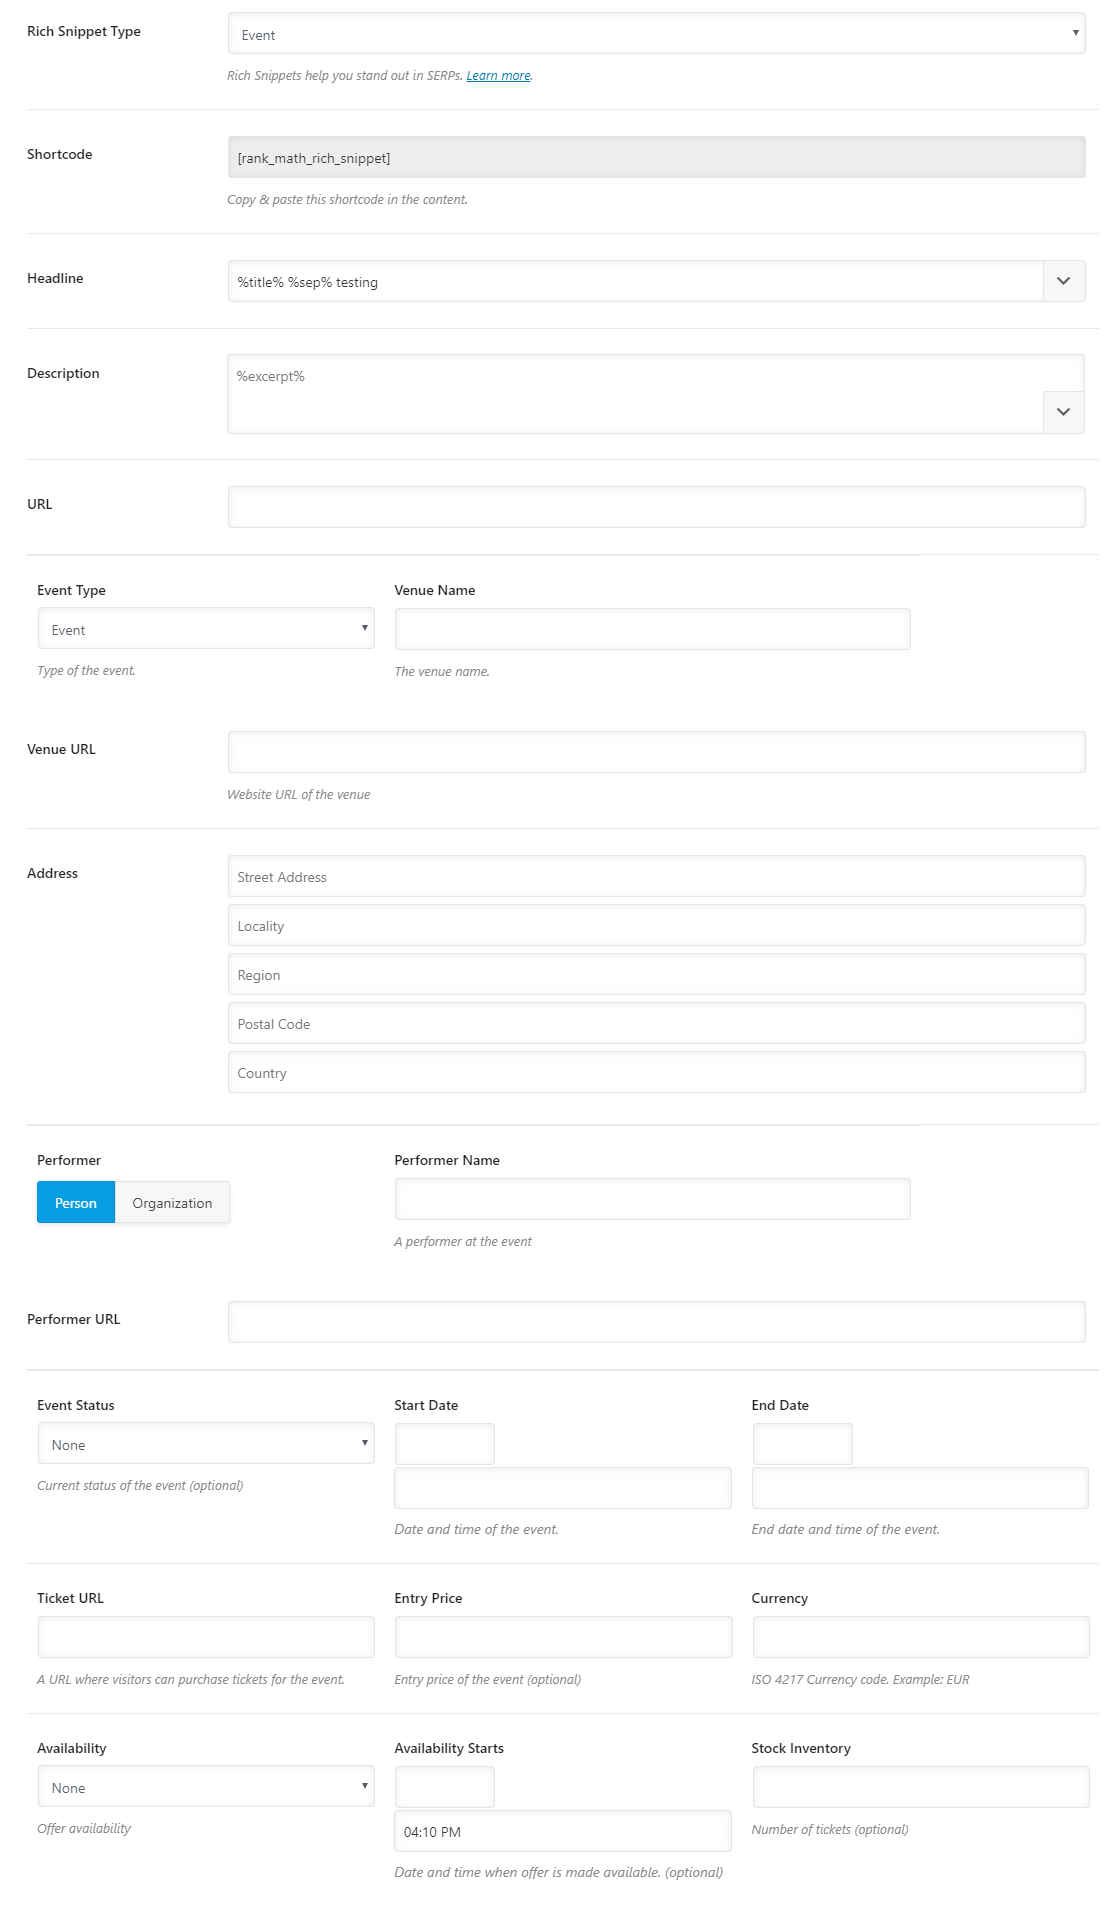
The Event Rich Snippet has a ton of options, so let us understand each of them quickly.
Shortcode
Rank Math does not include the information about your event inside the post in a way that your users can see it. It does it in a way that only the search engines have access to the information. But, for some reason, if you’d like to include the information about the event inside the post too, paste the shortcode in the post at the position you want the information to appear.
Doing this is optional and does not affect the metadata that Rank Math adds to the post.
Headline
Here you set the meta-headline for the event that you mention in your post. You can either type in a static heading or create one using variables. There are quite a few variables available, and you can check them all out by clicking the drop-down button at the end of the text field. Here is how it works.

Description
Here you set a meta-description of the event you’re talking about. Similar to the Headline, you can either create a static description or use the variables to create a dynamic one. The same variables that are available to set the headline are also available for the description.
The description should be short, but try to make it “sell” the event. Readers should know:
- What the event is
- Who it’s for
- Why they should care
URL
This field should contain the official URL for the event. If you leave this field empty, Google may assume that your page is the official page for the event.
Event Type
Here you select the type of event you’re talking about on the page. There are lots of different event types that are recognized in Schema.org markup – too many to list here! Just scroll through the options and find the one that best describes your event.
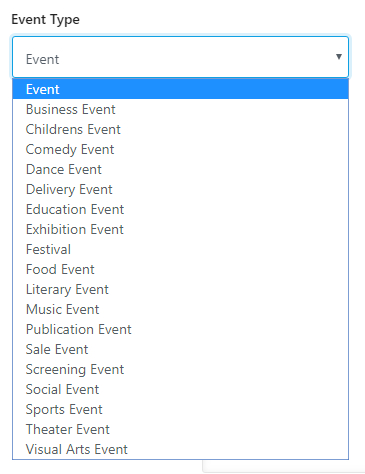
Here is the list of supported events:
- Event
- Business Event
- Children’s Event
- Dance Event
- Delivery Event
- Education Event
- Exhibition Event
- Festival
- Food Event
- Literary Event
- Music Event
- Publication Event
- Sale Event
- Screening Event
- Social Event
- Sports Event
- Theater Event
- Visual Arts Event
Venue Name
You can’t have an event without a location (unless it is online)! What’s the name of the venue? Enter the name of the venue here.
Venue URL
If the venue of the event has a separate URL, enter it here.
Address
Tell your readers how to reach the venue with a street address! Google can use this information to populate Google Maps and local search, and It may display the information in the search results, so people can get there easily. Fill in the address field with a reasonable amount of detail so that people can find the address easily.
Performer
Who is performing at the event? Is it a person or an organization. Choose the appropriate option.
Performer Name
Enter the name of any one of the performers here. For example, for a Person performing, you may write “Taylor Swift”, and for a group, you can write the name of the band, ex. “Metallica”. If there are multiple performers, enter the name of anyone of them.
Performer URL
If the performer you mentioned (person or organization) has a website, enter the URL here. Make sure to enter the URL of the performer you mentioned in the Performer Name field, not others.
Event Status
What is the current status of the event? Is the event canceled, on-time, or postponed? Select the appropriate option from the fields available.
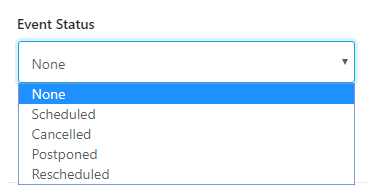
If you don’t know the status, you can leave it at “None” as this is an optional field.
Start Date and End Date
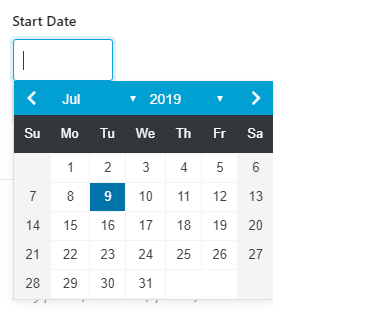
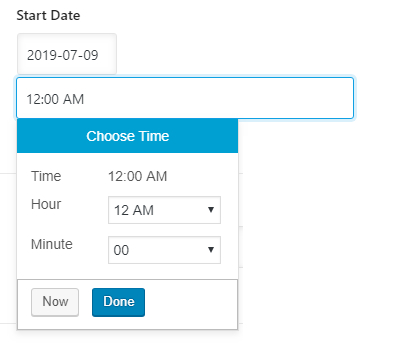
When is the event scheduled to happen, and how long will it last. The start date and the end date can be used to configure those options.
Both the Start Date and the End Date have a date picker and time picker, which you can use to enter the precise time and date for the event. Here is how they should look.
Ticket URL
Where can people buy tickets for the event? Enter the URL for that here. If the event is free, just leave this blank,
Entry Price
How much does the event cost? Enter only the number in the field without any currency symbol. If the event is free, or you don’t know the price, you can leave this field blank.
Currency
As we mentioned, you should not enter the currency symbol in the Entry Price field, as you will specify the currency here using the ISO 4217 Currency Code. If you don’t know your country’s currency’s ISO code, Wikipedia has an active code list.
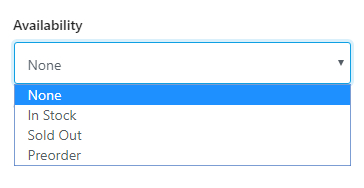
Availibility
Are the tickets still available, or have they sold out?
The options are:
- None
- In stock
- Sold Out
- Preorder
Availability Starts
When will tickets for the event be available? Use the date and time picker to select that date and time in this field.
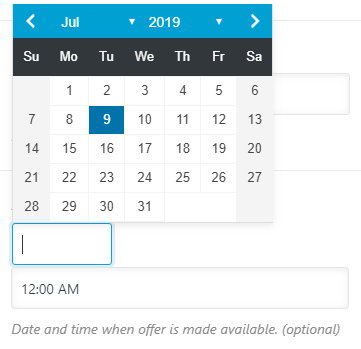
If you don’t know the actual date, you can leave this field blank.
Stock Inventory
If you know how many tickets are available for sale, enter the number here, or leave this field blank.
Job Posting
The Job Posting Rich Snippet is designed to be used when you’re posting available jobs on your website. Here are all the options that you should see in the Job Posting section.
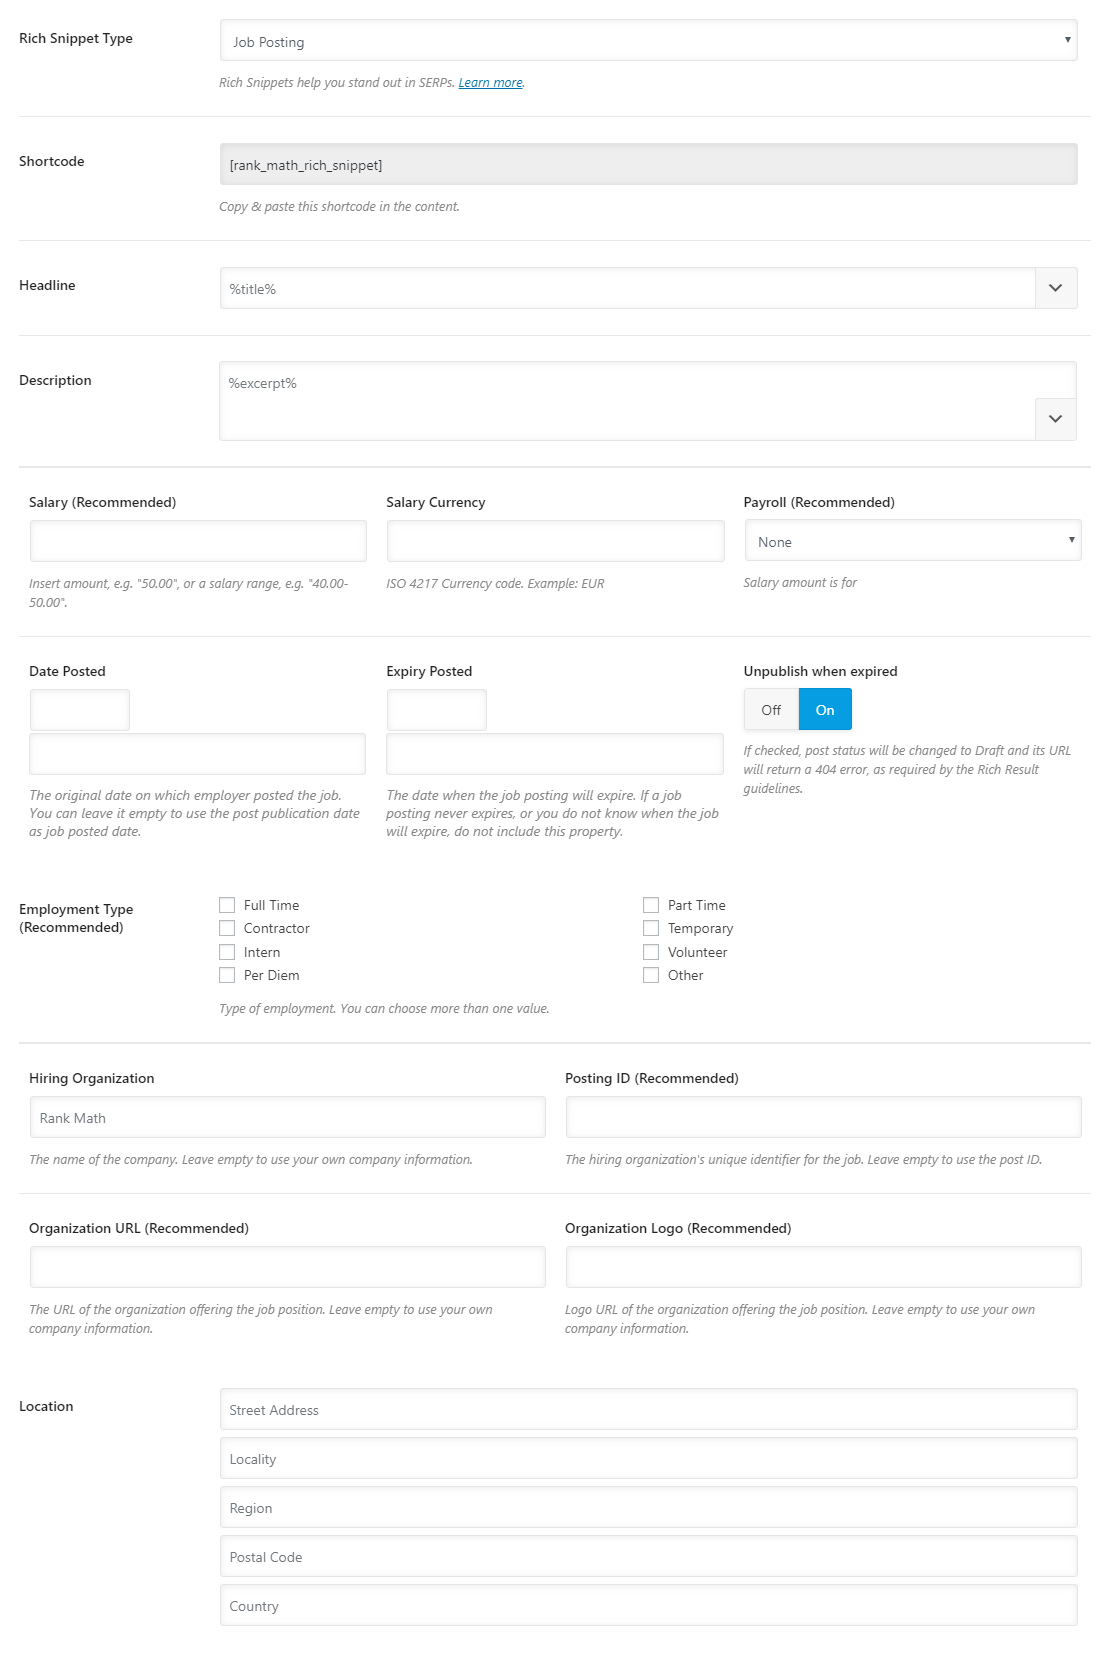
Shortcode
Rank Math does not include the information about the job inside the post in a way that your users can see it; It does it in a way that only the search engines have access to the information. But, for some reason, if you’d like to include the information about the job inside the post too, paste the shortcode in the post at the position you want the information to appear.
Headline
Here you set the meta-headline for the job that you mention in your post. You can either type in a static heading or create one using variables. There are quite a few variables available, and you can check them all out by clicking the drop-down button at the end of the text field. Here is how it works.

Description
Here you set a meta-description of the job you’re talking about. Similar to the Headline, you can either create a static description or use the variables to create a dynamic one. The same variables that are available to set the headline are also available for the description.
Apart from the headline, the description is the part where you add information to attract the right candidate. Make sure to add all the necessary information about the job to make the job appealing to potential candidates.
Salary
Insert the approximate salary range that is being offered for this job. Just enter the number here without any currency symbol. You can also enter a range, for example, “25000-33000” (without quotes) if the salary is not fixed.
Salary Currency
Here you enter the ISO code of the currency that the salary will be paid in. If you don’t know the ISO code of the currency, then Wikipedia has a complete list.
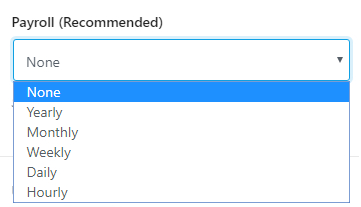
Payroll
Here you enter the time period for the salary will be paid for. Setting this up correctly is important. The last thing you want is to post a quarterly salary range while the candidates expect it as the monthly salary. Here are the time periods that you can specify.
Date Posted
This field should contain the date the job is posted. You don’t need to enter the date and time manually; you can use the date and time pickers to do it instead.
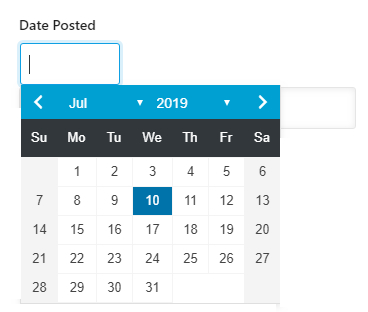
If you don’t know the date the job was posted, you can leave the field blank, and Rank Math will pick the post-publication date as the posting date.
Expiry Posted
Here you need to enter the date when the job listing will expire. Similar to the Date Posted field, you can use the date and time picker to enter the date and time instead of doing it manually.
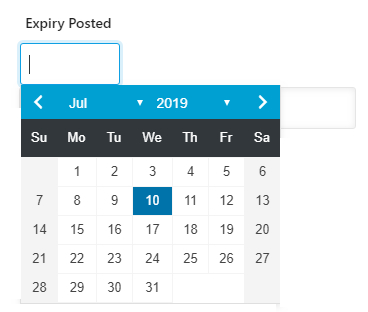
Unpublish when Expired
How would you feel if you found the perfect job opportunity only to discover that the job listing expired months ago?
To prevent this from happening, the Rich Result guidelines state that after a job listing expires, the post should be taken down. Rank Math has incorporated this feature and lets you control the behavior of your post when the job listing expires. When you enable this setting, then Rank Math will convert the post to “Draft” status and serve a 404 in its place. We recommend that you enable this setting.
Employment Type
What kind of employees is the employer looking for? Full-time, part-time, or freelance? The Employment Type field lets you define that easily.

Simply check the Employment types that are qualified for the job listing. You can and should select all the types that are qualified for the job.
Hiring Organization
Which organization has posted the job? Enter the name of that organization here. If you leave this blank, then Rank Math will use the information that you entered while setting up your website.
Posting ID
A unique ID for this specific job. This can be provided by the employer, or you can enter one yourself for record-keeping. If you leave the field empty, then the post ID will be used instead.
Organizaion URL
If the company posting the job offer has a website, list the URL in this field. If you leave this field blank, then your information will be used to populate this field.
Organization Logo
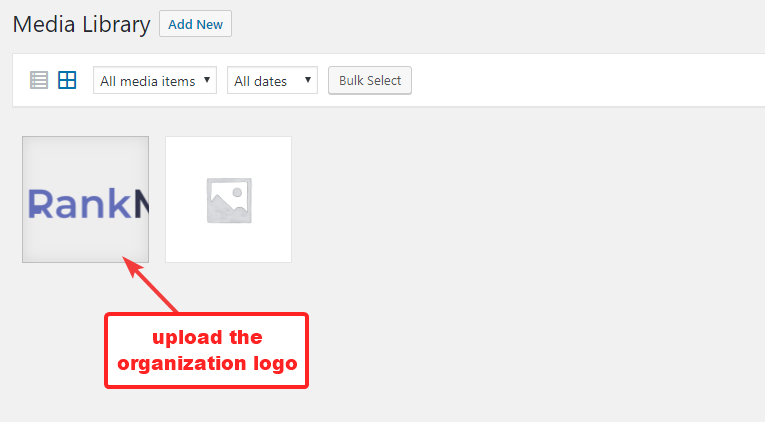
Enter the URL of the logo of the company posting the job. If you’re posting the job for another company, ask them to provide a URL, or you can upload their logo to your website and use it instead. Here is how to do it.
Open the Media Library from your admin account and upload the logo of the organization to your website.
Click the logo to open its details. You will find the URL with some additional information on the sidebar.
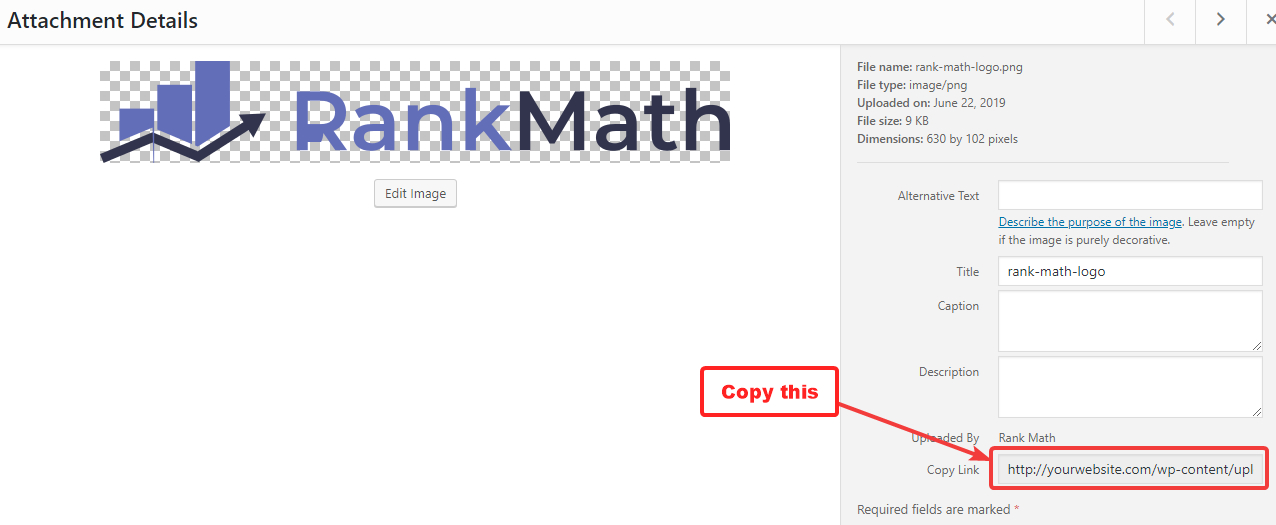
Then paste the URL in the field.
Location
Enter the location where the job of being offered. For remote jobs, you can leave this empty.
Music
If your post discusses music, then you should use the Music Rich Snippet. Here are all the options that should be available for the Music Rich Snippet Type.
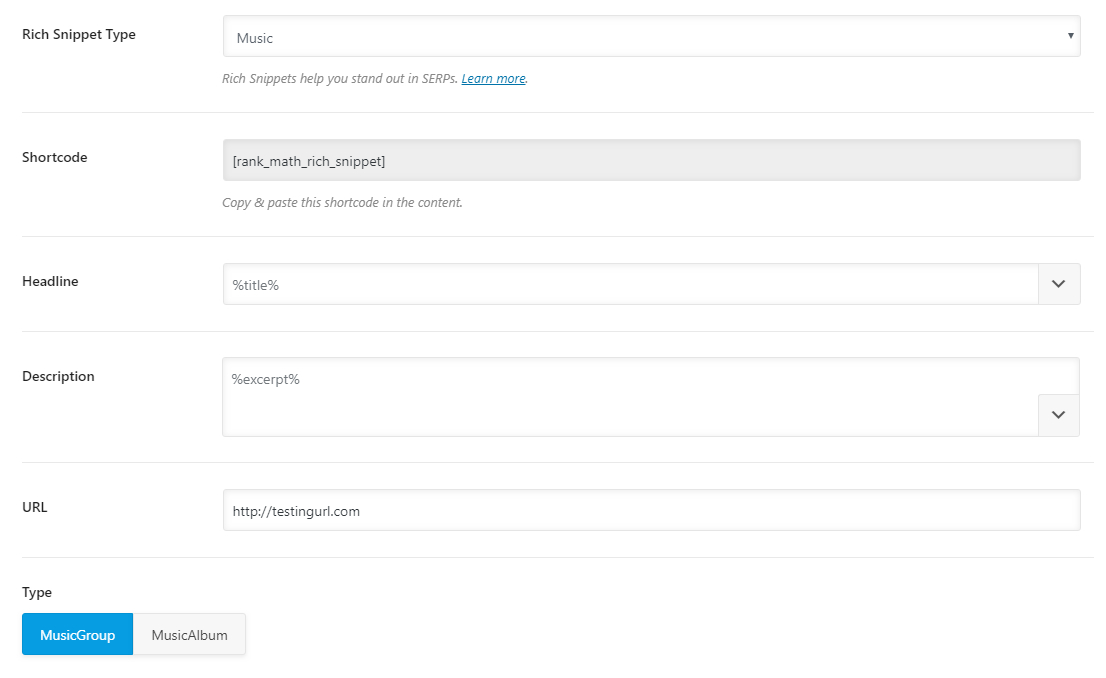
Let’s discuss the options needed to configure the Music Snippet.
Shortcode
Rank Math does not include the information about the music inside the post in a way that your users can see it; It does it in a way that only the search engines have access to the information. But, for some reason, if you’d like to include the information about the music inside the post too, paste the shortcode in the post at the position you want the information to appear.
Headline
Here you write the meta-headline that you want Search Engines to read. If you’re talking about a song, make sure to enter the name of the song. If it is an Album, do mention the name and the name of the artist too. If your post title already mentions these things, you can use the variables available to you to create a dynamic title. To see a list of all the available variables, click the drop-down icon present at the end of the text field. There are plenty of variables available, and you can also type in a few keywords to filter the variables.

Description
In the Description field, you can describe the music, the album, and even the artist. Write a description that would attract users and please the search engines. You can also use the variables we showed you above to create a dynamic description of the music.
URL
Enter the URL where the users can preview and purchase the music.
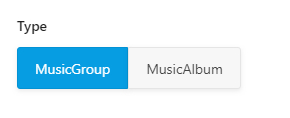
Type
Here you configure if you’re talking about music or the artists that created the music. Select the appropriate option for your post from the available options.
Product
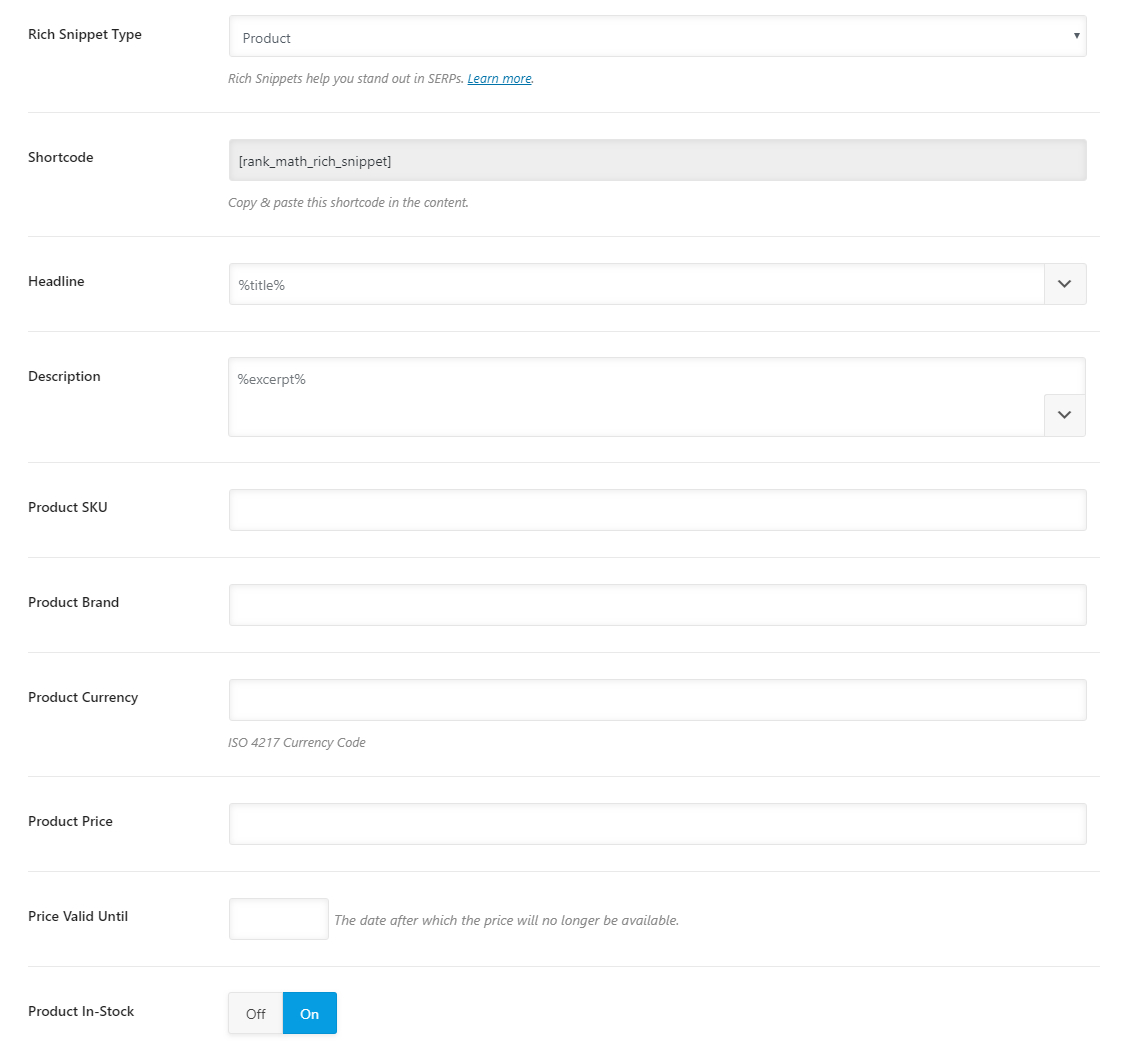
The Product Rich Snippet is the most useful when you’re talking about products. If you’re an ecommerce store, adding the Product Rich Snippet to your product pages is highly recommended. Here are all the options that you would see in the Product Rich Snippet.
Shortcode
Rich Snippets are supposed to be visible only to search engines. Therefore, all the information you add here will not be visible to any of your users. But, if there is a need to display that information to your users, you can copy and paste this shortcode inside your post. The location where you place the shortcode is the place the information will be made visible.
Headline
Here you will need to enter a meta-headline that helps identify the product. Include the product’s name, brand, and other information that might be useful to differentiate the product from other products.
You can either enter type in the headline manually or use variables to create a title dynamically. There are plenty of variables available to create a headline, and you can access them by clicking the drop-down at the end of the text area. You can also filter the variables by typing in a few words when the list of variables is present on the screen.

Description
Here you enter the product’s description. As with any product description, you would want to include the information that would be valuable to search engines and people alike. Similar to the Headline, you can either create a static description by typing it in or use variable to create a dynamic description. The same variables that we demonstrated above are also available for use in the description.
Product SKU
Enter the product’s unique Stock Keeping Unit here.
Product Brand
Which brand is the product from? Enter the name of that brand here.
Product Currency
Enter the ISO 4217 currency code of the currency the product is priced in. You can find the ISO code of your country’s currency from this Wikipedia Article.
Product Price
Enter the price of the product in this field without any currency symbols.
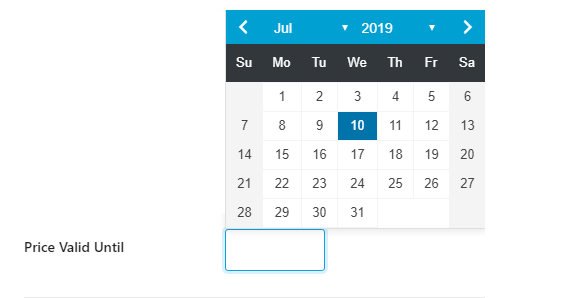
Price Valid Until
Enter a tentative date till which the pricing for the product will be valid. Use the date picker to pick the date instead of adding it manually.
Product In-Stock
If the product you’re talking about is in stock, enable this option, else disable it.
Recipe
This type is only useful if your page describes a recipe–how to prepare food or a beverage. Here are the options that should be visible in the Recipe Rich Snippet.
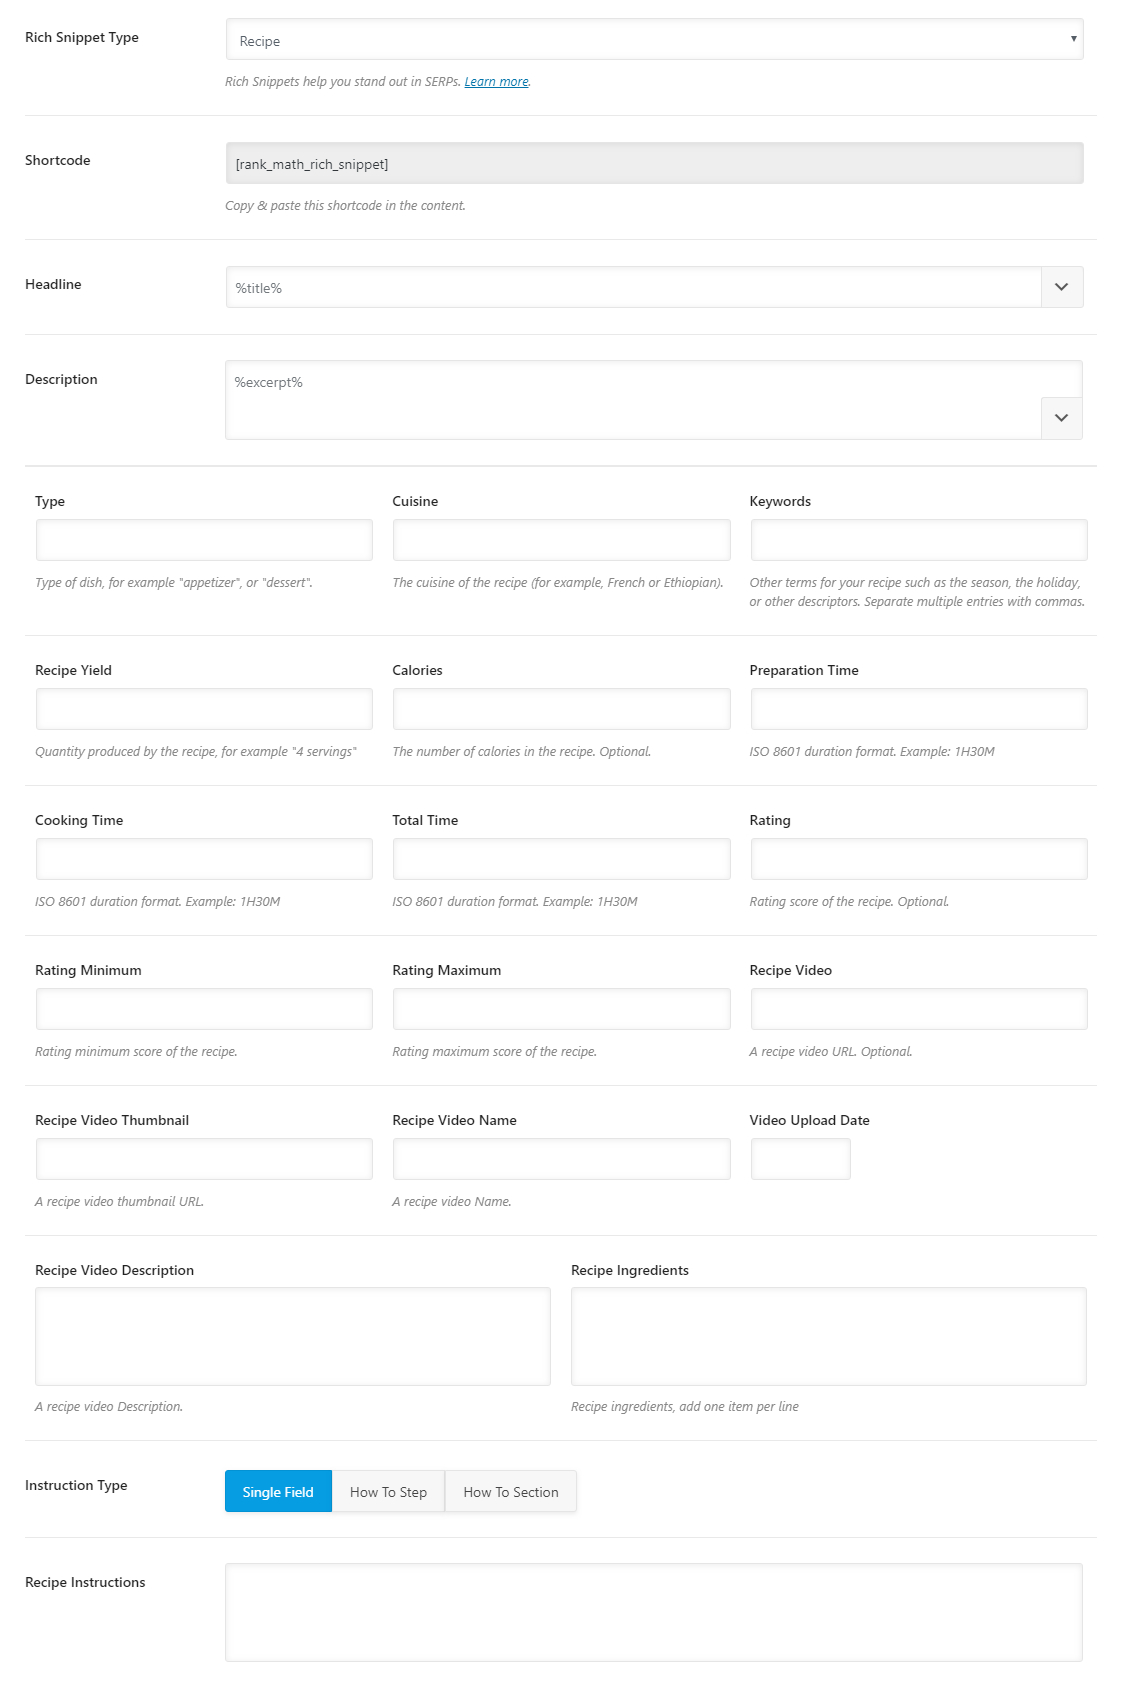
As you can see, it’s a pretty long form! Fortunately, it’s completely OK to copy-paste text from the post. Just remove any comments or details that aren’t relevant.
The text you enter in these fields should match the text on your page. For instance, don’t list ingredients that aren’t present in the text of your post or page.
Here’s a quick rundown of the fields, and what you should enter:
Shortcode
Rich Snippets are supposed to be visible only to search engines. Therefore, all the information you add here will not be visible to any of your users. But, if there is a need to display that information to your users, you can copy and paste this shortcode inside your post. The location where you place the shortcode is the place the information will be made visible.
Headline
The Headline should be the name of the dish. You can add some details about the recipe, but don’t make the title too long. If you don’t want to write the headline from scratch, then you can use variables to create a dynamic title. There are plenty of variables available, and you can check them out by clicking the drop-down button present at the end of the text area.

Description
Here you get to describe the recipe. If you’ve already done so in the post, you can use variables to fetch the related content in the description field. The same variables that we demonstrated for the Headline are also available to use in the Description field.
Type
What kind of dish is it? Is it a dessert, entree, or the main course? Enter that value here.
Cuisine
What cuisine does this dish fall in? Indian, Mexican, or French? Enter that value here.
Keywords
Here you need to enter some keywords related to your recipe. Some examples include “healthy”, “low calorie”, “fast cooking”, “easy”, etc. You can also add some seasonality related keywords here. Make sure to separate the keywords by commas.
Recipe Yield
How much food/beverage is prepared? 2 servings, 5 plates, 2 glasses?. Enter that value here.
Calories
How many calories are in the final dish/beverage? This should be the calories per serving.
Preparation Time
What is the preparation time needed to cook this dish? Enter the value here in ISO8601 format. For example, 1 hour 40 mins in ISO 8601 format is 1H40M.
Cooking Time
How much time does it take for the dish to cook? Enter the value here in ISO 8601 format. For example, 1 hour 40 mins in ISO 8601 format is 1H40M.
Total Time
How much time does it take to prepare the dish from start to finish? Enter the time in ISO 8601 format. For example, 1 hour 40 mins in ISO 8601 format is 1H40M.
Rating
Here you can optionally rate the recipe. Just enter the number here.
Rating Minimum
What is the lowest end of the scale when it comes to rating? On a 0 to 5 rating, you would enter 0 here.
Rating Maximum
What is the maximum rating that you are going to assign? On a 0 to 5 rating, you would enter 5 here.
Recipe Video
Here you should enter the URL of a video that shows the recipe being used in action. Although this field is optional, it is highly recommended that you add a video link.
Recipe Video Thumbnail
Enter the URL of the thumbnail that you’d like to use for the video here. Make sure to enter the URL to the actual image here.
Recipe Video Name
What should the name of the recipe video be? Enter that name here.
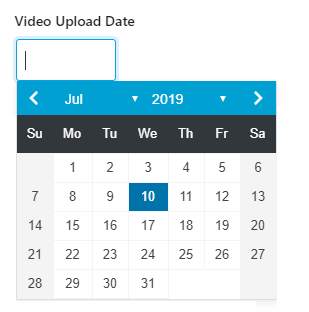
Video Upload Date
When was the video uploaded? Use the date picker to enter the date of upload here.
Recipe Video Description
Enter a description of the recipe video here.
Recipe Ingredients
What ingredients do you use while making the dish? Enter the ingredients here one per line.

Instruction Type
The instruction type is perhaps the most complex part of the recipe snippet to understand and execute. As recipes are made up of a large number of small steps, to understand the structure of the recipe, the data has to be presented step-wise to the search engines.
We understand that dividing the recipe steps step-by-step can be time-consuming, but it can be very useful for your page to appear in rich results. If you post a lot of recipes often, you can take the simple route, and post the entire recipe as a single step, and later divide them into multiple steps.

Let us understand all the options.
Single Field
The Single Field option is the simplest option. There are no fancy steps to configure, just add all the instructions to a text box. You can even copy-paste the data from the post itself.

How To Step
The How-To Step is a bit more defined, but essentially the same as the Single Field option. The only difference is that you also have to enter the Recipe Instruction Name here. Here is how the options appear.

How To Section
This is the holy grail of the recipe rich snippet section, and perhaps the most time-consuming to set up. But, you’ll also get rewarded for that effort. Let us take a look at the options that are available when you chose the How To Section.

The text box disappears, and it is replaced by the Recipe Instruction field. What you have to do here is to add multiple instructions, and populate the instructions with the actual recipe’s instructions. Let us explore “Instruction 1” by clicking it.

As you see, each instruction is divided into the Instruction Name and the accompanying text for the Instruction. If we take an example, then the step name could be “Sauteing”, and the text could be about which vegetables you would add to the pan, and in what order.
Once you’ve added the necessary text to the Instruction, you can create a new Instruction by clicking the “Add New Instruction” button.
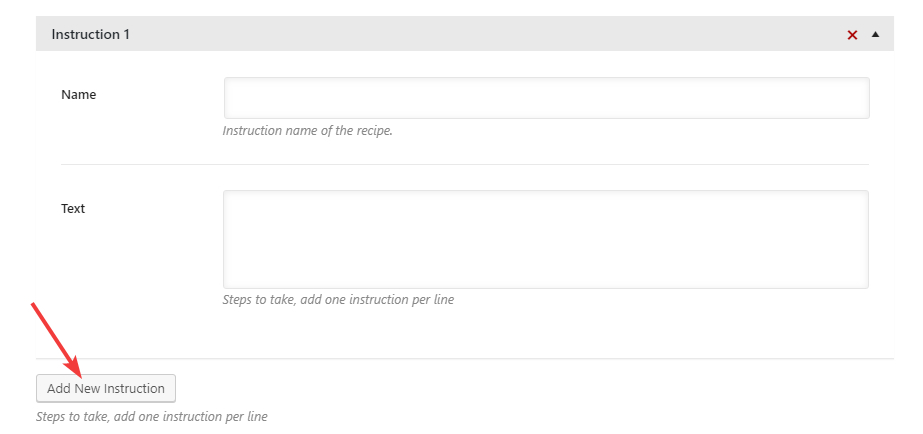
You’ll see that another Instruction is added. Now you just have to repeat the steps you took to fill in Instruction 1 and continue adding Instructions as needed by the recipe.
Here is how the image should look after you’ve added a few steps for the recipe.

Restaurant
The restaurant rich snippet should be used when your post talks about a food joint, a cafe, or a restaurant. Here are all the options that you would see when you select the Restaurant Rich Snippet.
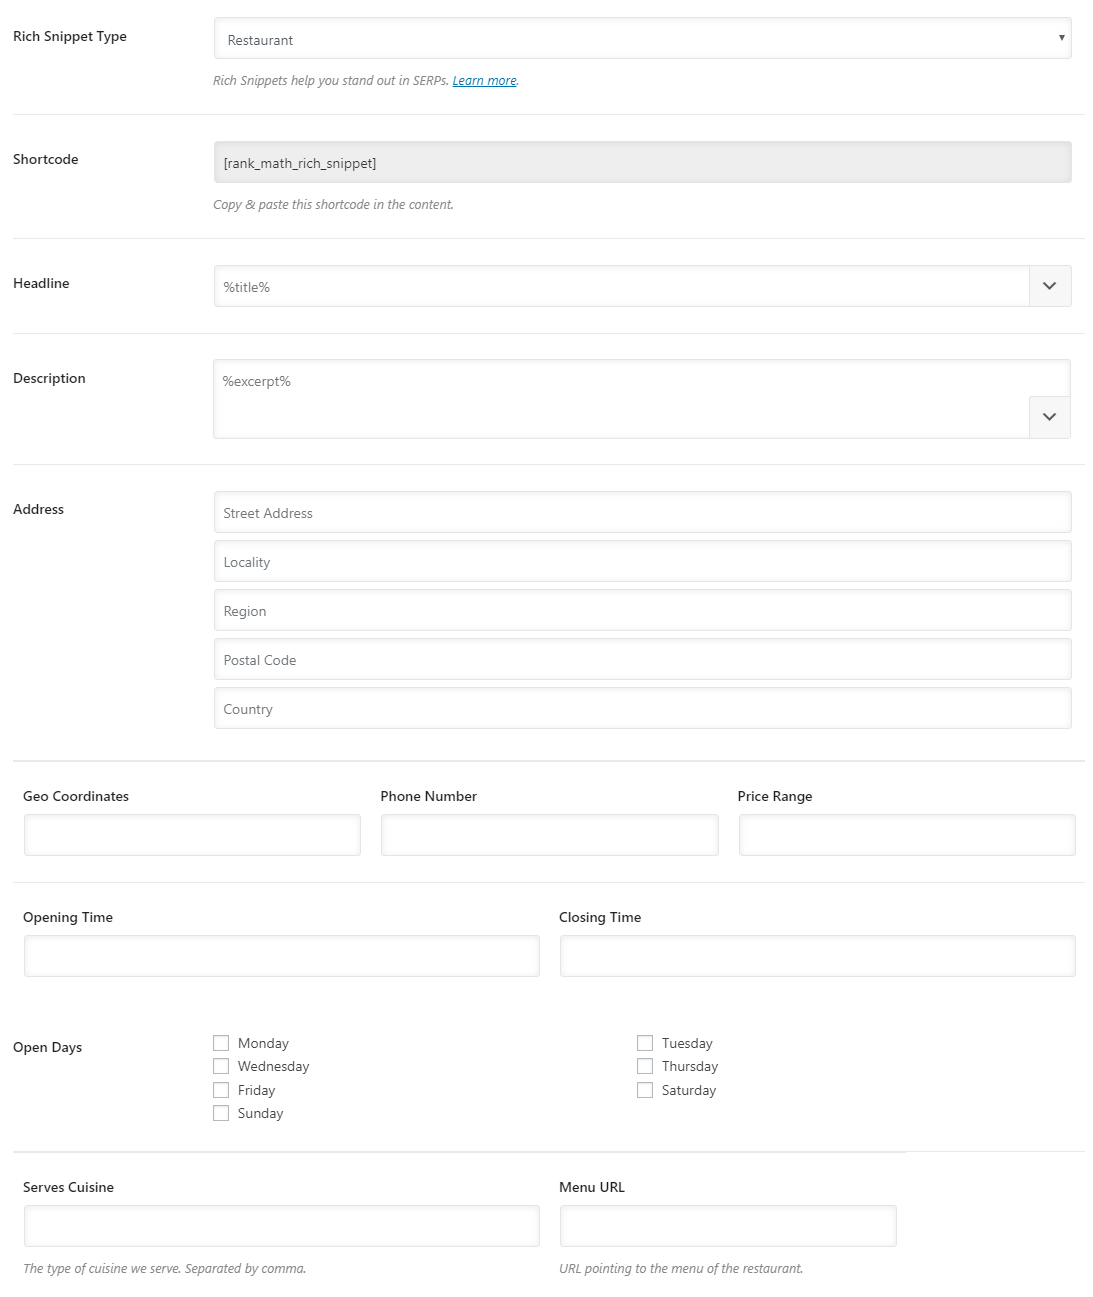
Shortcode
When you add information about a restaurant using the Restaurant Rich Snippet, that information is added to the code of your website and is not visible to the visitor. However, there can be many scenarios where you’d want to display the information about the restaurant to the end-user as well.
In that case, you don’t have to copy and paste the information from the Rich Snippet data to your post; simply add this shortcode at the position where you want the information about the restaurant to appear, and Rank Math will take care of the rest.
Headline
The Headline is the field where you will add the meta-name for the restaurant. Meta-name being the name that the search engines will crawl and index.
The Headline should obviously contain the Restaurant’s name, and optionally some additional data about the restaurant. There are 3 ways you can enter this information.
Static Description
You can enter a completely static headline by typing the entire thing yourself. This option works best when you don’t have the restaurant’s name or other information in the post’s title or the post’s body (we will explain why that matters in the next point).
Create a Dynamic Headline using Variables
If typing a static description is too much work for you, then you can use variables to create a headline dynamically. The variables point to the various meta information on your website, such as the post’s title, description, and other information. By placing the right variables in the Headline field, you’ll be able to create powerful headlines easily. The only requirement for this option is that key information you want to refer to should be present in key areas of your post (title, description, etc.).
There are plenty of variables available to create a dynamic title, and you can see all variables by clicking the drop-down button at the end of the text field. You can then scroll to see all the variables, and even type in a few words to filter the list of keywords.

A combination of Static and Dynamic
You can also combine static and dynamic options and use both of them to create the headline of your choice.
Description
The description field is where you describe the restaurant. You can describe the location, the ambiance, the staff, the food, the service, and the overall experience here.
Similar to the Headline, you can either type in a static description, create a dynamic description or a combination of both. The same variables that we demonstrated in the Headline section are also available to be used in the Description field.
Address
Here you need to enter the business address of the restaurant. This can be used by Google to show a map in the search results.
Geo Coordinates
Here you should enter the precise location of the business in geo coordinates. You can find the geo-coordinates by searching for your business in Google Maps or any other maps application.
Phone Number
Enter the phone number where the customers can reach the restaurant for inquiries and reservations.
Price Range
Enter the price range of the restaurant. No need for numbers here; just enter currency symbols. For example, $ means cheap while $ means expensive.
Opening Time
Here you enter the time that the Restaurant opens for business. You don’t have to enter the time manually, and you can use the integrated time picker instead.
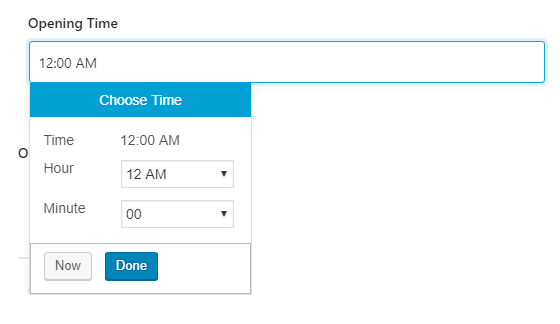
The time picker also has a “Now” button, and clicking it will populate the Time field with the current time.
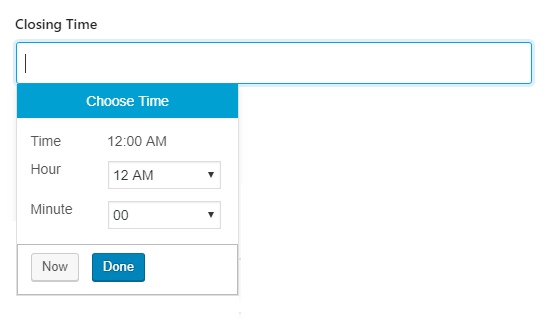
Closing Time
Here you specify the closing time for the restaurant. You don’t have to enter the time manually, and you can use the integrated time picker instead.
Open Days
Here you can select all the days the Restaurant is open. Select the checkboxes for the corresponding days, and Rank Math will include that information in your post automatically.
Serves Cuisine
Here you need to enter a comma-separated list of all the cuisines that the restaurant serves.
Menu URL
Here you enter the URL where the restaurant’s menu is present.
Video
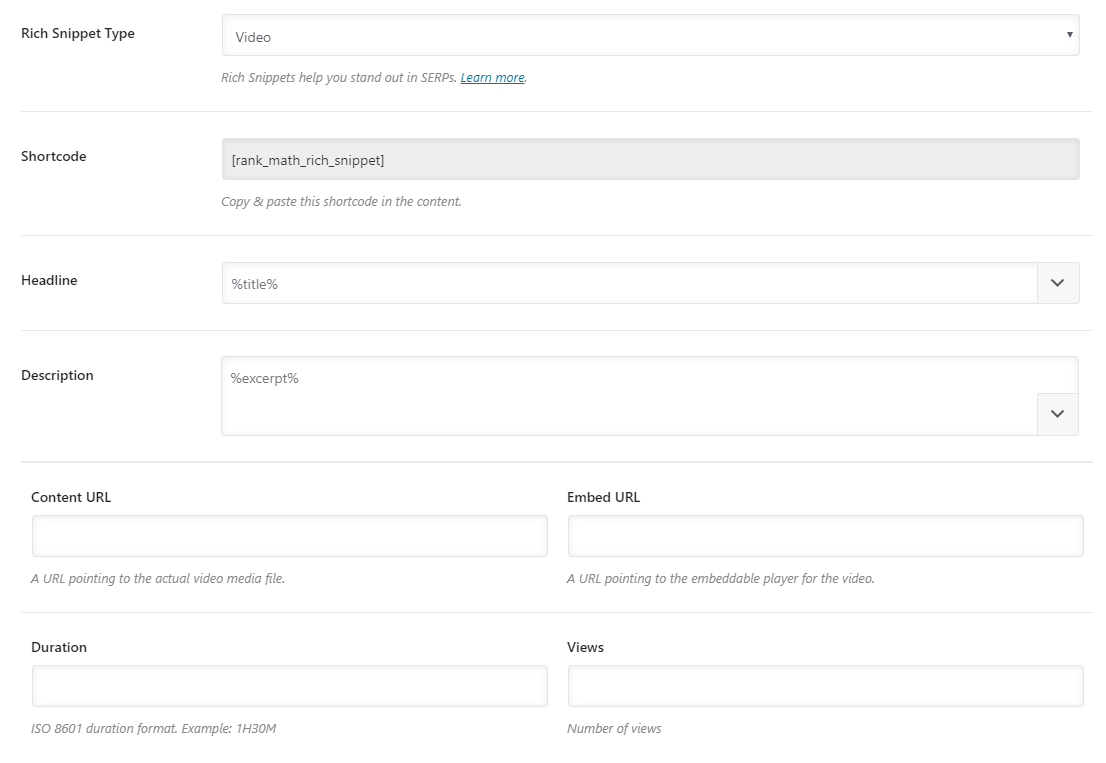
When you’re talking about a video in your post, then you should use the Video Rich Snippet. Here are the options that you would see when you select the Video Snippet.
Shortcode
When you configure any Rich Snippet, Rank Math inserts the meta-data inside your post so that the search engines are able to access it. Your users, however, don’t see the data at all. If there is a scenario in which you need to display the data to the users, you can copy and paste this shortcode in your post. The position you post the shortcode is the position where the data will be inserted, so place the shortcode accordingly.
Headline
The Headline is where you configure the title of the video. You can either create a static title by typing it in, create a dynamic title by using variables, or a combination of both. Using the variables makes the most sense when you’ve already entered the relevant information about the video in the post title.
To see the list of all the variables, click the drop-down button present at the end of the text area. There are plenty of variables available, and you’ll need to scroll a bit to see all the variables. You can also type in a few words to filter the variables.
Description
The Description field is where you enter the description of the video. Just like the Headline, you can create a dynamic description or a static one. All the variables available for the headline are also available for use in the description field, as well.
Content URL
Here you enter the URL of the video file.
Embed URL
Here you enter the URL to be used when the video needs to be embedded.
Duration
How long is the video? Type in the length of the video here.
Views
How many views does the video have? Type in the number here.
Person
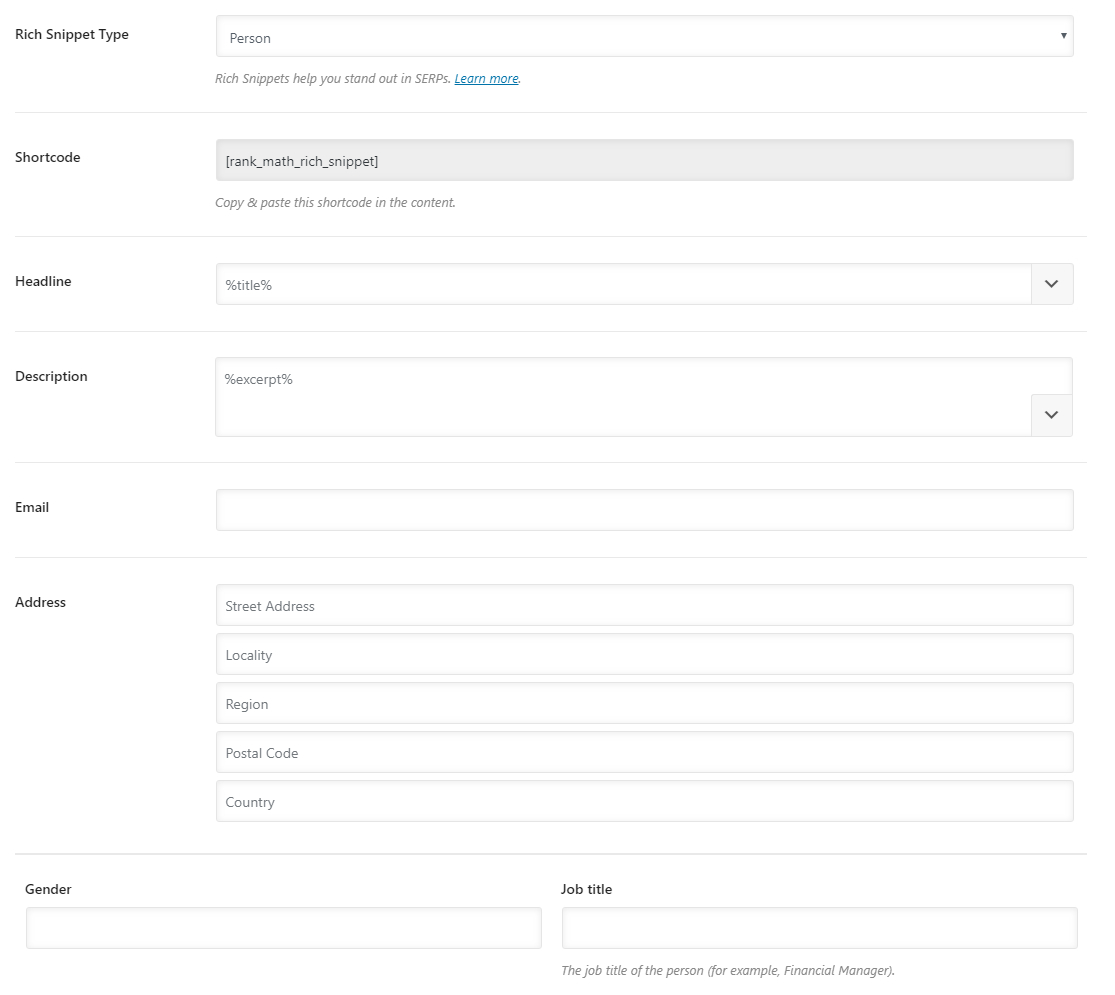
The Person Rich Snippet is to be used when you’re discussing a specific person. The person can be alive, dead, undead, or even fictional. Here are all the options that should be visible to you when you select the Person Rich Snippet.
Shortcode
Rank Math adds the rich data you configure to your page’s metadata, but it is not viewable by humans. However, if you want to include the data on the post for your viewers to read, then you can paste the shortcode on the page. Make sure to paste the shortcode in the location where you want the information to show up. Note that using this shortcode is optional and does not affect the metadata that will be added to the post.
Headline
Here you set the meta-headline for the person that you intend to mention in your post. In this case, it would most likely include the person’s name and some other data. If your page’s heading already has all the information that you’d like to add to your meta headline, then you can simply use the variables to have the exact meta-title. If it does not, you can still use the allowed variables and configure some static text along with it. You can either type in a static heading or create one using variables.
There are quite a few variables available, and you can check them all out by clicking the drop-down button at the end of the text field. Here is how it works.

Description
Here you set a meta-description for the person you’re talking about. Similar to the Headline, you can either create a static description or use the variables to create a dynamic one. The same variables that are available to set the headline are also available for the description.
In this field, you can enter the email address of the person.
Address
In the Address fields, you can enter the full address of the person.
Gender
Here you can enter the person’s gender. You can write Male, Female, or even enter a string for non-binary genders.
Job Title
Here you can enter the job title of the person. A few examples would be the Director of Operations, Customer Service Executive, etc.
Review
The Review Rich Snippet Type is the ideal Rich Snippet to use when you’re reviewing anything. Here are the options that should be visible in the Review Rich Snippet. To create excellent reviews on your website, don’t forget to check out WP Review by MyThemeShop.
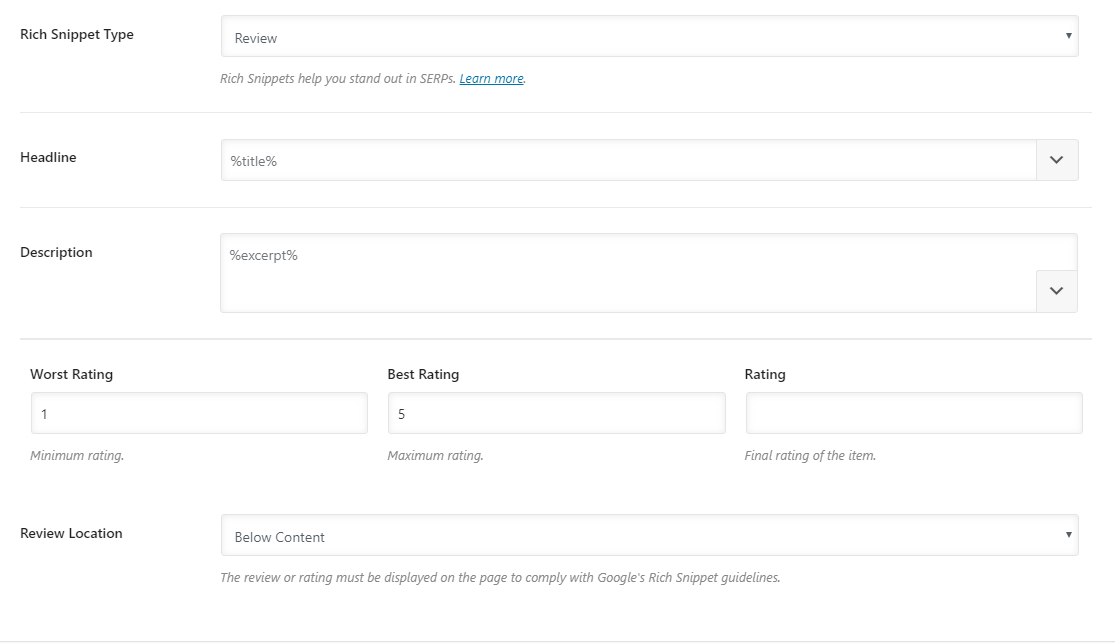
Headline
The Headline should consist of the meta-title of the review. Here you should include the name of the product and some related keywords (like a review, pros, and cons, etc.). You can create a static Headline by typing it in, or use variables to create part of the Headline (or all of it) dynamically.
To see all the variables available to you, click the drop-down icon next to the text area. There are plenty of variables to choose from, so spend some time understanding them. To find variables faster, you can also type in a few keywords, and the list of variables will be filtered for easy viewing.
Description
Here you need to enter a basic description for the review. Think of it as a short-review, where you include just the basic information about your actual review. Similar to the Headline, you can create a Description by typing it in or using variables. The same variables that we demonstrated in the Headline section are also available to be used in the Description section.
Worst Rating
Here you define the rating scale you used to rate the product. Enter the worse rating on your rating scale here.
Best Rating
Here you define the rating scale you used to rate the product. Enter the best rating on your rating scale here.
Rating
Here you need to enter the actual rating that you’ve given the product in your review. Make sure that the rating falls between the Worst Rating and the Best Rating. Also, if you leave the Best Rating and the Worst Rating fields empty, Rank Math will assume the rating scale of 1-5, as it is the most common.
Review Location
Google’s Rich Snippet Guidelines state that if the review meta-data is added to a page, then the ratings should also be visible on the page as well. Rank Math is fully compliant with this rule and lets you pick from 4 options to insert the rating on the page.

The first 3 options are self-explanatory, but let us explain the 4th one. When you select the 4th option, another field will open up below it.

The field contains a shortcode, and you have to place the shortcode inside the post at the position where you want your ratings to appear.
Service
The Service Rich Snippet should be used when you’re talking about a specific service. For example, if you have a local business website where you discuss specific services, you should use this Rich Snippet Type. Here are all the options that you should see in the Service Rich Snippet.
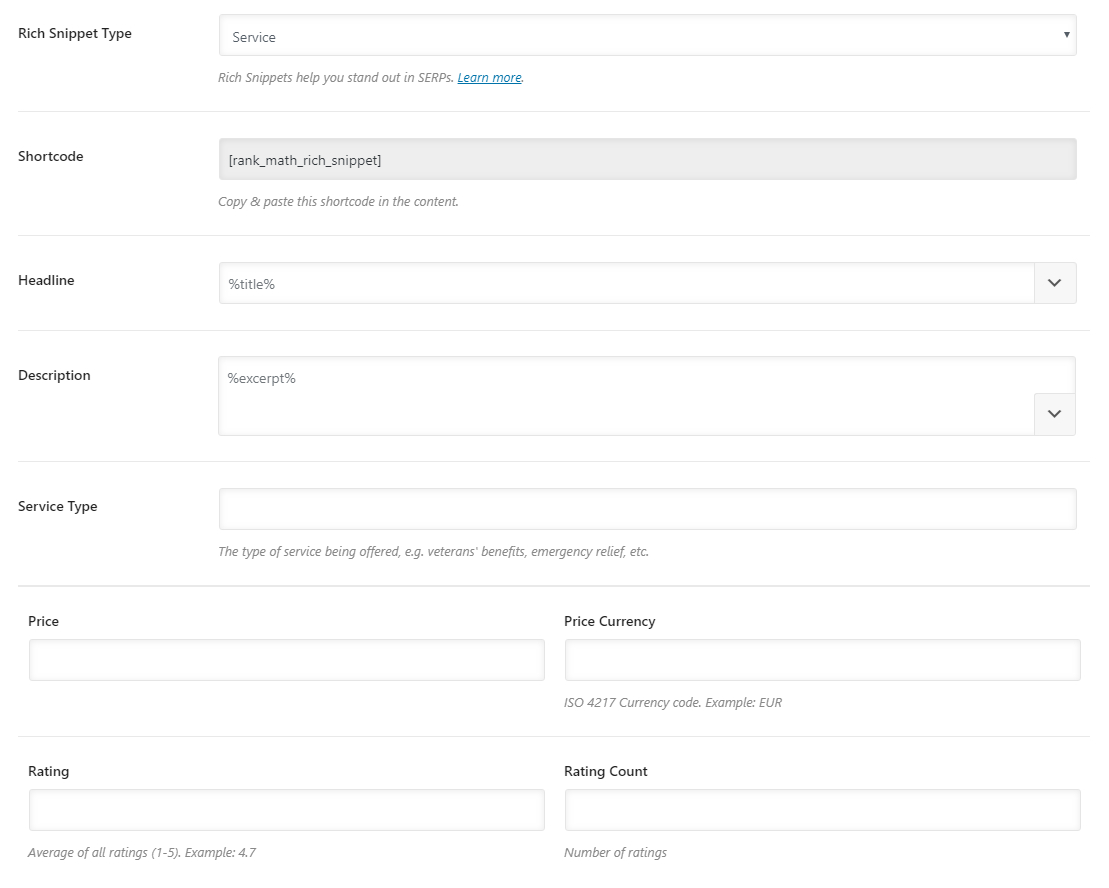
Here is what each of the options accomplishes.
Shortcode
Rank Math adds the rich data you configure to your page’s metadata, but it is not viewable by humans. However, if you want to include the data on the post for your viewers to read, then you can paste the shortcode on the page. Make sure to paste the shortcode in the location where you want the information to show up. Note that using this shortcode is optional and does not affect the metadata that will be added to the post.
Headline
The Headline should consist of the meta-title of the service. Here you should include the service name and some related keywords. You can create a static Headline by typing it in, or use variables to create part of the Headline (or all of it) dynamically.
To see all the variables available to you, click the drop-down icon next to the text area. There are plenty of variables to choose from, so spend some time understanding them. To find variables faster, you can also type in a few keywords, and the list of variables will be filtered for easy viewing.
Description
Here you need to enter a basic description of the service. Make sure to describe the service a bit and include reasons why potential customers should care. Similar to the Headline, you can create a Description by typing it in or using variables. The same variables that we demonstrated in the Headline section are also available to be used in the Description section.
Service Type
What type of service is being offered? Enter it here. A few examples would be landscaping, car washing, etc.
Price
What is the price of the said service? Enter the price here without any currency symbols.
Price Currency
Here you need to enter the currency you used to price your service. Enter the ISO 4217 compliant Currency Code here.
Rating
Here you need to enter the average rating for the service that you’re talking about. The rating scale used is 1-5, so enter a number accordingly. You can also enter a decimal rating like 4.3. Please note that this rating should be collected from actual users and not an arbitrary rating that you assign. Doing that is against Google’s terms of service.
Rating Count
Here you need to enter the number of ratings the service has received. Again, this number should be taken from actual ratings, and not an arbitrary number. Google has and will penalize sites for missing rich snippets in this manner, so it would be wise to stay away from any manipulative tactics.
Software Application
The Software Application Rich Snippet is used when you’re talking about Software applications. If you sell or talk about software products on your website, then you should use this Rich Snippet Type. Here are all the options that should be visible to you.
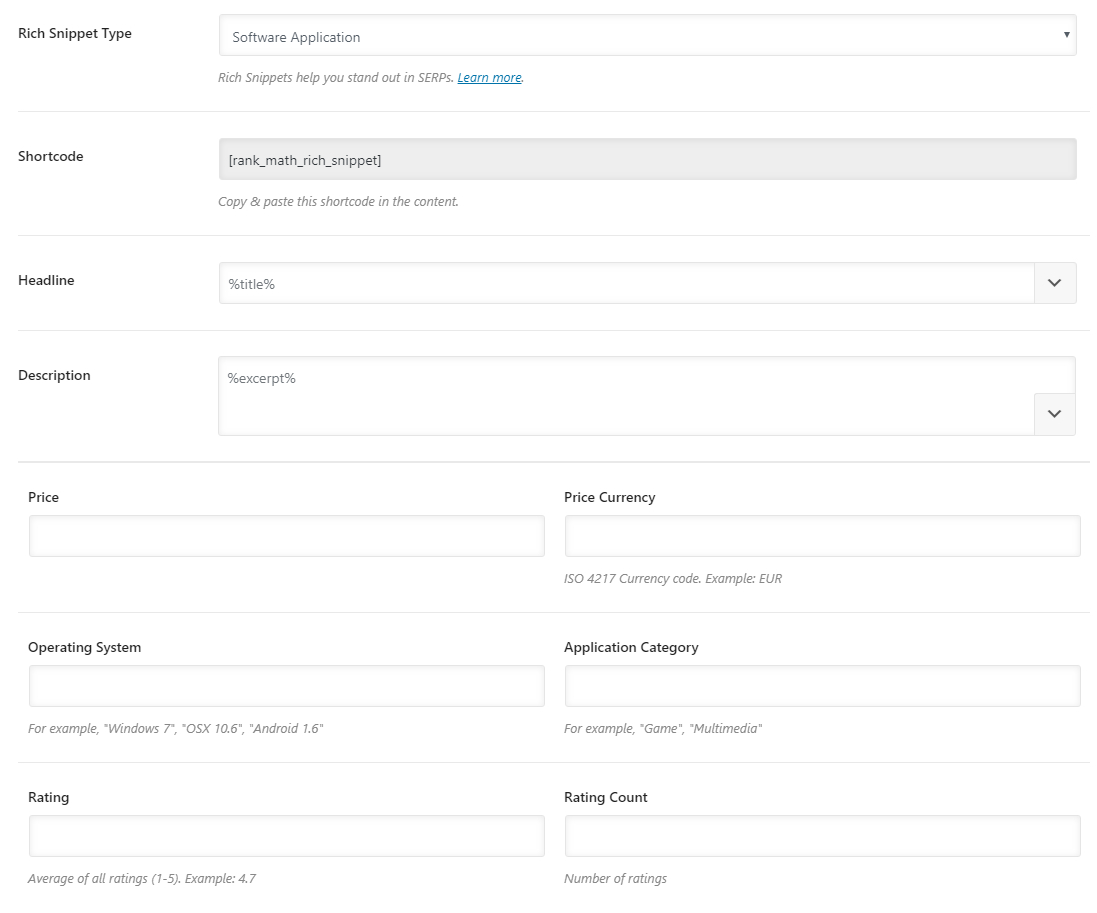
Shortcode
When you configure Rich Snippets, Rank Math adds the necessary meta-data to the post, but the data is not visible to the visitors who visit your page. If there is a need to display the information on the page as well, then instead of typing out the information on the page, you can simply copy and paste this shortcode on the page.
The position that you insert the shortcode will be the position that the information is displayed, so paste the shortcode accordingly.
Headline
Here you need to enter the Headline (or the title) for the software application. In most cases, you’d enter the name of the software here. You have the option to type the headline yourself, or use variables to create a headline dynamically. There are plenty of variables you can use, and to access the entire list, you can click the drop-down button present at the end of the text area. You’ll see that a lot of variables are available to use, and you can filter them by typing out a few words in the search bar present above the variable list.

Description
Here you need to describe the software product. Similar to the Headline, you can either type the description yourself or use variables to create one dynamically. The same variables we demonstrated in the Headline section are also available for use in the Description section.
Price
Here you need to enter the price of the software application without any currency symbols.
Price Currency
Here you need to enter the ISO 4217 compliant currency code that you priced your software in. Here is a reference list from Wikipedia to help you find yours.
Operating System
Enter all the Operating Systems the software application supports. Make sure to enter the names of the operating systems in quotes and separate them with commas. For example, here is how you would enter the names in the field:
“Windows 7”, “Windows 8”, “Windows 10”
Application Category
What application does the software fall in? It is a game app, a multimedia app, or a utility? Make sure to enter all the categories in quotes and separate them with commas.
Rating
Here you need to enter the average rating that the software has received from its users. The rating scale you should use is 1-5, and you can also enter decimal ratings like 4.3.
Rating Count
Here you need to enter the total number of ratings that the product has received.
Conclusion
As you saw, you can configure Rich Snippets inside Rank Math with a lot of precision. Although it might seem like a lot of work to configure these snippets, you have to remember that you only need to configure most of these once as they will become your default values. For every post that needs customized snippets, you only need to change the values that need customization.
Even then, configuring Rich Snippets can seem like a lot of effort. But, the SEO benefits far outweigh the effort. Also, if it is a lot of effort for you, it is a lot of work for your competition as well, which means they could be ignoring it. Would you let an opportunity to trump your competition pass away?
