
When redesigning my website I wanted to add this curtain reveal effect to the footer of the site. It’s a fun effect & relatively easy to do. Scroll to the bottom of this page to take a look.
The effect is done completely in CSS. Put simply, you set the footer container to be fixed to the bottom of the page with a z-index of -1. Then you need to set the height of the footer container and set a bottom margin to the main content area that matches that height. This should work on most Divi sites, depending on how your footer is configured.
Got it? OK! On to the code. You can add this code to your CSS file of choice or add it to Divi’s Custom CSS section (which can be found in Divi Theme Options > General tab > Custom CSS.
I’ve commented the parts of the code that may need to be edited, depending on the amount and style of the content in your footer.
/*Divi fixed position footer*/

#main-content {
margin-bottom: 410px; /*This may to be adjusted depending on the content of your footer*/
z-index: 2;
}

#main-footer {
width: 100%;
position: fixed;
left: 0;
bottom: 0;
z-index: -1;
}
/*Edit this section for tablet-sized screens*/
@media only screen and ( max-width: 980px ) {
#main-content {
margin-bottom: 700px; /*This may to be adjusted depending on the content of your footer*/
}
#main-footer {
height: 700px; /*This may to be adjusted depending on the content of your footer*/
}
#footer-widgets {
bottom: 83px;
}
}
/*Edit this section for phone-sized screens*/
@media only screen and ( max-width: 767px ) {
#main-content {
margin-bottom: 700px; /*This may to be adjusted depending on the content of your footer*/
}
#main-footer {
height: 700px; /*This may to be adjusted depending on the content of your footer*/
}
#footer-widgets {
bottom: 83px;
padding: 5% 0;
}
#footer-widgets .footer-widget:nth-child(n), #footer-widgets .footer-widget .fwidget {
margin-bottom: 4.5% !important;
}
}
footer-reveal.js
http://iainandrew.github.io/footer-reveal/
What is it?
footer-reveal.js is a jQuery plugin which allows you to apply that great ‚fixed/reveal‘ effect to your footer quickly and easily.
Want to see it in action? Scroll down!
Usage
Download and add footer-reveal.js after jQuery, before your closing <body> tag.
<script src="jquery.min.js"></script><script src="footer-reveal.js"></script>
Then, in your JS file, call the footerReveal() function on your footer element. Like this:
$('footer').footerReveal();
Add Fixed Footer Through CSS
The first and easiest way to create a fixed footer is by adding some CSS lines. With the Divi Builder and WordPress, we can add these lines in different places. Let’s have a look at them.
Add CSS Code Through Custom CSS For One Page
The first way to add the CSS code is by adding it to one page in particular. Although it’s better to make a fixed footer the same for each page on your website (to have that consistency on your website), you can choose to let it apply to one page in particular as well.
Open the page you want to add the CSS code lines to and click on the following button of the Divi Builder.
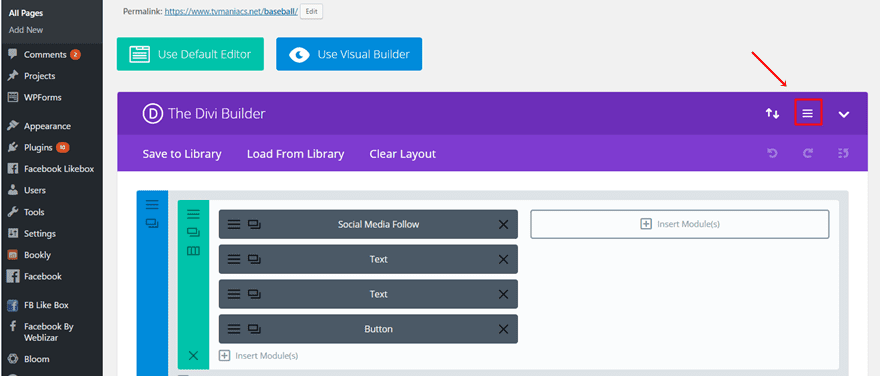
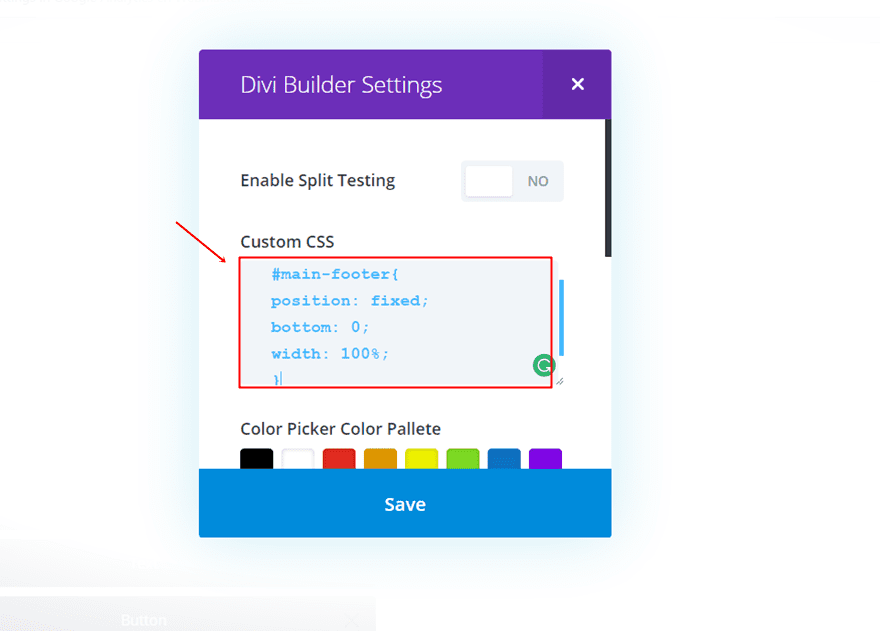
Scroll down and add the following code to the Custom CSS field:
#main-footer{ |
position: fixed; |
bottom: 0; |
width: 100%; |
} |
Add CSS Code Through Theme Customizer
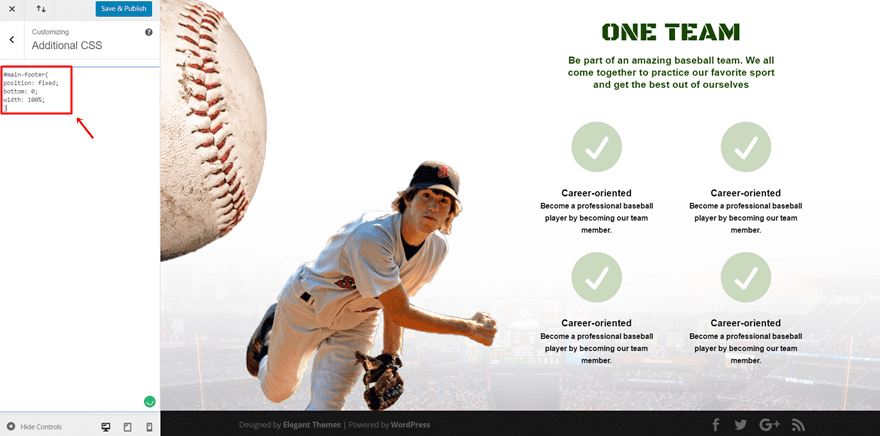
Another way to add the code is through the Theme Customizer. By using the Theme Customizer, you’ll watch the results happen in real-time on your website. The code that you add through the Theme Customizer applies to all the pages on your website.
Go to Theme Optimizer on your website > Additional CSS > Paste the following CSS lines of code:
#main-footer{ |
position: fixed; |
bottom: 0; |
width: 100%; |
} |
Add CSS Code Through Theme Options
The last way to add the CSS code to your website is through the Theme Options. When you add your code in the Custom CSS field of the Theme Options, the code will apply to the whole website as well. This is the most frequently used way to add custom CSS code to your whole Divi website.
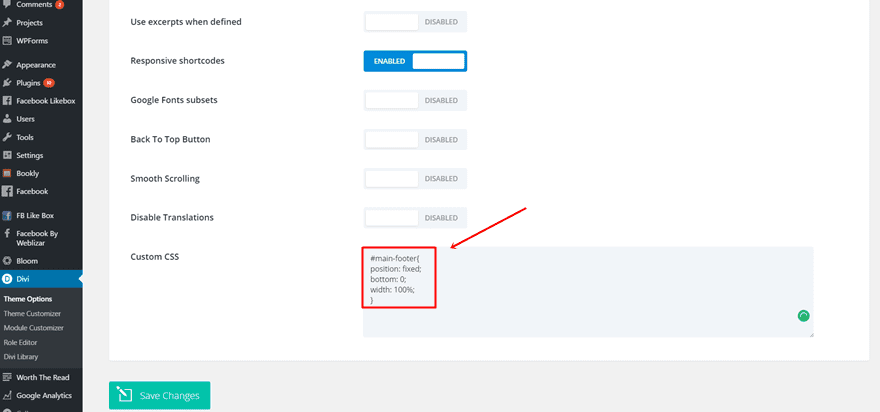
Go to Divi > Theme Options > General > Scroll down and add the following code to the Custom CSS field:
#main-footer{ |
position: fixed; |
bottom: 0; |
width: 100%; |
} |
Add Fixed Footer Through jQuery
Another possibility we have is making the CSS changes through some jQuery code lines. When you’re using a fixed footer, you usually want to make sure it applies to all the pages on your website. That kind of consistency makes it easier for your visitors to navigate through your website without getting confused.
Add jQuery Code Through Code Module For One Page in Particular
Open the page where you want the fixed footer to apply and add a new standard section to the top of your page. Next, choose a fullwidth row and add a Code Module to it. Open the Code Module and past the following jQuery code in the Content Box:
<script text="text/javascript"> |
jQuery(function($) { |
$("#main-footer").css("position","fixed").css("bottom",0).css("width",'100%'); |
}); |
</script> |
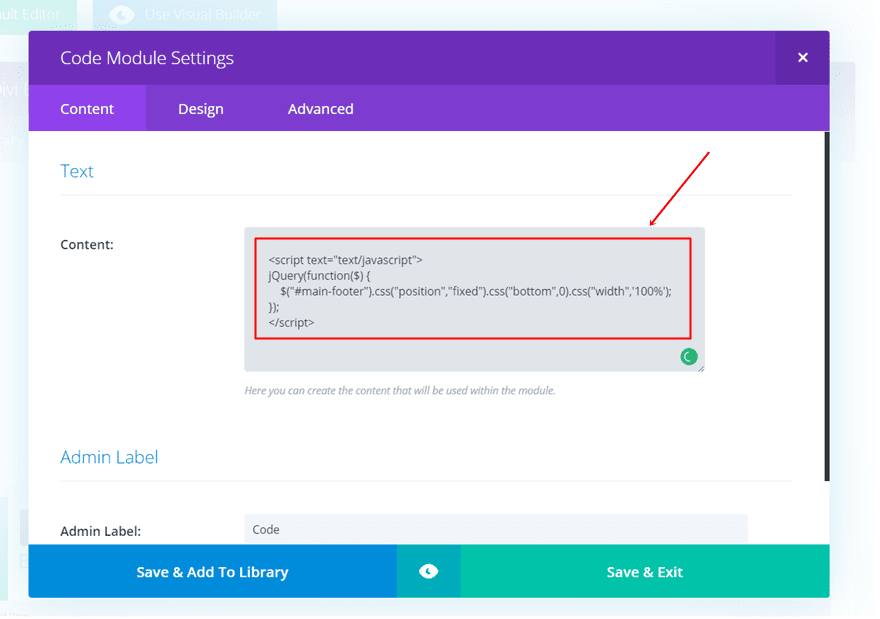
By adding jQuery code through the Code Module on one particular page, the code will only apply to that page. The rest of your website will have a normal footer whereas the one where you used the Code Module will have a fixed footer.
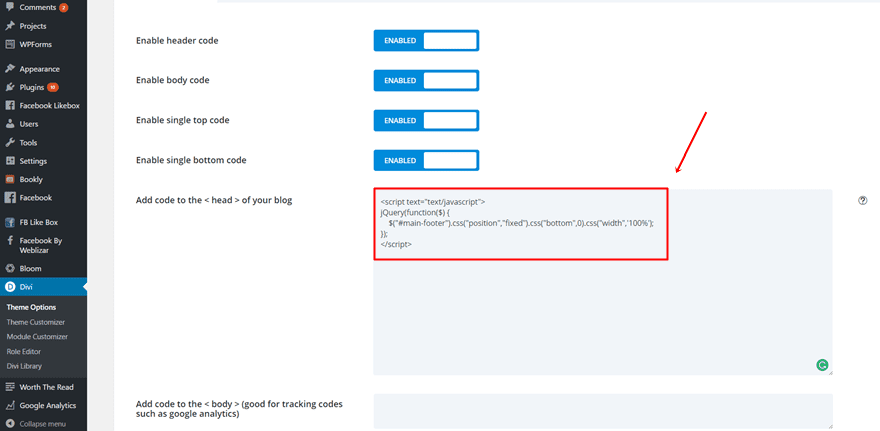
Add jQuery Code Through The Theme Options
The last option to add jQuery code that makes your footer fixed is through the Theme Options. The lines of code will immediately apply to your whole website and will offer that consistency your website needs.
Go to Divi > Theme Options > Integration > And paste the following lines of codes in the <head> of your website:
<script text="text/javascript"> |
jQuery(function($) { |
$("#main-footer").css("position","fixed").css("bottom",0).css("width",'100%'); |
}); |
</script> |
Final Thoughts
We showed you how to make a sticky footer in one of the previous posts. This post particularly handled how to make a fixed footer for your website. The fixed footer will always remain at the bottom of the visitor’s screen while visiting your website. If you have any questions or suggestions, make sure you leave a comment down in the comment section below so we can get in touch!