You’ve may have already heard that self-hosting videos is a bad idea and you should never do it:
- Need a CDN (>>> BunnyCDN)
- Storage space for videos, either in server or CDN storage (push zone)
- Same video file delivered for mobile and desktop, fast and slow networks (>>> Gumlet.com)
But I would say, if you „properly“ do it, there is nothing wrong it.
- Autoplay
- No single line of JavaScript or CSS needed
- Full control over video, fully customizable
- Ideal for background videos
- No branding
Step 1: Compress Video
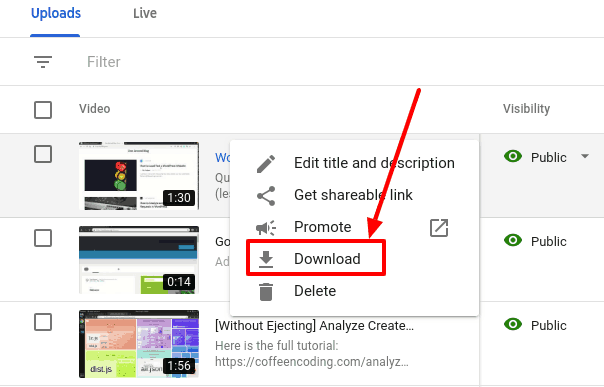
There are many online and offline compressors available that can compress videos. But what I would suggest is to upload the video to YouTube and download it back. You’ll get the best-compressed video! >>> https://studio.youtube.com >>> Videos

Step 2: Upload Video & Serve from CDN
You can upload the video files directly to ‚Media‘ and enable CDN. But what I would suggest is to upload videos to a CDN that have push zone (storage). Thus you save server disk usage, save server bandwidth and will be easy in future to migrate the site to another host/server.
Push Zone: A Push Zone is a zone where the user uploads („push“) files directly, as you would with a regular hosting account, later connected to a pull zone. Ideal for large files (>10MB)
There are many CDN providers which provide a push zone. My favourite one is BunnyCDN. It has storage and edge servers designed for video delivery. It’s very reliable and cheap.
Goto BunnyCDN and create an account. Add a new storage zone and upload your videos.
Once uploading is complete, grab the URL of the video (you’ll need to connect it to a pull zone).

Step 3: Embed Video in WordPress
Embedding the video is pretty easy. Add a ‚Custom HTML‘ block and add the following snippet.
<video width="100%" height="100%" controls>
  <source src="VIDEO_URL" type="video/mp4">
</video>
Replace VIDEO_URL with yours and you’re good to go.
By default, the placeholder image will be the first frame in the video. If you want you can place a custom image.
<video width="100%" height="100%" placeholder="IMAGE_URL" controls>
  <source src="VIDEO_URL" type="video/mp4">
</video>
This is the native video player in the browser. No external JavaScript or CSS is downloaded for this. The video tag is highly customizable. You can find more options in it here.
Bonus Tip
If none of the solutions works for you, at least preconnect to the YouTube or Vimeo domains. By doing this you tell the browser: „hey, I’ll need to make TCP connection and SSL handshake to these domains very soon, so do them now“. You could save 200-300ms which browsers spend for connecting to domains.
Paste the following code the head tag:
For YouTube:
<link rel="preconnect" href="https://www.youtube.com">
<link rel="preconnect" href="https://i.ytimg.com">
<link rel="preconnect" href="https://i9.ytimg.com">
<link rel="preconnect" href="https://s.ytimg.com">
For Vimeo:
<link rel="preconnect" href="https://player.vimeo.com">
<link rel="preconnect" href="https://i.vimeocdn.com">
<link rel="preconnect" href="https://f.vimeocdn.com">
Autoplay und weitere Steuerungsmöglichkeiten / HTML5 Video – Attribute
Die meisten Attribute für das HTML video-Tag sind vom Typ Boolean. Die ausschweifende Schreibweise autoplay=“autoplay“ wie in XHTML wird nicht mehr benötigt, stattdessen reicht einfach „autoplay“. In HTML5 kann direkt der Wert des Attributs angegeben werden.
- autoplay / autoplay
- Das Video wird gestartet, sobald es geladen ist.
<video autoplay … >
Aber Achtung! Auf den mobilen Geräten wird das Video trotz autoplay nicht automatisch abgespielt. Wenn das Video direkt starten würde, verbraucht es kostbares Datenvolumen ohne Erlaubnis des Benutzers. Ab iOS 10 hat Webkit die autoplay-Regelung aufgeweicht: WebKit’s New policies for video
Safari macOS High Sierra (Juni 2017) startet auch auf dem Desktop das Video mit autoplay nicht mehr automatisch, sondern erst mit einem Klick auf den Play-Button.
- controls/ controls
- Die Steuerung des Video wird angezeigt (Play, Pause, Lautstärke, usw. ). Wenn das Attribut controls nicht gesetzt ist, wird das Video ohne Steuerung angezeigt.
<video controls … > - height/ Pixel
- Höhe des Videos
<video height="400" … > - loop / loop
- Das Video startet erneut, sobald es vollständig abgespielt wurde
<video loop … > - muted / muted
- Ohne Ton
<video muted … > - poster/ URL
- URL eines Bildes, das bis zum Start des Videos gezeigt wird
<video poster="start.jpg" … > - codeload/ auto
metadata
none - Wie das Video geladen werden soll
<video codeload="auto" … > - src / URL
- Die URL der Video-Datei
<source src="extracting.mp4" type="video/mp4" /> - width / Pixel
- Breite der Videodatei
<video width="720" … >
Mit <video playsinline> spielen iPhones ab iOS 10 Videos inline innerhalb der Webseite und wechseln nicht automatisch zum Fullscreen-Modus. playsinline wurde daraufhin in die HTML-Spezifikation aufgenommen.


