macOS Catalina is Hackintoshable, yet it requires supported hardware and effort to be installed on a PC. Right now, the newest iteration of macOS is 10.15, known as Catalina. In this guide, we’ll show you how to install Catalina on your PC with the newly released Hackintosh Catalina Installer.
1 – How to Install Hackintosh Catalina on PC
- Download Catalina
- Make Bootable Catalina USB
- Make PC Ready for Hackintosh Catalina
- Configure UEFI Setting
- Boot into Installer
- Customize & Install Catalina
- Boot into macOS Catalina
2 – Advantage of Other Methods VS Hackintosh Catalina Installer
- You do not need a real Mac: All other Hackintoshing methods need to have an existing macOS installation for it to work. This usually means that you either have to find a real Mac, or set up a Mac VM. However, with Hackintosh Catalina Installer, you can just set up everything even from a Windows / Linux computer.
- The post installation is easier: By default, Hackintosh Catalina Installer will automatically install necessary Hackintosh specific kexts and drivers for your computer when you boot your macOS installation for the first time. Other methods require you to do this manually, While the post installation in Hackintosh Catalina Installer can cover up most Hackintoshes (you may have to use Install some kexts manually), it is still a nice convenience.
- Hackintosh Catalina Installer supports more hardware: Normally other Hackintoshing methods are specific for a Computer Build, but Hackintosh Catalina Installer can be Installed on most computers without touching a single line of code.
3 – Interested in Installing Hackintosh Catalina, Here are the requirements
- An existing computer with Windows, Linux or Mac: This is the computer where you will download and set up Hackintosh Catalina. The computer can run either Windows, Linux or macOS; any operating systems will work.
- A Hackintosh-compatible computer with an empty hard drive: This is the computer where you will install Hackintosh Catalina. It can be the same computer as the one mentioned in the previous point. If your computer already has macOS installed, Hackintosh Catalina will just update macOS normally, without deleting any of your apps or files, but always a fresh installation is recommended. macOS needs its own hard drive partition — a minimum of 15 GB of space is required, but at least 50 GB of space is recommended. It is preferred that you use a completely empty hard drive for Installing Hackintosh Catalina.
- Hackintosh Catalina Installer : Catalina Installer is a distribution of macOS Catalina that has been modified to work with PCs. You will need to use a Bittorrent client to download the disk image file containing Hackintosh Catalina, which is a little less than 6 GB in size. You must register on the website to be able to download anything.
- An empty USB drive (16 GB or larger): In this guide, you will write (port) Hackintosh Catalina onto a USB drive, and boot your computer from that drive to install macOS Catalina. The USB drive must be at least 8 GB in size. Since you will need to erase all of the files on the USB drive, make sure to back up its contents first. You can reuse this USB drive for normal stuff after you finish installing Catalina.
- TransMac: ($48, 15-day free trial): If you are using a Windows computer to set up Hackintosh Catalina, you need to use TransMac to write the disk image file onto your USB drive. You can just download the free trial.
- Restore Catalina.pkg: (Free): If you’re using a Mac to set up Hackintosh Catalina, you need special “Restore Catalina” app to write the disk image file onto your USB drive. Again, you must register on the website to be able to download anything.
- Metal Supported Graphics Card: Metal is the foundation for accelerated graphics and compute on Apple platforms, enabling your apps and games to tap into the incredible power of the GPU. Catalina requires metal compatible Graphics Card to have full graphics acceleration on macOS. But Metal is not necessary to Install macOS.
- Here is the list of Nvidia Cards that are Natively Supported with Catalina.
- GTX Titan | GK 110
- GTX Titan Black | GK 110
- GTX Titan Z
- GTX 780 Ti
- GTX 780
- GTX 770
- GTX 760 Ti
- GT 740
- GT 730
- GT 720
- GT 710
- GTX 690
- GTX 680
- GTX 670
- GTX 660 Ti
- GTX 650 Ti
- GTX 645 (Fermi)
- GT 640 (Kepler edition, GK 107/208 core)
- GT 630 (Kepler edition, GK 208 core)
- Quadro 410
- Quadro K420
- Quadro K600
- Quadro K2000/D
- Quadro K4000/D
- Quadro K4200
- Quadro K5000
- Quadro K5200
- Quadro K6000
- Quadro NVS510
These are Not Supported in Mojave, Catalina or Big Sur
- RTX 3090
- RTX 3080
- RTX 3070
- Titan RTX
- RTX 2080 Ti
- RTX 2080 Super
- RTX 2080
- RTX 2070 Super
- RTX 2070
- RTX 2060 Super
- RTX 2060
- GTX 1660 Ti
- GTX 1660 Super
- GTX 1650
- GTX 1080/Ti
- GTX 1070/Ti
- GTX 1060
- GTX 1050/Ti
- GT 1030
- GTX Titan X (GM200 Maxwell core)
- GTX 980/Ti
- GTX 970
- GTX 960
- GTX 950
- GTX 750/Ti
- GTX 745
- Quadro 600
- Quadro K620
- Quadro K1200
- Quadro K220
- Quadro M (all models)
- Quadro P (all models)
4 – Creating Hackintosh Catalina Bootable USB from Mac.
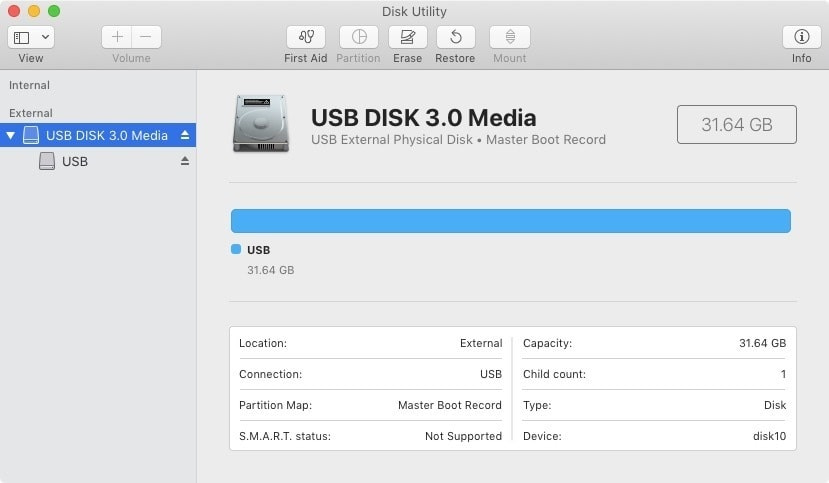
Follow this step if you are setting up Hackintosh Installer on a Mac or existing Hackintosh. Plug your USB drive into Mac, and open Disk Utility (located in Applications->Utilities in your main hard drive). Select your USB drive in the sidebar of Disk Utility and erase the drive, with the “Format” set to “Mac OS Extended (Journaled)” format. You can rename the drive any way you want.
Select the main USB Device, “USB DISK 3.0 Media” as in the example above.
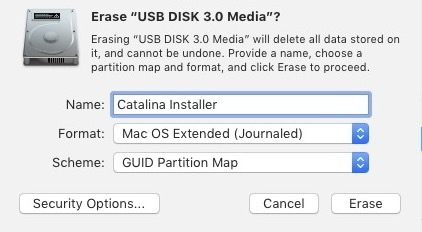
Erase USB as “Mac OS Extended (Journaled) format” & as “GUID Partition Map” Scheme.
Next, make sure that your Hackintosh Catalina disk image file is in the same folder as “Restore Catalina.pkg”. If “Restore Catalina.pkg” is still in a ZIP file, double-click that file to unzip it.
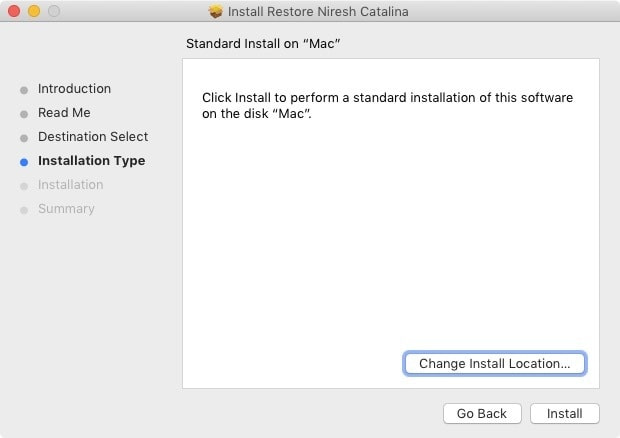
Double click on “Restore Catalina.pkg” to start the app. By default, the app will be aimed at your computer’s main hard drive (mine is named “Mac” in the picture above). You do not want this– instead, click through the installer until you reach the page with the “Change Install Location” button.
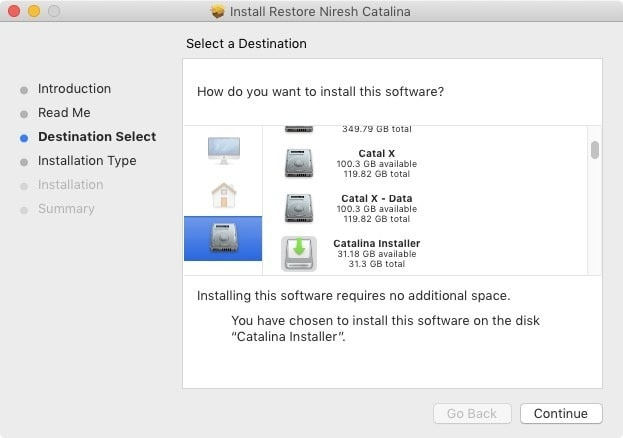
From here, change the install location of the app to your USB drive (mine is named “Catalina Installer” in the picture below).
Press the enter / return key. The app will ask for your system password. After you enter your password, it will begin writing the Hackintosh Catalina disk image onto the USB drive.
This will probably take 20-40 minutes, though it may take longer, depending on the speed of your USB drive & Computer. Once it finishes, your USB drive will contain a fully bootable version of the Hackintosh Catalina installer.
NOTE: “Restore Niresh Catalina.pkg” is very glitchy. If you can not find the “Change Install Location” button on the first time that you run the app, restart your computer and re-run the app.
5 – Creating Hackintosh Catalina Bootable USB from Windows.
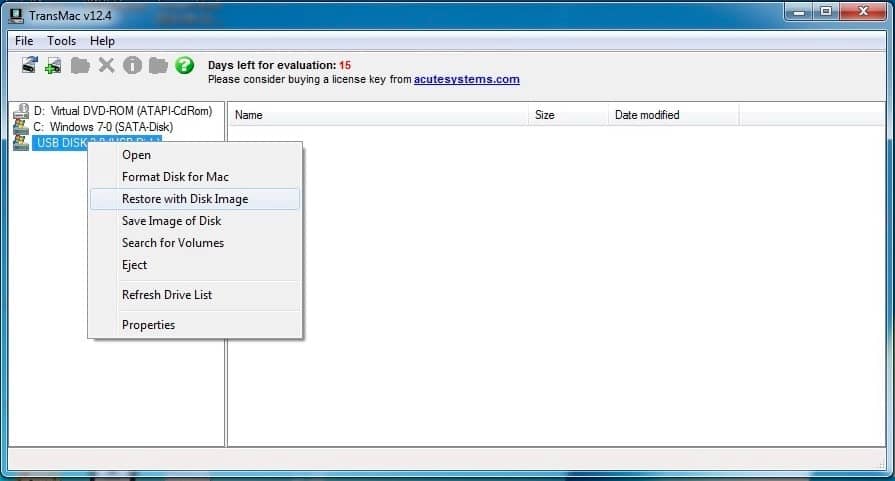
Follow this step if you are setting up Hackintosh Catalina on Windows. Plug your USB drive into your computer, and open TransMac. Find your USB drive on the left-hand column of the TransMac window.
Right-click on the USB drive, and click “Format Disk for Mac”. This will delete all of the files on your drive and prepare it for macOS Catalina.
Once your USB drive is done formatting, right-click it again and click “Restore with Disk Image”.
A file selection window will pop up, Choose your Hackintosh Catalina disk image file (it will probably be called “Niresh-Catalina.dmg”), and proceed. Now, TransMac will write Hackintosh Catalina onto your USB drive.
This will probably take 20 to 40 minutes, though it may take longer, depending on the speed of your USB drive. Once TransMac finishes, your USB drive will contain a fully bootable version of the Hackintosh Catalina installer.
6 – Creating Bootable Hackintosh Catalina USB from Linux.
Preparing Catalina bootable USB from Linux is tricky, First, you have to uncompress dmg, then write it to USB.
Install DMG2IMG with YUM or APT-GET from Terminal
sudo apt-get install dmg2imgsudo yum install dmg2imgde-compress Catalina DMG with DMG2IMG.
Then restore the uncompressed image to USB.
Change the variables below as you need (Warning: The following is just an example do not copy and paste).
sudo dmg2img -v -i /path/to/'Niresh-Catalina.dmg' -o /path/to/Niresh-Catalina-Uncompressed.dmgsudo dd if=/path/to/Niresh-Catalina-Uncompressed.dmg of=/dev/sdb bs=1M7 – Set up the parts of your Personal Computer.
- Unplug all USB connected devices from your computer before you begin the setup (except your keyboard and mouse.). A faulty external USB hard drive can cause your Hackintosh boot loader to hang on startup.
- Open up your computer and unplug any extra internal hard drives that your computer has, besides the hard drive that you are installing macOS on. (Just unplug the hard drive SATA cables from your motherboard.)
- Remove any unnecessary PCI Cards and Hardware (You can plug them later.)
8 – Set up your motherboard’s BIOS for Catalina.
Essentially, the BIOS (or UEFI) is the settings page for your computer’s motherboard. From here, you can fiddle with how your computer hardware works.
It is often necessary to change a few basic settings in the BIOS or UEFI to get macOS up and running. The BIOS standard is generally used by motherboards from before 2012, while the UEFI standard is used by motherboards made after that, Hackintosh Catalina Installer only support UEFI Based BIOS.
- To access BIOS / UEFI Setup, Press and hold Delete button on a USB Keyboard while the system is booting up.
- Load Optimized Defaults.
- Set USB drive to the highest boot priority.
- If your CPU supports VT-d, disable it.
- Disable CFG-Lock.
- Disable Secure Boot Mode
- If your system has OS Type, set it to Other OS.
- Set OS Type to Other OS.
- Save and exit.
Read more about Configuring UEFI BIOS for a Hackintosh
9 – Boot into Hackintosh Catalina
Restart your Hackintosh, and plug in your Hackintosh Catalina USB drive. If things go well, your computer will boot from the USB drive instead of booting from your normal hard disk. You will then be able to view the Hackintosh Catalina clover boot loader menu.
If you do not manage to reach the Hackintosh Catalina menu, check your motherboard’s BIOS settings to make sure that the changes you made in Step 6 were properly applied. If they were, but you still cannot boot from the Hackintosh Catalina USB drive, unplug your USB drive, and go back to Step 3,4,5. Reformat your USB drive with Disk Utility and try again. If all else fails, try using a different USB drive for Hackintosh Catalina.
At the Hackintosh Catalina menu, press the enter key (or return key) to start the mac os Catalina installer. The installer screen will take several minutes to load.
In the worst case scenarios, instead of loading the Mac OS installer, you may end up at a dark gray screen that tells you to restart your computer (a kernel panic), or you may end up with a small crossed-out sign (a loading error). If you get a kernel panic/loading error (or if the Mac OS installer simply won’t start within 10 minutes), you’ll need to enter some boot flags. To enter boot flags, manually restart your computer by pressing your computer’s power button. Then, once you’ve booted back into the Hackintosh Catalina menu, try typing any necessary boot flags before pressing the enter/return key. Check out our list of common boot flags and our guide to fixing boot problems with verbose mode for reference.
10 – Fix No Packages were eligible to Install
At the end of 2020, Catalina Installer will not work and may throw an error “macOS Catalina could not be installed on your computer – No packages were eligible for install” to fix this open Terminal (From Utilities Menu > Terminal) and run the following Command.
date 0724000019
11 – Install Hackintosh Catalina
Once you’ve entered the macOS Catalina installer, you will come up to a hard disk selection page. This is where you choose where you want to install Catalina.
If you’re installing Catalina on a computer that has never been turned into a Hackintosh before (i.e. doesn’t already have Mojave, High Sierra, Sierra, or EL Capitan installed), there won’t be any hard disk options to select. We’ll have to fix that. To do this, start up Disk Utility, which is located under the Utilities menu in the top bar.
You need to use Disk Utility to erase a hard drive partition so that macOS Catalina can install itself on it. In the sidebar of Disk Utility, choose the hard drive partition where you want Catalina installed, and erase it by using the “Erase” tab. You can also just erase the entire hard drive. In the screenshot below, my two hard drive partition is called “Macintosh HD”, while my entire hard drive is called “Apple SSD macOS-0 SSD Media”.
When erasing, the format should be set to “APFS” & Scheme to “GUID Partition Scheme”. You can also partition the hard disk by using Disk Utility’s Partition tab.
On the installation page for macOS, the hard disk/disk partition should now be showing up. Select it, and then click the “Customize” button on the bottom left. This is where using a distribution becomes really useful: Catalina Installer allows you to install extra Hackintosh drivers and kexts, straight from the macOS Catalina installer.
However, choosing the right options from this page can be really tricky, so unless you’re absolutely certain about which drivers and kexts you need to install for your computer, I don’t recommend installing too much stuff from here. The default selection will enable macOS to boot from the hard drive without any assistance, and automatically enable audio and ethernet. For most computers, that will be enough.
If your computer already has macOS installed and you are simply updating it to Catalina, you can just uncheck all of these options. macOS treats Catalina as just another update, there’s no need to reinstall all of your kexts and drivers.
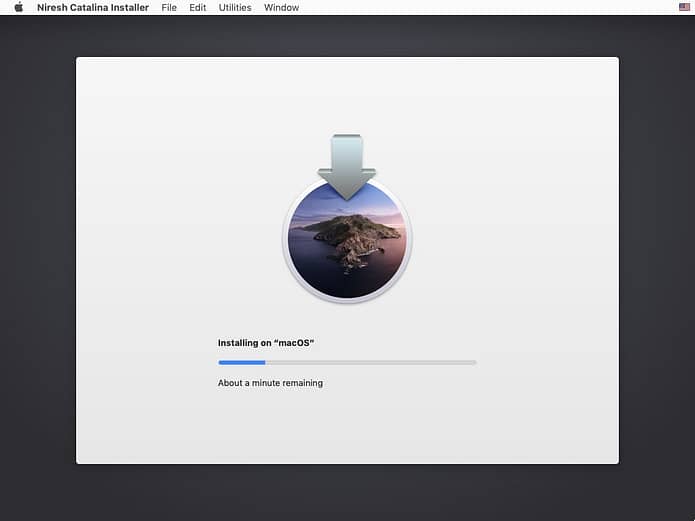
Once you’re done with the “Customize” page, install Catalina. This will take at least 30 minutes.
