files

PiHole – Sicher und werbefrei surfen mit dem Raspberry Pi

Als Mediacenter oder IoT-Lösung – der Bastelrechner Raspberry Pi ist vielseitig einsetzbar. Mit Pihole macht er sogar euer gesamtes Netzwerk werbefrei und frei von Trackern. So richtet ihr die Software Schritt für Schritt einKling.

Was ist der Unterschied von Pihole zu einem Adblocker?

Warum einen Raspberry Pi mit etwas ausstatten, das ein Adblocker im Browser auf den ersten Blick auch kann? Weil Adblocker-Plugins etwas anders funktionieren und aufgerufene Websites erst blocken, sobald sie euren PC, Mac oder das Smartphone erreicht haben. Pihole hat einen anderen Ansatz, denn es blockt Tracker, Viren-verseuchte Websites und Werbung auf DNS-Ebene.

Das heißt, dass das Pihole quasi alles ausfiltert, bevor es an die Geräte im Netzwerk ausgeliefert wird. Wie ein Sieb, das zwischen eurem Router und allen Geräten im Netzwerk arbeitet. Und es bringt den Vorteil mit, dass diese Geräte auch in den nativen Apps werbefrei sind – und nicht nur mit Plugins oder speziellen Apps. Ich blicke in deine Richtung, iPhone.

Weniger Tracking, mehr Speed

Weniger Tracker bedeuten auch gleichzeitig mehr Privatsphäre, denn die eingebauten Filter sorgen dafür, dass deutlich weniger Informationen über euer Surfverhalten gesammelt werden können. Pihole ist zwar kein Tails oder Tor, das euren Traffic über fünf Millionen Proxies und dann noch mal zur Venus schickt, blockt aber sehr viele Anbieter und gefährliche Seiten.

Weniger Werbung und weniger Gefunke von Trackern und Analytics-Anbietern bedeutet zudem weniger Traffic und schnellere Ladezeiten von Websites und Apps. Na, überzeugt? Das alles braucht ihr für die Einrichtung.

Diese Hardware brauchst du für den Raspberry Pi mit Pihole

  • Einen Raspberry Pi – im Grunde tut es jeder Raspberry, auch der Raspberry Pi 1 oder Zero. Wir empfehlen euch jedoch einen Raspberry Pi 3 und aufwärts, um die Weboberfläche vom Pihole flott nutzen zu können.
  • Ein Netzteil – oder einen USB-Anschluss mit 2A-Output oder mehr.
  • Eine Micro-SD-Karte und einen SD-Adapter, der Karten meistens beiliegt.
  • Optional: Ein Gehäuse für den Raspberry Pi.
  • Optional: Einen Hoodie, da ihr ein paar einfache Shell-Befehle kopieren werdet und dabei aussehen müsst, wie ein Hacker.

Software für Pihole


Vorbereitung der SD-Karte

  1. Ladet euch im ersten Schritt Balenaetcher (oder eine der oben erwähnten Alternativen) herunter und installiert das Tool. Balenaetcher braucht ihr, um das Betriebssystem für den Raspberry Pi auf der SD-Karte zu „installieren“. Das Image öffnen und die Dateien kopieren funktioniert übrigens nicht, da eine Partitionstabelle auf die Micro-SD-Karte geschrieben werden muss.
  2. Raspberry Pi OS findet ihr hier, wobei ihr für das Pihole nur die „Lite“-Version braucht. Bei der Veröffentlichung dieses Artikels ist das Raspberry Pi OS (32-bit) Lite (basierend auf Debian Buster). Ihr könnt aber auch die 64-Bit-Variante installieren oder die Version mit einer Desktopumgebung, falls ihr den Raspberry Pi mit Pihole noch für andere Dinge verwenden wollt.
  3. Startet Balenaetcher, wählt die heruntergeladene und entpackte Datei und dann die Micro-SD-Karte aus, die nun mit oder ohne Adapter in eurem PC stecken sollte. Checkt bitte vorher, dass ihr die richtige Micro-SD-Karte und nicht eine externe Festplatte oder den USB-Stick auswählt (den mit dem geheimen Ordner, den Mutti niemals sehen sollte).
  4. Balenaetcher schreibt das Raspberry Pi OS auf die SD-Karte, und somit wäre das gute Stück dann auch schon bereit für den Einsatz. Steckt die Karte in euren Raspberry und stöpselt ihn mit einem HDMI- und am besten einem Netzwerkkabel verbunden an die Strombuchse. Ihr braucht zudem eine Tastatur mit Bluetooth-Adapter oder ganz oldschool eine mit Kabel.


Voreinstellungen des Raspberry Pi OS

Nachdem der Raspberry Pi gebootet hat (was ein wenig nach „Matrix“ aussieht), loggt ihr euch mit folgenden Logindaten und Passwort ein:

pi
raspberry

(beziehungsweise „raspberrz“, da die Tastatur noch auf Englisch eingestellt ist)

Ich bin zwar kein Hellseher, nehme aber an, dass ihr mit hoher Wahrscheinlichkeit eine deutsche Tastatur nutzt. Damit das auch der Raspberry weiß, gebt ihr im Terminal ein:

sudo raspi-config

In dem Konfigurationstool hüpft ihr zu Punkt 4 (Localisation Options) und stellt im nächsten Schritt die Locale unter I1 auf Deutsch (DE), die Timezone (I2) auf Berlin, das Keyboard Layout (I3) auf Deutsch (DE) und WLAN Country (I4) ebenfalls auf DE. Die Punkte wählt ihr mit der Space-Taste an oder ab und wechselt mit Tab auf „Select“ beziehungsweise „Back“. Nach etwas Gerödel verlasst ihr das Menü über „Finish“ und startet den Raspberry am besten neu, mit:

sudo reboot

Nach dem Neustart ändert ihr zunächst das Passwort, damit Mr. Robot nicht so einfach Zugriff auf euren Raspberry Pi hat. Loggt euch ein (diesmal mit hoffentlich deutschem Tastaturlayout) und gebt ein:

passwd

Gebt euer aktuelles Passwort ein (raspberry) und dann euer neues, das ihr am besten in einem Passwortmanager speichert. Um das Betriebssystem auf den neuesten Stand zu bringen, führen wir ein Update durch, mit:

sudo apt update && sudo apt -y upgrade && sudo apt-get -y dist-upgrade && sudo apt -y autoremove && sudo apt -y autoclean && sync && sudo reboot

Nach dem Neustart installiert ihr nun Pihole und macht euch erstmal zum root, da Pihole bestimmte Rechte für die Installation braucht:

sudo passwd root

Vergebt jetzt ein temporäres Passwort und loggt euch als root ein, mit:

su -


Deutsche Tastatur:

  1. sudo raspi-config
  2. Punkt 4 Localisation Options
  3. l3 Change Keyboard Layout
  4. PC generic de 105 tecles (intl.)
  5. Runtergehen auf „Andere“
  6. Das Wort Duits suchen und bestätigen
  7. Dann nach oben und DUITS auswählen
  8. und dann geht es komischerweise wie gewohnt weiter


Die Installation von Pihole auf dem Raspberry Pi

Pihole bietet eine übersichtliche Oberfläche, mit der ihr weitere Einstellungen vornehmen könnt. 

Falls ihr nicht wisst, welche IP euer Pihole hat, findet ihr es so raus und notiert es am besten:

hostname -I

(das ist ein großes I, wie „Ihhh“, kein L)

Jetzt installiert ihr das Pihole über das Skript:

curl -sSL https://install.pi-hole.net | bash

Sollte das nicht funktionieren, weil curl fehlt, könnt ihr auch Folgendes tun:

wget -O basic-install.sh https://install.pi-hole.net
sudo bash basic-install.sh


Bei Problemen findet ihr weitere Infos zur Installation auf der GitHub-Seite von Pihole. Das Skript installiert und arbeitet ein bisschen vor sich hin und wird euch zwischendurch einige Fragen stellen, die ihr wie folgt, beantworten könnt:


Select Upstream DNS Provider: Cloudflare oder Google oder einer eurer Wahl.

Select Lists: Wählt hier einfach alle Listen aus.

Select Protocols: IPv4 und/oder IPv6, falls ihr IPv6 nutzt.

Do you want to use your current network settings as a static address: Gebt hier die IP-Adresse des Raspberry Pi ein, die euer Router zugewiesen hat (beziehungsweise Enter), und wählt den Router als Gateway aus – meist 192.168.0.1, aber prüft es zur Sicherheit nochmal in den Einstellungen eures Routers.

Do you wish to install the web admin interface: Ja, denn hier nehmt ihr nachher Einstellungen vor und seht, was das Pihole alles filtert.

Do you wish to install the web server (lighttpd): Ja, denn ohne läuft auch die Weboberfläche nicht oder ihr müsst euch den Server anders zusammenfrickeln.

Do you want to log queries: Ja, sofern ihr die Zugriffe in Logdateien speichern wollt.

Select a privacy mode for FTL: Je nachdem, ob ihr ein öffentliches Netzwerk betreibt oder die Anfragen schlicht und einfach komplett anonymisieren wollt (hallo DSGVO), könnt ihr hier einstellen, was genau geloggt wird.


Nach der Installation zeigt euch das Skript die Adresse des Pihole als IPv4 und/oder IPv6 sowie das Passwort für die Weboberfläche an. Loggt euch wieder als root aus und auch ein Neustart kann nicht schaden:

exit
sudo passwd -dl root
sudo reboot


Pihole als DNS-Server des Routers eintragen

Im Grunde könnt ihr den Raspberry nun an seinen Zielort verfrachten. Er braucht nur noch Strom und ein Netzwerkkabel zu eurem Router. Das Pihole funktioniert im Grunde auch per WLAN, sofern es nicht der ganz alte Raspberry Pi 1 ist. Für eine stabile Verbindung, und um etwas Frickelei zu vermeiden, solltet ihr aber ein Netzwerkkabel nutzen. Wer den Raspberry Pi übrigens nicht kennt: Das Teil hat leider keinen An- oder Aus-Schalter. Ihr macht ihn an, wenn ihr das USB-Kabel anstöpselt und fahrt ihn am besten herunter mit:

sudo shutdown now

Dann könnt ihr ihn vom Strom trennen und wieder anklemmen, wenn ihr ihn einschalten wollt. Im Idealfall wird er aber die ganze Zeit durchlaufen und Trackinganfragen, Werbung und anderen Firlefanz auf DNS-Ebene blocken. Damit das funktioniert, müsst ihr das in einem letzten Schritt eurem Router mitteilen.
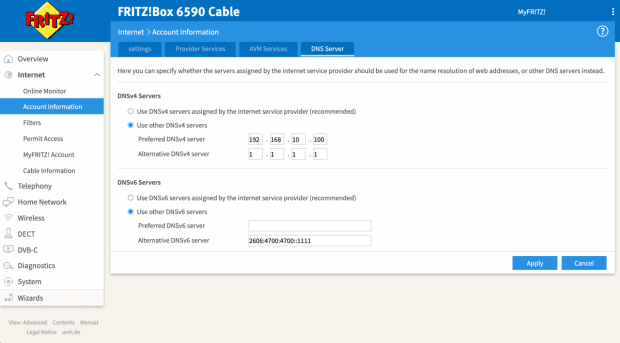
Pihole müsst ihr im Backend der Fritzbox als DNS-Server eintragen. Hier unterscheiden sich die Modelle bei ihrer Weboberfläche natürlich. Bei der Fritzbox findet ihr die Einstellung unter Internet > Zugangsdaten > DNS-Server.

Hier gebt ihr die IPv4- und/oder die IPv6-Adresse eures Pihole ein. Als Alternative empfiehlt sich noch ein zweiter DNS-Server, falls ihr den Raspberry mal wechseln, aber dennoch weiter Internet haben wollt. Hier bieten sich Cloudflare (1.1.1.1) oder Googles DNS-Server (8.8.8.8) an, aber ihr könnt natürlich nehmen, was ihr wollt.


Die Weboberfläche und weitere Einstellungen

Im Grunde sollte alles out-of-the-box funktionieren. Ihr könnt euch die Weboberfläche vom Pihole ansehen, indem ihr die IP-Adresse im Browser angebt und ein „/admin/“ anhängt, zum Beispiel:

http://192.168.0.10/admin/

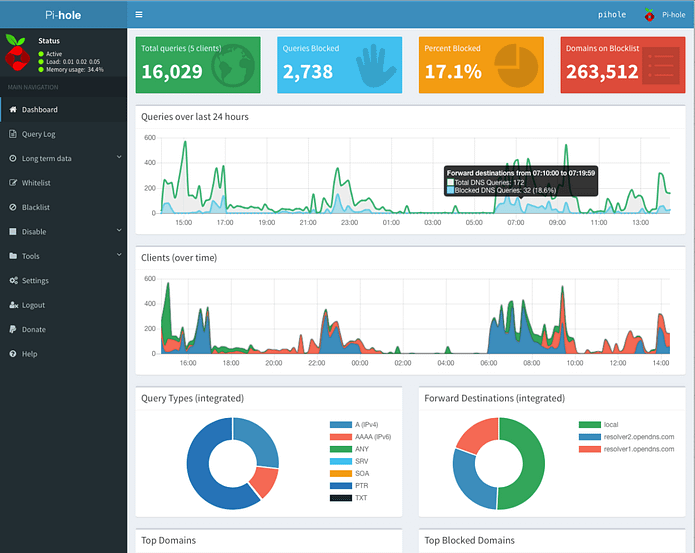
Loggt euch mit dem Passwort aus der Installation ein und ihr könnt euch auf dem Dashboard ansehen, wie viele Anfragen vom Pihole geblockt worden sind, welche Domains und Tracker das waren und so weiter. Wenn ihr die Listen aktuell halten wollt, könnt ihr unter dem Punkt Tools > Update Gravity auf Update klicken.

Eine Allow-Liste findet ihr ebenfalls im Menü links und ihr werdet sie das eine oder andere Mal brauchen, denn manchmal blockt Pihole relativ harmlose Werbetracker oder versaut euch Links in Newslettern, da diese meist über Tracking-Tools laufen. Setzt die entsprechenden Domains dann einfach auf die Liste oder schaltet Pihole kurzzeitig mit einem Klick auf Disable aus und wählt, für wie lange er ausbleiben soll.

Wer möchte, kann das Pihole auch als DHCP-Server nutzen, DNSSEC aktivieren, als rekursiven DNS-Server mit Unbound nutzen, weitere Adblock-Listen hinzufügen oder die Allow-Lists automatisch updaten lassen. Auf die gehört übrigens auch www.t3n.de – ist ja klar. Wie ihr das alles anstellt, erfahrt ihr hier:

Als kleiner Tipp: Wenn das Blocken mal nicht direkt funktioniert, wartet ein paar Minuten, bis euer Netzwerk das Pihole als DNS-Server „vermittelt“ hat. Oder startet euer Gerät ein Mal neu. Das gleiche gilt auch, wenn ihr das Pihole im Menü kurzzeitig ausschaltet, denn ein paar Sekunden lang wird es Tracker immer noch blocken.


Neue Ad-Block Filterlisten in Pi-hole einbinden


Standardmäßig enthält Pihole 5.0 aktuell 7 Filterlisten zum Blocken von Domains bzw. Webseiten. Diese ermöglichen Pihole das Filtern von unerwünschten Inhalten wie z.B. Werbebannern oder unerwünschten Scripten. Durch das Hinzufügen weiterer Filterlisten lässt sich die Zahl der unerwünschten Domains sehr einfach erhöhen. Wir wollen euch heute zeigen, wie ihr euren Pi-hole noch besser im Ad-Blocking machen könnt.

Filterlisten gibt es wie Sand am Meer. Wichtig ist, dass diese Listen gepflegt werden, denn die Listen werden nicht nur einmal in Pihole eingebunden, sondern regelmäßig auf Änderungen geprüft. Wir haben für euch ein paar Listen bzw. Webseiten zusammengetragen:

for blocklists i’m using

https://raw.githubusercontent.com/StevenBlack/hosts/master/hosts https://mirror1.malwaredomains.com/files/justdomains http://sysctl.org/cameleon/hosts https://zeustracker.abuse.ch/blocklist.php?download=domainblocklist https://s3.amazonaws.com/lists.disconnect.me/simple_tracking.txt https://s3.amazonaws.com/lists.disconnect.me/simple_ad.txt https://hosts-file.net/ad_servers.txt https://raw.githubusercontent.com/HenningVanRaumle/pihole-ytadblock/master/ytadblock.txt https://github.com/anudeepND/youtubeadsblacklist/blob/master/domainlist.txt https://v.firebog.net/hosts/lists.php?type=tick

for blacklists i’m using

ad.doubleclick.net clients6.google.com googleads.g.doubleclick.net i1.ytimg.com pagead2.googlesyndication.com pubads.g.doubleclick.net r1—sn-vgqsen7z.googlevideo.com r1.sn-vgqsen7z.googlevideo.com r17—sn-vgqsenes.googlevideo.com r2—sn-vgqs7n7k.googlevideo.com r20—sn-vgqs7ne7.googlevideo.com r20.sn-vgqs7ne7.googlevideo.com r4—sn-vgqs7nez.googlevideo.com r4.sn-vgqs7nez.googlevideo.com securepubads.g.doubleclick.net static.doubleclick.net www.youtube-nocookie.com

I’ve had decent success with this regex

^r[0-9]*([-]{1,3}|.)sn-[a-z0-9]{4,}-[a-z0-9]{4,}\.googlevideo

It’s not perfect, but does block about 80% of the ads that play during streaming, but only about 40% of the ads that play before the video begins.


Einbinden neuer Filterlisten in Pi-Hole

Ab der Version 5 von Pi-Hole befindet sich die Verwaltung der Filterlisten im Gruppen-Management der Software. Ihr könnt mehrere Gruppen definieren, die dann auf unterschiedliche Blocklisten zugreifen können.

 
Nach dem Einbinden neuer Blocklisten müssen diese noch über die im Bereich Tools vorhandene Funktion Update Gravity in Pi-Hole aktiviert werden.


pihole5-list-tool

Installing Python packages

sudo apt update
sudo apt install python3-picamera

sudo apt install python3-pip

installation

If you don’t sudo pip3 install, things won’t work – possibly in a very confusing way. Definitely on Raspbian 10, so probably before that.

$ sudo pip3 install pihole5-list-tool --upgrade

usage / running

Simply run:

$ sudo pihole5-list-tool

Finishing up

After adding lists, they must be loaded by running:

$ pihole -g


allowlists

Currently the only source for maintained whitelists is anudeepND’s allowlist. They are presented as:

  • Allowlist Only – Domains that are safe to allow i.e does not contain any tracking or

      advertising sites. This fixes many problems like YouTube watch history,
      videos on news sites and so on.
    
  • Allowlist+Optional – These are needed depending on the service you use. They may contain some

      tracking sites but sometimes it's necessary to add bad domains to make a
      few services to work.
    
  • Allowlist+Referral – People who use services like Slickdeals and Fatwallet need a few sites

      (most of them are either trackers or ads) to be whitelisted to work
      properly. This contains some analytics and ad serving sites like
      doubleclick.net and others. If you don't know what these services are,
      stay away from this list. Domains that are safe to whitelist i.e does
      not contain any tracking or advertising sites. This fixes many problems
      like YouTube watch history, videos on news sites and so on.
    

ad/blocklists

Currently the only source for maintained blocklists is firebog.net

  • Non-crossed lists: For when someone is usually around to whitelist falsely blocked sites
  • Ticked lists: For when installing Pi-hole where no one will be whitelisting falsely blocked sites
  • All lists: For those who will always be around to whitelist falsely blocked sites


Zusätzliche Whitelists

Gibt es, um mal welche zu nennen:

Aber die Ersteller/Verwalter von Blocklists sollten Einträge aus solchen Whitelists eigentlich bereits aus ihren Listen entfernt haben.


IP-Adresse oder sonstige Netzwerkeinstellungen ändern

Reconfigure pi hole via command line: pihole -r

You can also change ip address in

/etc/pihole/setupVars.conf


Updating

Updating is as simple as running the following command:

pihole -up


How do I set or reset the Web interface Password?

The Web interface password needs to be reset via the command line on your Pi-hole. This can be done locally or over SSH. You will use the pihole command to do this:

pihole -a -p

You will be prompted for the new password. If you enter an empty password, the password requirement will be removed from the web interface.
Quick-Tip: Linux / Raspberry Pi Update und Speicher bereinigen & Zugriff über SSH Putty, MacOS, ChromeOS

Update


sudo apt-get update

sudo apt-get dist-upgrade


Säubern

am einfachsten ist Linux über BleachBit zu reinigen

sudo apt-get autoremove && sudo apt-get -y autoclean
sudo apt-get clean

und noch zusätzlich

Cache

sudo du -sh /var/cache/apt


Thumbnail Cache

anzeigen:

du -sh ~/.cache/thumbnails

löschen:

rm -rf ~/.cache/thumbnails/*


Cronjob anlegen


sudo crontab -e 

0 0 1 * * sudo apt-get autoremove && sudo apt-get clean && sudo apt-get -y autoclean
5 15 * * 1-5sudo du -sh /var/cache/apt


[ Con­trol-X ]
[ y ]
[ Enter ]
 

Unter https://crontab.guru oder http://corntab.com/ oder https://www.bennetrichter.de/tools/crontab-generator/ kann man sich cron­jobs erstel­len las­sen.


Raspberry Pi: SSH einrichten – so geht’s

Auf einem Raspberry Pi läuft traditionell eine Version von Linux. In der Praxis bedeutet dies, dass viele Funktionen auf dem Pi über das Terminal verwaltet werden können, beispielsweise die Installation von neuen Programmen oder Updates oder auch Serverfunktionen des Pis. Der Vorteil: Das funktioniert nicht nur direkt am Raspberry Pi, sondern auch aus der Ferne, also von einem anderen PC im Netzwerk. Dabei kommt Secure Shell oder kurz SSH zum Einsatz. Das Protokoll ermöglicht eine verschlüsselte Verbindung zum Raspi und die Ausführung von Terminal-Befehlen aus der Ferne. Auch Dateitransfers von und zum Pi lassen sich per SSH-Verbindung realisieren.


Hinweis: Durch SSH besteht ein Sicherheitsrisiko, falls der RPi Zugang zum Internet hat. Ändern Sie daher unbedingt das Standard-Passwort über den Befehl passwd.

SSH auf dem Raspberry Pi installieren

Aktuelle Versionen von Raspbian oder auch den meisten alternativen Linux-Distributionen kommen ab Werk mit einem SSH-Server. Diesen müssen Sie nur noch aktivieren (s. unten). Falls Sie eine ältere Version von Raspbian oder eine Distribution ohne vorinstallierten SSH-Server verwenden, können Sie diesen schnell nachinstallieren. Öffnen Sie dazu am Raspberry Pi ein Terminal und geben Sie diesen Befehl ein:

sudo apt-get install ssh

Nun müssen Sie den SSH-Server nur noch starten. Dazu geben Sie diesen Befehl ein:

sudo /etc/init.d/ssh start

Damit Sie den SSH-Server nicht jedes Mal manuell starten müssen, können Sie ihn auch automatisch beim Booten aufrufen. 


 Enable SSH

As of the November 2016 release, Raspberry Pi OS has the SSH server disabled by default. It can be enabled manually from the desktop:

  1. Enter sudo raspi-config in a terminal window
  2. Select Interfacing Options
  3. Navigate to and select SSH
  4. Choose Yes
  5. Select Ok
  6. Choose Finish

Alternatively, use systemctl to start the service

sudo systemctl enable ssh
sudo systemctl start ssh

When enabling SSH on a Pi that may be connected to the internet, you should change its default password to ensure that it remains secure. See the Security page for more details.

Ab sofort ist der Raspberry Pi dauerhaft für den SSH-Zugriff gerüstet.


SSH unter Windows nutzen

Windows musste lange ohne einen eigenen SSH-Client auskommen. Beginnend mit dem Fall Creators Update von 2017 hat Microsoft aber eine SSH-Implementierung auf Basis von OpenSSH in die neue Kommandozeile PowerShell integriert. Öffnen Sie also einfach über das Startmenü die PowerShell und geben Sie diesen Befehl ein:

ssh benutzername@IPAdressedesPi

Wie bereits erwähnt ist der Standard-Benutzername “pi”. Die IP-Adresse des Raspis finden Sie beispielsweise über Ihren Router heraus. Am Raspberry Pi selbst gibt der Terminal-Befehl “ifconfig” die aktuellen Netzwerkeinstellungen und damit auch die IP-Adresse aus. Bei der ersten Verbindung müssen Sie die SSH-Schlüssel des Pis bestätigen, wozu Sie einfach “yes” eintippen. Nach Eingabe des Benutzerpassworts können Sie die Fernwartung des Pis komfortabel direkt unter Windows durchführen.

In älteren Windows-Versionen bzw. auf Windows-10-Systemen, die noch nicht mit den neueren Systemupdates versorgt wurden, müssen Sie für die SSH-Verbindung zum Pi auf externe Programme zurückgreifen. Der wohl populärste SSH-Client für Windows ist PuTTY. Das kostenlose Programm öffnet in einem Terminalfenster eine SSH-Verbindung zu Ihrem Pi (oder natürlich jeden anderen SSH-Server). Tragen Sie dazu einfach die IP-Adresse des Pis in das Feld “Host Name” ein, wählen Sie bei “Connection Type” den Punkt “SSH” und klicken Sie auf “Open”. Im nun geöffneten Fenster geben Sie den Benutzernamen und das Passwort ein. Nun können Sie das Terminal des Raspberry Pi von Windows aus bedienen. Natürlich können Sie PuTTY auch unter Windows 10 als Alternative zur Powershell verwenden.


SSH-Verbindung unter Linux oder macOS nutzen

Arbeiten Sie unter einer Linux-Distribution oder mit dem Mac, ist die SSH-Verbindung zum Pi deutlich einfacher. Beide Systeme kommen ab Werk mit einer SSH-Implementierung. Öffnen Sie einfach das Linux- bzw. macOS-Terminal und geben Sie den entsprechenden Befehl ein. Standardmäßig verbinden Sie sich beispielsweise mit folgendem Befehl per SSH zum Raspberry Pi:

ssh benutzername@IPAdressedesPi

Nun können Sie sich genau wie bei Windows auf der Kommandozeile des Raspberry Pis austoben.


Chromebook SSH Client

Secure Shell Extension

The easiest method of using SSH from a Chromebook is by way of a third-party extension, called Secure Shell Extension. With this add-on, you can not only login to your remote machines (via the ssh command), you can also securely copy files to and from those same remote machines (using the Secure FTP command, sftp).


How do you install that extension? Easy. Here are the steps:

 
  1. Open the Chrome browser on your Chromebook.

     
  2. Click the Menu button and then click More tools Extensions.

    Screenshot of the chromebook menu.
  3. Click the three horizontal lines in the upper left corner and then select Open Chrome Web Store.

    Screenshot of the Open Chrome Web Store link.
  4. Type Secure Shell Extension in the search bar.

     
  5. Click the Add to Chrome button associated with Secure Shell Extension.

    Screenshot of the Add to Chrome button.
  6. When prompted, click Add extension.

    Screenshot of the Add Extension button.

How to Use Secure Shell Extension

You should now see a new icon in your Chrome browser toolbar. Follow these steps to create a new connection:

 
  1. Click the Secure Shell Extension icon in the Chrome toolbar.

    Screenshot of the Secure Shell Extension icon.
  2. From the drop-down, click Connection Dialog.

    Screenshot of the Connection Dialog entry.
  3. In the resulting window, fill out the necessary information for the connection.


In order to create a new connection, you’re only required to fill out the following details:


Username@hostname – For this entry, type the username you’ll login with and either the IP address or domain of the remote host. For example, if you need to log into a remote machine with the IP address 192.168.1.166, with a username jack, type jack@192.168.1.166.

 
Screenshot of the New Connection window.

Once you fill out that information, the extension will automatically fill out the username and hostname below the username@hostname line. After you’ve filled out that line, click Enter on your keyboard and, when prompted, click Allow (to give the extension permission to open ssh links).

 
Screenshot of the Allow button.

After giving the extension the necessary permissions, follow these steps to complete the connection:

 
  1. Type yes and click Enter on your keyboard to continue with the connection, type the password for the remote user, and click Enter on your keyboard.

    Screenshot of the SSH password prompt.
  2. You should now find yourself on the terminal window of the remote machine.


When you’re finished working on the remote machine, type exit and click Enter on your keyboard. You will then be prompted to type x to complete the exit from the extension.


Reconnecting

One nice thing about the Secure Shell Extension is that it will remember your connections. Click on the extension icon (in the Chrome toolbar) and you’ll see your saved connections listed. Click on an entry and type the remote user password for that machine to login.

 
Screenshot of the newly added connections.

If, instead, you need to connect to a different machine, open the Connection Dialog and click [New Connection]. Fill out the same information you did before (with the username/IP address for the new remote machine) and your new connection is ready. When you have more than one connection saved, all of those connections will be listed (for quick access) in the Secure Shell Extension drop-down.


That’s all there is to it. With the assistance of a simple third-party extension, you can gain easy and secure access to your remote machines … all from your user-friendly Chromebook.

Mac OS X: Animiertes GIF als Schreibtisch-Hintergrund

animated-gif-wallpaper-mac

Have you ever wished the wallpaper on your Mac was animated? One common trick to achieve that effect is to set a screen saver as the desktop wallpaper in Mac OS X, which looks great but can wind up using a fair amount of processor to display the animations, but now another option is available; use an animated GIF as desktop wallpaper on the Mac instead, thanks to a little free app called GifPaper.


GIFPaper is somewhat experimental at this point, requires skipping Gatekeeper, uses about 15% of CPU to display the animation, requires manually installing a preference panel, and if you want to get rid of it, you have to force quit the associated process through Activity Monitor. Because of all that, using GifPaper is likely better used exclusively by more advanced Mac users, as it’s totally unsupported by the developer (or anyone else). If you aren’t comfortable with any of that, don’t use the GifPaper app for now. If you don’t mind those caveats, here’s how you can use GIFPaper to set an animated GIF as the desktop picture on a Mac.

How to Set Animated GIF as Desktop Wallpaper in Mac OS X

    1. Get GIFPaper from this Dropbox link*, it’s free from the developer but unsupported
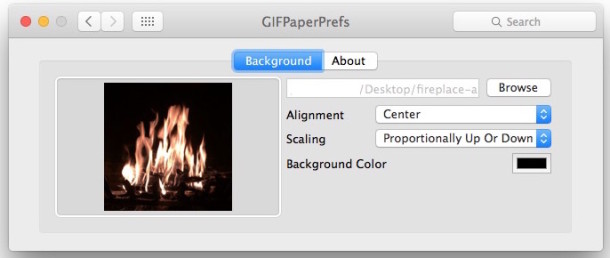
    2. Install the preference panel and use the Browse option to select your animated GIF, then adjust the settings as desired

animated-gif-as-wallpaper-mac

  1. The animated GIF should load as wallpaper immediately, but if it doesn’t try manually launching the Gifpaper.app to load the gif as the desktop background picture

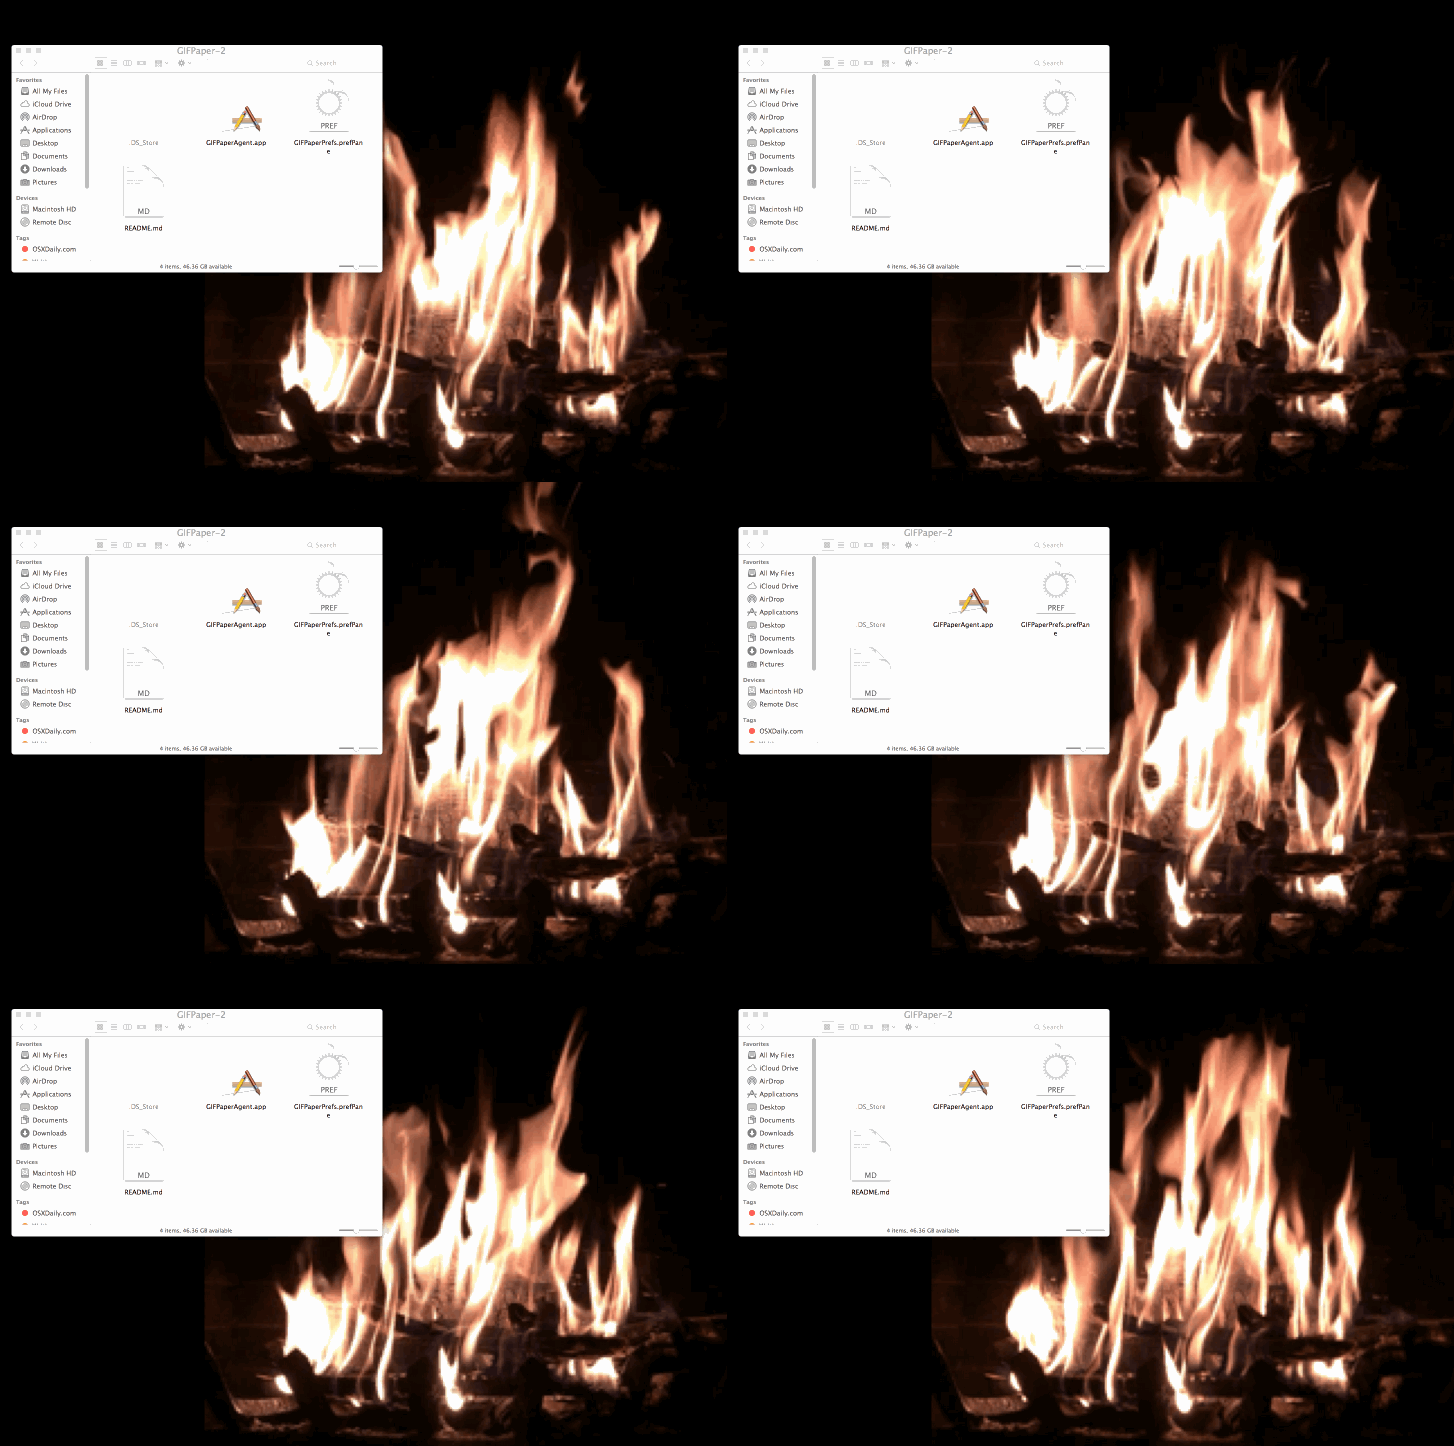
Here’s an example of the Mac desktop with a fireplace GIF in use as the wallpaper background image:

animated-gif-wallpaper-mac

And here’s another Mac desktop example with animated GIF as wallpaper via Lifehacker:

animated-gif-mac-wallpaper-lifehacker

This can be a fun use for your Live Photos converted to GIFs, which is what I have done in this piece with a fireplace gif that was created from a Live Photo. Of course if you have Gif Brewerythan you can use other masterful animated GIF creations of your own doing as well, otherwise a quick Google Image search for “animated gif (item)” or visit to a site like Giphy should find you something to meet your GIF needs.

* Download and use this app at your own discretion, currently there is no associated developer page or Github page about the GifPaper app. Generally speaking it is unwise to download and use apps or files from random web links from an unidentified developer, but this app was found by LifeHacker and it works as advertised (the creepy blinking eyes gif via 2001 (the movie) shown on page is from Lifehacker too).

Removing GIF Paper and getting the regular wallpaper back again

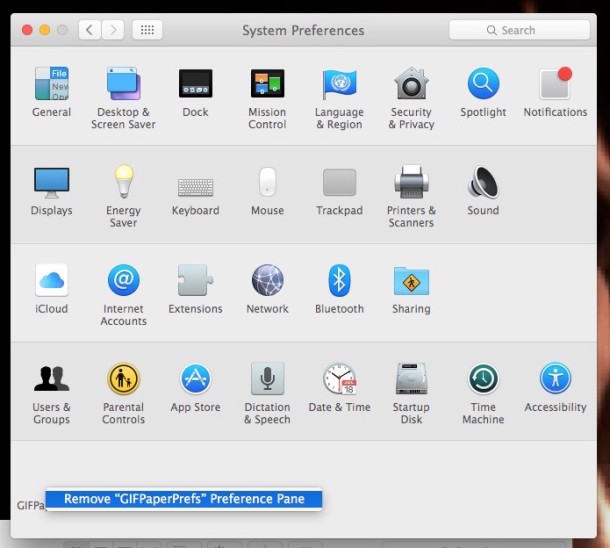
You can remove the GifPaper preference panel with a right-click:

gifpaper-prefs-remove

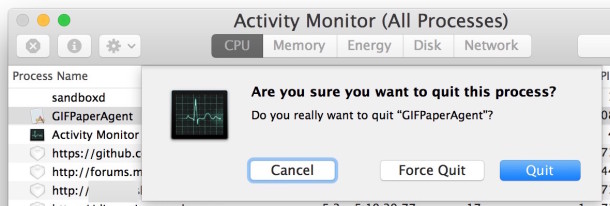
And if you want to end the animated GIF as your wallpaper, either reboot the Mac, or quit the Gif Paper process running through Activity Monitor:

quit-gif-paper-agent

Unfortunately there isn’t a Github page with source or an official site for the project, though the developer Tomasz Wojcik mentions they’d likely put it on Github eventually. If you were hoping to get a look at the source, get support for the app, or ask questions specifically about the project or how it works, you’ll have to reach out to the creator directly via the readme file attached to the download, for now anyway.

Geschwindigkeit deiner Website optimieren

Wir alle kennen die Tools zum Messen der Geschwindigkeit einer Website: Pagespeed, YSlow, Pingdom, Webpagetest oder das Kombitool aus Pagespeed und YSlow GTMetrix. Aber wie wird zum Beispiel Browser Caching aktiviert? Wer sich damit nicht auskennt, der findet viele, viele Artikel dazu, die viel Code in sich haben und nichts erklären. Hier ist noch einer davon. 😉
Über die vergangenen Jahre habe ich dieses Gist immer wieder ergänzt, verbessert und korrigiert. Entstanden ist eine sehr praktische Sammlung von Einstellungen, die fail safe die jeweiligen Möglichkeiten des Hosters ausnutzen. Die entsprechenden Anweisungen sind in If-Abfragen gekapselt, so dass es bei guten Hostern keine Probleme mit nicht unterstützen Modulen geben sollte.

Die Einstellungen teilen sich in drei Bereiche: Komprimierung (Deflate/GZip), Browser Caching (Ablaufdatum für statische Caching-Inhalte definieren) und dem Setzen von sinnvollen Headern (Keep Alive, Accept Encoding, etc.).

#
# Sources:
# http://stackoverflow.com/questions/7704624/how-can-i-use-gzip-compression-for-css-and-js-files-on-my-websites
# http://codex.wordpress.org/Output_Compression
# http://www.perun.net/2009/06/06/wordpress-websites-beschleuinigen-4-ein-zwischenergebnis/#comment-61086
# http://www.smashingmagazine.com/smashing-book-1/performance-optimization-for-websites-part-2-of-2/
# http://gtmetrix.com/configure-entity-tags-etags.html
# http://de.slideshare.net/walterebert/die-htaccessrichtignutzenwchh2014
# http://de.slideshare.net/walterebert/mehr-performance-fr-wordpress
#
<IfModule mod_deflate.c>
# Insert filters / compress text, html, javascript, css, xml:
AddOutputFilterByType DEFLATE text/plain
AddOutputFilterByType DEFLATE text/html
AddOutputFilterByType DEFLATE text/xml
AddOutputFilterByType DEFLATE text/css
AddOutputFilterByType DEFLATE text/vtt 
AddOutputFilterByType DEFLATE text/x-component
AddOutputFilterByType DEFLATE application/xml
AddOutputFilterByType DEFLATE application/xhtml+xml
AddOutputFilterByType DEFLATE application/rss+xml
AddOutputFilterByType DEFLATE application/js
AddOutputFilterByType DEFLATE application/javascript
AddOutputFilterByType DEFLATE application/x-javascript
AddOutputFilterByType DEFLATE application/x-httpd-php
AddOutputFilterByType DEFLATE application/x-httpd-fastphp
AddOutputFilterByType DEFLATE application/atom+xml 
AddOutputFilterByType DEFLATE application/json
AddOutputFilterByType DEFLATE application/ld+json 
AddOutputFilterByType DEFLATE application/vnd.ms-fontobject 
AddOutputFilterByType DEFLATE application/x-font-ttf 
AddOutputFilterByType DEFLATE application/x-web-app-manifest+json 
AddOutputFilterByType DEFLATE font/opentype 
AddOutputFilterByType DEFLATE image/svg+xml
AddOutputFilterByType DEFLATE image/x-icon
# Exception: Images
SetEnvIfNoCase REQUEST_URI \.(?:gif|jpg|jpeg|png|svg)$ no-gzip dont-vary
# Drop problematic browsers
BrowserMatch ^Mozilla/4 gzip-only-text/html
BrowserMatch ^Mozilla/4\.0[678] no-gzip
BrowserMatch \bMSI[E] !no-gzip !gzip-only-text/html
# Make sure proxies don't deliver the wrong content
Header append Vary User-Agent env=!dont-vary
</IfModule>
## EXPIRES CACHING ##
<IfModule mod_expires.c>
ExpiresActive On
ExpiresDefault "access plus 1 week"
ExpiresByType image/jpg "access plus 1 year"
ExpiresByType image/jpeg "access plus 1 year"
ExpiresByType image/gif "access plus 1 year"
ExpiresByType image/png "access plus 1 year"
ExpiresByType image/svg+xml "access plus 1 month" 
ExpiresByType text/css "access plus 1 month"
ExpiresByType text/html "access plus 1 minute"
ExpiresByType text/plain "access plus 1 month"
ExpiresByType text/x-component "access plus 1 month" 
ExpiresByType text/javascript "access plus 1 month"
ExpiresByType text/x-javascript "access plus 1 month"
ExpiresByType application/pdf "access plus 1 month"
ExpiresByType application/javascript "access plus 1 months"
ExpiresByType application/x-javascript "access plus 1 months"
ExpiresByType application/x-shockwave-flash "access plus 1 month"
ExpiresByType image/x-icon "access plus 1 year"
ExpiresByType application/json "access plus 0 seconds"
ExpiresByType application/ld+json "access plus 0 seconds"
ExpiresByType application/xml "access plus 0 seconds"
ExpiresByType text/xml "access plus 0 seconds" 
ExpiresByType application/x-web-app-manifest+json "access plus 0 seconds" 
ExpiresByType text/cache-manifest "access plus 0 seconds" 
ExpiresByType audio/ogg "access plus 1 month" 
ExpiresByType video/mp4 "access plus 1 month" 
ExpiresByType video/ogg "access plus 1 month" 
ExpiresByType video/webm "access plus 1 month" 
ExpiresByType application/atom+xml "access plus 1 hour" 
ExpiresByType application/rss+xml "access plus 1 hour" 
ExpiresByType application/font-woff "access plus 1 month" 
ExpiresByType application/vnd.ms-fontobject "access plus 1 month" 
ExpiresByType application/x-font-ttf "access plus 1 month" 
ExpiresByType font/opentype "access plus 1 month" 
</IfModule>
## EXPIRES CACHING ##
#Alternative caching using Apache's "mod_headers", if it's installed.
#Caching of common files - ENABLED
<IfModule mod_headers.c>
<FilesMatch "\.(ico|pdf|flv|swf|js|css|gif|png|jpg|jpeg|txt|html|htm)$">
Header set Cache-Control "max-age=2592000, public"
</FilesMatch>
</IfModule>
<IfModule mod_headers.c>
 <FilesMatch "\.(js|css|xml|gz)$">
 Header append Vary Accept-Encoding
 </FilesMatch>
</IfModule>

<filesMatch "\\.(js|js.gz)$">
Header set Cache-Control "max-age=604800, private"
</filesMatch>
<IfModule mod_gzip.c>
 mod_gzip_on Yes
 mod_gzip_dechunk Yes
 mod_gzip_item_include file \.(html?|txt|css|js|php|pl)$
 mod_gzip_item_include handler ^cgi-script$
 mod_gzip_item_include mime ^text/.*
 mod_gzip_item_include mime ^application/x-javascript.*
 mod_gzip_item_exclude mime ^image/.*
 mod_gzip_item_exclude rspheader ^Content-Encoding:.*gzip.*
</IfModule>
# Set Keep Alive Header
<IfModule mod_headers.c>
 Header set Connection keep-alive
</IfModule>
# If your server don't support ETags deactivate with "None" (and remove header)
<IfModule mod_expires.c> 
 <IfModule mod_headers.c> 
 Header unset ETag 
 </IfModule> 
 FileETag None 
</IfModule>

OS X: PDFs auf dem Desktop zeigen Dateivorschau

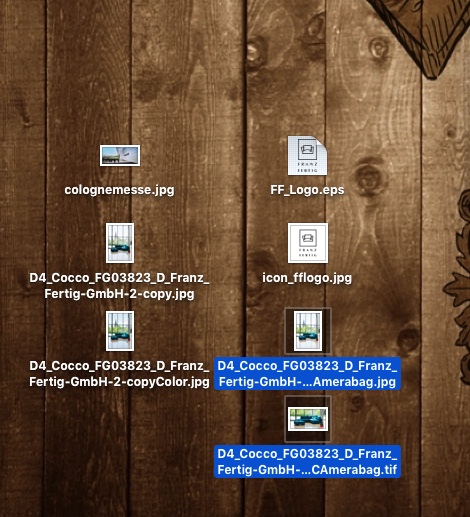
Mit aktiver Dateivorschau wird es auf dem MacbookPro unter OS X «El Capitan» schnell unübersichtlich, wenn mal zehn PDF-Dateien auf dem Desktop liegen.

screenshot_0637

Die Inhaltsvorschau von PDF-Dateien ist eigentlich ein nettes Feature. Aber bei mehreren PDF-Files auf dem Desktop bzw. «Schreibtisch» wird es eher unübersichtlich, wenn OS X deren Inhalte anstelle der Adobe-Dateisymbole anzeigt.

Lösung: Sie können das umschalten. Klicken Sie einmal auf den Schreibtisch und wählen Sie im Menü Darstellung den Befehl «Darstellungsoptionen einblenden» aus. Anschliessend erscheint die unter Anderem die Option «Symbolvorschau einblenden». Schalten Sie diese hier ab.

Falls Sie andere Ordner haben, in denen Sie die Vorschau gerne weiterhin hätten, ist das kein Problem. Sie können es bei Bedarf für jeden beliebigen Ordner einzeln regeln.

WordPress CRON Job startet nicht

1. Maintenance mode?

Firstly: is your website in maintenance mode? This disables scheduled tasks of all kinds – so turn it off first.

2. No visitors?

WordPress’s scheduler relies on the site having visitors. No visitors means that WordPress doesn’t run, and therefore can’t hand over to the scheduled task. If your site is in development, and you schedule a backup run for a time when all the developers are asleep, then that may be the cause for the scheduled task not running. (Read more here).

3. Is your scheduler explicitly disabled?

Perhaps your site has WordPress’s scheduler disabled in the configuration.UpdraftPlus versions 1.6.61 and later will alert you of this; to check manually, look for a line like this in your wp-config.php file (which is found in the root directory of your WordPress install), and remove it (or change true to false, making sure there are no quote marks around false):

define('DISABLE_WP_CRON', true);

In this case, the disabling may be something your web hosting company did intentionally, so be aware that they may re-disable it. Or, it may be something that you did intentionally, and you may have set another means of calling WordPress’s scheduler system, perhaps via your web hosting company’s control panel. In that case, the message about DISABLE_WP_CRON is to be expected – but note that it is then your responsibility to make sure that the scheduler is called frequently enough to process all the jobs scheduled on your site. No backups, even those scheduled with “Backup Now” will run until the time that you have set the scheduler system to be called.

Also – note that it’s possible for DISABLE_WP_CRON to be set in a file other than wp-config.php; wp-config.php is simply the most likely (99%) place. If you have a warning about DISABLE_WP_CRON, but it is not found in wp-config.php, then it will be somewhere else – you will need to hunt for it.

4. Loopback connections are disabled?

Some web hosting providers (one big one: Heart Internet) purposefully (though for no good reason) disable the “loop-back” connects that allows WordPress to run its scheduler. In such a case, you can try this use WordPress’s alternative scheduling system – instructions here. The instructions amount to one thing: add a line anywhere in the middle of your wp-config.php file as follows (don’t add it too late in the file, or it will take no effect):

define('ALTERNATE_WP_CRON', true);

5. Try using a cron job

If your web hosting company gives you “shell” access and you can set up cron jobs, and if you are confident/skilled enough to use that, then that’s a great solution. Jobs run that way won’t face any time-out issues imposed by the webserver. Read more about running via the shell here.

6. Is your entire website password-protected?

Another cause is if your entire website is password-protected at the HTTP level (e.g. via a .htaccess file). This also prevents WordPress’s scheduler from working. You should configure your webserver to allow “loop-back” connections (i.e. connections to self), otherwise you WordPress scheduler and everything that depends upon it will be broken. If you are using Apache and .htaccess, then adding these two lines to the access control section of your .htaccess should work – after replacing a.b.c.d with your website’s IP address):

Allow from a.b.c.d
Satisfy Any

Please note: The above suggestion is just a suggestion. .htaccess configuration is a very big subject. UpdraftPlus neither “supports” nor “doesn’t support” different .htaccess configurations, because .htaccess files operate at quite a different level to WordPress plugins. If you enter the correct instructions in your .htaccess file to permit access, then UpdraftPlus will work. But if you are not sure of the correct instructions for your particular server, then you need to consult with either your web-hosting company or your local .htaccess guru.

Windows Defender deaktivieren und entfernen

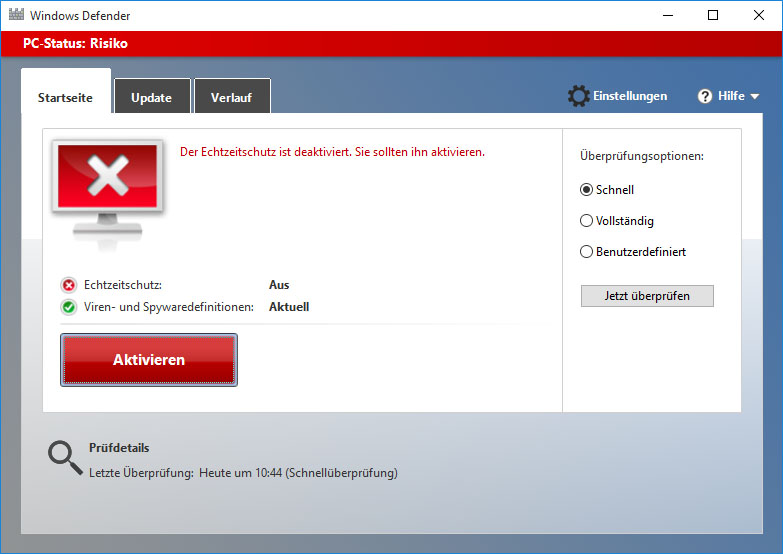
windows-10-defender-deaktiviert-fenster

Since Windows Vista, your operating system comes with an anti spyware program called Windows Defender. It’s a small piece of software that runs in the background to help protect your computer from various pieces of spyware and malicious software. Defender has been around since 2006 and although not a fully featured security application, it does at least offer some protection for Windows Vista and 7 out-of-the-box. In Windows 8, Microsoft went a step further basically renamingMicrosoft Security Essentials to Defender, and it’s now an antivirus package as opposed to just small resident anti spyware tool.

The problem with all Defender versions in Windows Vista and above is it’s integrated into the operating system and installs by default with no visible or hidden option to uninstall. Many people are looking for ways to disable, uninstall or remove it from their system as they prefer to use other software. Windows XP users at least have the luxury of choosing whether they want to download and install Defender in the first place as it’s a separate package, and then have the option to uninstall again through Add or Remove Programs. Luckily most of the time when you install a new anti spyware program or antivirus application that includes anti spyware, it should be smart enough to disable Windows Defender as your new software takes care of it from now on. However, if Defender is still running or causing other issues, you need to know how to turn it off manually or in more extreme cases remove it from the system completely. Here we show you how to do both.

windows defender program is turned off

Disabling Defender In Windows Vista And 7

Defender in Windows Vista is slightly more integrated into the operating system as opposed to Windows 7 with added options for protecting Internet Explorer, startup items and services/drivers etc. It also includes a tray icon for the program which is started with Windows that needs to be removed. There are two easy ways to disable Defender in Windows 7 and Vista:

Method #1

1. Click Start and type services.msc into the search box, or go to Control Panel -> Administrative Tools -> Services.

2. Look for “Windows Defender” in the services list and double click on it to bring up the Properties window.

disable Windows Defender service

3. Click the Stop button to stop the Windows Defender service and then click on the Startup type drop down menu and select Disabled. Press OK.

Stop Windows Defender Services

Method #2

1. This way is just as easy, go to Control Panel -> Windows Defender, or if it’s running in the tray under Vista, simply double click on the tray icon.

2. Click on Tools and then go to Options.

windows defender tools option

3a. In Windows Vista scroll right to the bottom of the window and you’ll see an option “Use Windows Defender” under Administrator options. Simply uncheck “Use Windows Defender” and click Save, Defender will now be turned off.

Uncheck Use Windows Defender

3b. Defender is laid out slightly differently in Windows 7. In the Options window, click on Administrator down the left and then uncheck “Use this program” and click Save.

administrator use this program

Removing The Startup Entry

If you stop and disable Vista’s Windows Defender from Services and do not disable the Windows Defender tray program (MSASCui.exe) from starting with Windows, you’ll likely get the following error message:

Application failed to initialized: 0x800106ba. A problem caused this program’s service to stop. To start the service, restart your computer or search Help and Support for how to start a service manually.

Application failed to initialized 0x800106ba

1. Click Start and type msconfig into the search box.

2. Go to the Startup tab and uncheck Windows Defender displayed in the Startup Item column. Click OK and at the restart box check “Don’t show this message again” and then click “Exit without restart”.

disable Windows defender from MSCONFIG

Of course, there are many other tools around that can disable Windows startup entries such as CCleaner which you can use instead if you wish.

Disabling Windows Defender In Windows 8

As we mentioned above, Windows 8 Defender is now pretty much the full Microsoft Security Essentials antivirus software under the Defender name. It can also be disabled using two methods which are basically the same as for Windows Vista and 7. The first method of disabling the Windows Defender service is exactly the same as Method #1 above, the second is slightly different because of the MSE looking interface.

1. Go to Control Panel -> Windows Defender or click on the Start Screen -> right click -> All Apps -> Windows Defender.

Windows 8 Defender

2. Click on the Settings tab -> click Administrator on the left, and then uncheck the “Turn on Windows Defender” box and save the changes.

turn off windows defender 8

Windows 10 Defender ausschalten und einschalten

Anleitung: Defender ausschalten unter Windows 10

Wer den Defender nur vorrübergehend ausschalten oder wieder einschalten will, der kann dies am besten über die Dienste machen. Hier besteht nicht nur die Möglichkeit den Dienst kurzzeitig anzuhalten und nach einem Neustart wieder zu starten, sondern über diesen Weg kann man den Windows 10 Defender auch komplett deaktivieren. So bleibt der Windows Malwareschutz auch nach einem Neustart komplett deaktivieren und ausgeschaltet.

  1. Einstellungen im Startmenü öffnen
  2. Auf Update und Sicherheit und dann unter Windows Defender den Echtzeitschutz ausschalten

Defender über die Registry deaktivieren

Alternativ zu dieser Methode kann man auch über die Registry kinderleicht den Defender unter Windows 10 ausschalten. Wer also nicht über die Dienste gehen möchte, der muss folgendermaßen in der Registry vorgehen und einen bestimmten Wert ändern.

  1. Öffne die Registry über die Windows-Taste + R und gebe dort “regedit” ein.
  2. Jetzt navigierst Du zu dem Pfad “HKEY_LOCAL_MACHINESOFTWAREPoliciesMicrosoftWindowsWindows Defender” und erstellst über einen Rechtsklick einen neuen Schlüssel mit dem Namen “Windows Defender”.
  3. In diesem Pfad öffnest Du wieder das Kontextmenü über die rechte Maustaste und erstellst einen “DWORD-Wert (32-bit)” und diesen nennst Du “DisableAntiSpyware”.
  4. Setze hier den Wert auf 1 und speichere den Schlüssel ab.
  5. Jetzt ist der Windows Defender über die Registry deaktiviert worden. Um diesen wieder zu aktivieren, einfach den Wert von 1 auf 0 ändern.

Einzelne Dateien oder Ordner aus dem Scan ausschließen

Wer den Defender trotzdem nutzen möchte aber einfach nur einzelne Verzeichnisse, Dateien oder Dateiendungen aus dem Scan ausschließen will, der kann dies natürlich auch über die Einstellungen machen und das geht folgendermaßen.

  1. Öffne das Startmenü und gehe über die “Einstellungen” auf den Punkt “System”.
  2. Navigiere dort wieder zu dem “Windows Defender” und gehe auf der rechten Seite auf den Punkt “Einen Ausschluss hinzufügen”.
  3. Hier hast Du jetzt die Möglichkeit nicht nur einzelne Dateien sondern auch ganze Ordner, Dateitypen und Prozesse auszuschließen.
  4. Eine sehr nützliche Sache vor allem deswegen, weil man jetzt auch einzelne Programme ausschließen kann. Wenn es zum Beispiel Probleme mit Spielen oder Programmen wie Steam und Co. gibt.
  5. Wenn man eine falsche Datei oder Ordner angegeben hat, kann man dies jederzeit rückgängig machen über den Eintrag und “Entfernen”.

Das war unsere kurze Anleitung zum Deaktivieren von dem Windows 10 Defender. Sollte es noch Fragen geben oder wenn irgendwas nicht funktioniert wie beschrieben, einfach einen Kommentar hinterlassen.


!!! Completely Uninstalling Windows Defender !!!

For most users, simply turning off Windows Defender or disabling it via the Services Control Panel should be enough to stop it running. If for whatever reason you’re still having some sort of issue or are determined to remove Defender completely from the system, unfortunately is isn’t possible using Programs and Features or the Turn Windows features on or off window.

Although there is no official way to cleanly uninstall Defender, it is possible to remove the service, Control Panel entry, other related registry entries and all the files and folders manually so Defender is unofficially removed from the system. This does present its own set of problems though as the registry keys, files and folders are all protected with enhanced permissions and you have to take ownership of them all. Also, once removed, you can’t re-install Defender again because it isn’t a separate package.

As there seems to be no tool around to do it for you, we’ve decided to create our own little utility that can delete all the necessary protected registry keys, files and folders at the click of a button. Currently the program works great on Windows Vista and 7’s Defender but does not work and shouldn’t be used on Windows 8, we may include full Windows 8 Defender support in future if people request it.

Windows Defender Uninstaller

Simply download the portable Windows Defender Uninstaller and run it, then click the button to uninstall Defender. The lower pane will show what’s being deleted and if there are any errors. For best results, it’s best to disable Defender beforehand using one of the methods above. Please use this tool at your own risk as once Defender has been removed, it cannot easily be re-installed, make sure you have backups to hand in case you change your mind later on.

Alternative: NoDefender.zip 

Manually Removing Defender

For the more experienced, removing the Windows Defender service, files, folders and Control Panel entry can be done manually, but as they’re all protected, you need to know how to delete a protected registry key and how to take ownership of folders with a tool like WinOwnership or theTake Ownership context menu .

1. Open a command Prompt and type the following to stop and then delete the Defender service:

sc stop windefend

sc delete windefend

sc stop windefend

2. Next you need to grant full permissions to and delete the following registry key so the Defender Control Panel entry can be deleted:

HKEY_LOCAL_MACHINESOFTWAREMicrosoftWindowsCurrentVersionExplorer
ControlPanelNameSpace{D8559EB9-20C0-410E-BEDA-7ED416AECC2A}

3. Also grant full permission and delete the Defender programregistry key:

HKEY_LOCAL_MACHINESOFTWAREMicrosoftWindows Defender

4. Now take ownership of and delete the following folders:

C:Program FilesWindows Defender

C:ProgramDataMicrosoftWindows Defender

C:Program Files (x86)Windows Defender (for 64-bit users only)

After that is done, Defender should now be removed. Windows may complain that Defender is turned off but this will disappear after a reboot or you can go into Action Center and tell it not to monitor your anti spyware software.

turn off messages about spyware and related protection

Of course we don’t recommend disabling or uninstalling Windows Defender for the sake of it, especially if it’s causing you no issues or there is no specific need to do so. Disabling Windows Defender will leave your computer unprotected from spyware and other malware, so you obviously need to make sure you have another anti spyware program or security package to replace it.

Thunderbird Postfach-Zugriff durch Komprimierung beschleunigen

Mit Thunderbird lässt sich Post aus verschiedenen Postfächern gemeinsam verwalten. Wenn das Volumen der Postfachordner jedoch stark wächst, wird Thunderbird langsam. Um Postfachdateien zu verkleinern, genügt es nicht, Nachrichten und Anhänge zu löschen. Entfernt werden die gelöschten Elemente erst, wenn das Postfach komprimiert wird.

Komprimieren: Die Grenze für das automatische Komprimieren von Postfachordnern bei Thunderbird können Sie mit „Extras ➞ Einstellungen ➞ Netzwerk & Speicherplatz“ im Dialogfenster festlegen. Achten Sie dabei darauf, dass bei Thunderbird „Ordner komprimieren“ markiert ist. Reduzieren Sie im Feld daneben die Postfachgröße beispielsweise auf 1 MB. Erst wenn diese Grenze erreicht wird, entfernt Thunderbird die Mails, die Sie gelöscht haben, aus dem Ordner und reduziert so das Dateivolumen. Sie können den Komprimierungsbefehl vorzeitig einleiten, in  dem Sie einen Ordner – zum Beispiel den Papierkorb – mit der rechten Maustaste anklicken und „Komprimieren“ wählen.

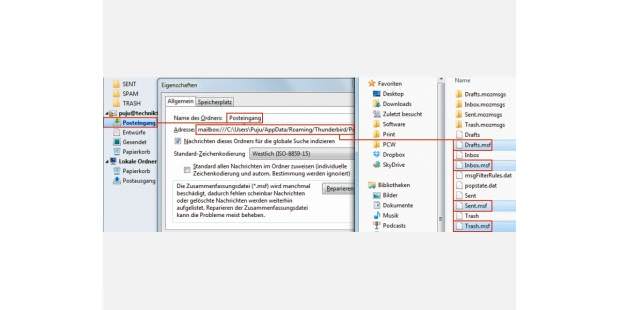
Reparieren: Wenn die Komprimierung Thunderbird nicht beschleunigt oder die Ordnerstruktur beschädigt ist, lässt sich auch eine Reparatur der gespeicherten Ordner-Zusam  men  fassungen ausführen. Klicken Sie dazu den Postfachordner – etwa den Posteingang – mit der rechten Maustaste an und wählen Sie daraufhin im Menü „Eigenschaften ➞ Allgemein ➞ Reparieren“.

3519542_620x310

Um Thunderbird zu zwingen, seine Zusammenfassungsdateien neu zu generieren, löschen Sie die „*.msf“-Dateien im Mailbox-Verzeichnis.

Löschen:   Sollte dies nicht den gewünschten Erfolg nach sich ziehen, haben Sie noch die Möglichkeit, die Zusammenfassungsdateien zu löschen. Dies zwingt Thunderbird zur Neuordnung. Hierfür öffnen Sie wieder per Rechtsklick auf einen Postfachordner und „Eigenschaften“ im Dialogfenster die Registerkarte „Allgemein“ und markieren im Feld „Adresse“ durch Überstreichen mit gedrückter Maustaste die Pfadangabe, etwa „C:/Users/name/AppData/Roaming/Thun derbird/Profiles/kiou49ux.default/Mail/pop.1und1.de/“ (Markierung vom Laufwerksbuchstaben bis zum letzten Schrägstrich). Der Dateiname am Ende der Pfad  angabe darf hierbei ebenso wenig wie die Bezeichnung „mailbox:///“ am Beginn markiert werden. Betätigen Sie nun gleichzeitig die Taste Strg und die Taste C, um die Adresse zu kopieren. Schließen Sie mit „Abbrechen“ das Fenster und mit „Datei ➞ Beenden“ das Programm.

Öffnen Sie dann ein Explorer-Fenster. Klicken Sie in die Adresszeile und ersetzen Sie den markierten Pfad mit dem gleichzeitigen Drücken der Taste Strg und der Taste V durch die zwischengespeicherte Adresse. Betätigen Sie die Enter-Taste. Im geöffneten Ordner klicken Sie die Dateien mit der Erweiterung „.msf“ an, während Sie die Taste Strg gedrückt halten. Tippen Sie danach auf die Taste Entf und bestätigen Sie die nachfolgende Abfrage mit „Ja“. Beim nächsten Start stellt Thunderbird die Zusammenfassungsdateien neu und ohne den alten Ballast her.

7 Helferlein, um gesperrte Dateien und Ordner zu löschen

7 Tools to Unlock Those Hard to Delete Files

Files become locked because they are still being used by a Windows process or service and cannot be touched until Windows releases the file. One of the worst programs to actually cause this problem is the Explorer.exe process itself getting a lock on a file or even external devices like USB flash drives so you are unable to safely remove them. Other things like malicious software, security software or crashed programs can sometimes be to blame and can stop a file being deleted or moved. Here’s a selection of 7 different file unlocking and deleting tools for you to remove your difficult to get rid of files and folders.

unabledeletefile


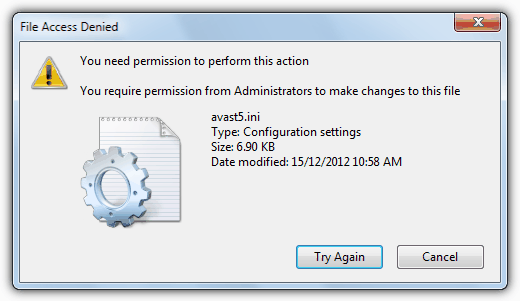
Software such as anti-virus files are difficult to delete simply because the software tries to protect itself from malicious processes and therefore makes its files very hard to tamper with by setting advanced permissions. Knowing this, we’re going to perform a very simple test of trying to delete an avast! antivirus file called “avast5.ini” using Windows 7 x64 while the program itself is still running. Try to delete this file normally and you will get a “You require permission from Administrators to make changes to this file” even if you’re the administrator.

1. FileASSASSIN

Most of you will know FileASSASSIN’s makers Malwarebytes from their excellent Anti-Malware program and that tool actually includes a version of FileASSASSIN, accessible from the More Tools tab. It can attempt to unlock the files handles, unload modules, kill the related process and also optionally delete the file using the built in unlocking method. There is also the option to mark the file for delete on reboot or run a Standard delete.

FileASSASSIN

FileASSASSIN is available either as a portable or setup installer version and you simply run the program and browse for, or drag and drop a file on to the window. Then select the unlock and delete option tick boxes and click Execute. The standalone FileASSASSIN program hasn’t been updated since 2007 and may not be as effective as other tools these days, the version integrated into Anti-malware seems to be better. Works on windows XP and above.

Deleting avast5.ini result: The file remained using all internal and the after a reboot options. It WAS removed after a reboot by using the FileASSASSIN function from Malwarebytes Anti-malware.

Download FileASSASSIN 


2. LockHunter

LockHunter is made by Crystal Rich, the same people behind the superb USB Safely Remove utility. It’s simple to use and shows you which processes are locking the files or folders you want to delete and gives the options to simply unlock and additionally rename or copy as well. LockHunter also has a fallback in case you make a mistake by sending any deleted files to the Recycle Bin for easy recovery.

LockHunter

The program needs installing and can be accessed via the right click menu, which will show an entry of “What is locking this file?” or “What is locking this folder?” depending on what’s selected. Processes with a lock will show in the window and you can select the Unlock It! or Delete It! options or the rename and copy options from Other. LockHunter is still in beta so might not be totally stable, there are 32-bit and 64-bit versions available. Works on Windows 2000 and above.

Deleting avast5.ini result: LockHunter was unable to delete the ini file, there is no delete on reboot option.

Download LockHunter 


3. IObit Unlocker

IObit are the people behind popular tools like Advanced SystemCare or Smart Defrag and Unlocker is another one of their simple to use applications. The program is able to just unlock files or folders for manual file management, or unlock and delete, rename, move or copy automatically. There is also a Forced mode tick box option which will terminate all related processes if the standard mode fails.

IObit Unlocker

IObit Unlocker requires installing and you have to be aware of the toolbar and other adware that gets offered during the install. The program works best by way of the right click context menu where you simply select your files or folders and choose the IObit Unlocker entry. What you have chosen will show in the top window and clicking on anything with a status of Locked will show the processes with a lock on it below. To delete a file simply choose the Unlock and Delete option from the central drop down button.

IObit Unlocker works on windows XP and above. Sadly the official download from IObit redirects to FreeNew.net where they force you to download an install manager to get the program. The CNET download link  DOESN’T have an install manager, or you can just use Downloadcrew’s download link .

Deleting avast5.ini result: The file was successfully deleted WITHOUT needing a reboot or using Forced mode! What’s more, IObit was able to easily delete the whole folder full of these protected files, where most tools here couldn’t even delete just the single file.

Visit IObit Unlocker 


4. BlitzBlank

Anti malware and Firewall developers Emsisoft have created BlitzBlank to help in the removal of difficult to delete files especially in the case of malicious files and processes. The program is specifically designed to remove files during the Windows boot process before most software has a chance to protect or lock a file. The tool has other deleting options besides files and folders, such as removing registry entries, disabling drivers and also executing other files. BlitzBlank is a tool for more advanced users and a warning on starting the tool will tell you that.

BlitzBlank

BlitzBlank is a portable executable which makes it great for the USB toolkit. To delete a file make sure you’re on the Designer tab, click in the Type column and select File or Folder from the drop down, click on <File Path> in the Object column and either type in or browse for the file or folder using the “…” button. The Action column will allow for deleting, moving or copying and you can replace with a Dummy or choose to make a backup. Multiple entries can be added, just enter the new item on the next line. Click Execute Now and the program will prompt to reboot.

All actions in the Designer tab are fed into the Script tab where they can be edited, saved, loaded or pasted in from a previous session. BlitzBlank is compatible with Windows XP to Windows 8 32-bit and 64-bit and is also part of Emsisoft’s Emergency Kit  which is a valuable, free and portable malware removal suite.

Deleting avast5.ini result: The file was successfully deleted after a reboot.

Download BlitzBlank 


5. Unlocker

Unlocker is without doubt the most popular locked file removal utility around and has been for quite a few years. In addition to helping remove files with permission or file protection issues, it also tries to remove the process handles that might have a lock on a file causing it to be not removable. Or failing that, you’re given the opportunity to kill the process identified as being the cause of the lock which hopefully allows for deletion.

The Unlocker

An install will give you a handy right click context menu entry where you can simply right click on a file or folder and select Unlocker from the menu. Depending on if there are any locking handles on the file will determine whether you get the simple delete helper dialog above, or the main window which shows the processes causing an issue and you have the option of unlocking the handles on the file or killing the process causing the lock completely.

release locked files

The program comes in both 32-bit and 64-bit versions and also a portable version although currently it is one release behind the setup installer. Something you need to watch out for is the adware options that need to be disabled during an install.

Deleting avast5.ini result: The file remained intact using rename, delete or move, even after a reboot.

Download Unlocker 


6. File Governor

NoVirusThanks File Governor works in quite a similar way to Unlocker in that it can try to forcefully delete a file as well as unlocking the handles attached to it including DLL file handles. If unlocking the handles doesn’t work, you can terminate the process causing the problem as long as it isn’t a system critical process which is why some knowledge is required of which processes are safe to kill and which aren’t when using these tools.

File Governor

File Governor comes as both portable or setup versions and the handy thing is the portable version still gives you the option to include a right click entry for it in your Windows context menu. Use that right click option or open the program and use “Search for locked files” for the program to analyze your file. Any processes with a lock on the file will show in the window where you can choose to Unlock the handles or terminate / delete / copy / move the process.

The Tools menu gives the option to browse for and Force delete, Delete on reboot or Rename a single file. File Governor work on Windows 2000 and above.

Deleting avast5.ini result: Force delete, Delete on reboot and Rename all failed to remove the file.

Download File Governor 


7. Pocket KillBox

KillBox is a tiny single executable of under 100K and sadly the program has been abandoned with no website and no chance of updates or fixes. It does pack quite a lot into that small size though, and offers a standard file delete method, a Delete on reboot and also replace the with a dummy or chosen file on reboot method. Another neat little option is a pop out task killer (by pressing Processes >> in the menu bar) which can auto kill tasks every 5 seconds and a few useful tools such as a handy little temp file cleaner and quick access to the HOSTS file, the registry editor and services.

Pocket Killbox

You can browse for or drag and drop more than 1 file onto the window at once, dropping a folder will enter the files in the folder and the directory itself at the bottom of the drop down list. Choose the delete method and then click the red icon to begin the delete process. Works on Windows XP to Windows 7.

Deleting avast5.ini result: Using Standard, Delete on reboot or Replace on reboot failed to remove the file.

Download Pocket KillBox 

Editor’s Note: Some other tools we looked at were EMCO’s UnLock IT / MoveOnBoot and UnlockMe. Although Unlock IT  is a pretty looking program with themes, it can only unlock process handles and cannot delete, move or rename files directly. MoveOnBoot  is designed to delete or move files during a reboot but didn’t touch the test file, and has a massive 35MB installer!! UnlockMe looks like a useful tool but crashed nearly every time we tried to select a file to delete. Also looked at were Delete Doctor  and FilExile  and both are more like general delete tools without the more advanced options needed to delete stubborn files.

We were very impressed by IObit Unlocker because it was the only tool to delete the test file (and its whole folder) without needing a reboot while BlitzBlank and the Malwarebytes version of FileASSASSIN did the job after a reboot. If you’re using a tool such as Unlocker and come across something you can’t remove, those other programs are worth a look.
Read More: https://www.raymond.cc/blog/lockhunter-is-unlocker-alternative-that-works-on-windows-x64/

Lightroom: 3 Arten, wie man Fotos umbenennen kann (Batch renaming)

Renaming on Import

Rename_Export_1_large

To rename your photos when importing, go to the File Renaming Tab on the right-hand side of the Import dialog box.

I import all my photos via Lightroom and I rename all my files on import to get rid of the letters my camera places at the beginning of each filename—DSC (Nikon) or IMG (Canon).  These just bug me and I don’t want to see them.

This is just the type of renaming that you want to do on import—a process that you do for EVERY photo you import.  

Follow these steps to create your own preset that renames your photos like this.

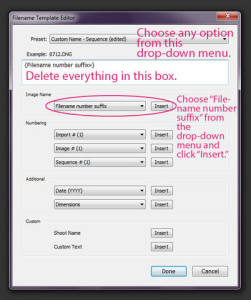
1) Choose “Edit” from the drop-down menu with in the File Renaming Tab on the right-hand side of the import dialog box.

2) A new box will open up.  Delete all the text in the white box.  Then choose “Filename number suffix” from the drop-down menu under the “Image Name” section.

3) To save these settings as a preset, go back up to the top drop-down menu and choose “Save Current Settings as New Preset”.  Give your preset a name and click “Create.”

Rename_Import_2_large

Renaming After Selecting Favorites

This is the type of renaming that I like to use for client photos.  I typically don’t really love the long sequence of numbers that most of my files are left with after they have been taken.  So once I have chosen my favorites, I select them and rename them.

To do this, you need to be in the Library module.  Then just select the photos you want to rename and then hit F2 or choose Rename Photos from the Library drop-down menu.  

This will open a dialog box that will give you several options for renaming your files.  “Custom Name-Sequence” is the one that I choose most often.  Using this method, I can add the client’s name (custom name) and start the numbering of these favorites at 1 (sequence).

The reason I choose this import method over the next one I will tell you about is that I want the files I give my client to have the same name on my hard drive.  Things just get too confusing otherwise if I am trying to look up a photo to edit later on.


Renaming on Export

This is another way that I rename photos, but I don’t use it frequently for Client photos for the reason I just mentioned above.  I sometimes use this renaming technique on files that I am printing (to differentiate them from other files) or posting to my blog or social media (to have keywords in my photo title).

To take advantage of this type of renaming, select the files that you want to export.  Right-click and choose “Export” or click ctrl (cmd) + shift + E.  Then scroll down the section that gives you the options for file renaming.  Click the box next to “Rename to:” and choose the options that you want and as your photos are exporting.  Once you click “Export”, they will also be renamed.

Happy Editing!!

Windows 8.1 – entfernen von „Ordner“ vom Arbeitplatz „Dieser PC“

How to Remove the “Folders” From My Computer in Windows 8.1

image

Windows 8.1 bought some of the more common folders to the top of the “This PC” window. Having used Windows since its inception, we find this looks odd and sought to fix it.

How to Remove the “Folders” From My Computer in Windows 8.1

Press the Win + R keyboard combination to bring up a run box, then type “regedit” and press enter.

image

When the registry editor opens, navigate to:

HKEY_LOCAL_MACHINE\SOFTWARE\Microsoft\Windows\CurrentVersion\Explorer\MyComputer\NameSpace\

image

You can see in the above screen shot that there are several registry keys with convoluted names. Most of them are mapped to one of those folders you see in the explorer Window. We managed to figure out which is which through trial and error, here are our findings:

Desktop Folder – {B4BFCC3A-DB2C-424C-B029-7FE99A87C641}

Documents Folder – {A8CDFF1C-4878-43be-B5FD-F8091C1C60D0}

Downloads Folder – {374DE290-123F-4565-9164-39C4925E467B}

Music Folder – {1CF1260C-4DD0-4ebb-811F-33C572699FDE}

Pictures Folder – {3ADD1653-EB32-4cb0-BBD7-DFA0ABB5ACCA}

Videos Folder – {A0953C92-50DC-43bf-BE83-3742FED03C9C}

To remove the folders from the explorer window, simply delete the corresponding registry key using the information provided above.

image

That’s pretty much all there is to it. Of course, if you are not comfortable hacking around in the registry you can just run one of the handy registry files we have created for you.

image

When its all said and done, you can have that familiar look and feel back.

image

You can use the registry files at [download id=“6012″] or

https://www.dropbox.com/sh/ceephyncvznjoka/kqTZtOMpM1

Use „ThisPC Folders – Add.reg“ and „ThisPC Folders – Add (WOW64).reg“ to restore the This PC folders in Windows 8.1 64-bit.Use „ThisPC Folders – Remove.reg“ and „ThisPC Folders – Remove (WOW64).reg“ to remove the This PC folders in Windows 8.1 64-bit.

More details on the registry keys, in my reply at http://answers.microsoft.com/en-us/windows/forum/windows8_1_pr-files/how-do-i-get-rid-of-the-clutter-under-this-pc-in/937131d0-8cd0-42ac-ab44-026426aa84ea

Files over Miles: Große Dateien direkt zwischen Rechnern übertragen

Dateienaustausch von Browser zu Browser – sende Dateien direkt zu anderen Benutzern (P2P)

Deine Dateien werden auf dem schnellsten Weg zwischen Dir und Empfänger versendet. Es gibt keine Zwischenserver die den Prozess verlangsamen. Probiere FilesOverMiles aus und sende Dateien direkt zwischen Deinen Rechnerns um zu sehen wie schnell es ist!  Die Datei wird für den Download bereitstehen bis die Webseite geschlossen ist.

Du bestimmst wer Deine geteilten Dateien downloaden kann. Du erhälst eine geheime und eindeutige URL die von FileOverMiles generiert wurde. Die Datei wird verschlüsselt und direkt zum anderen Benutzer gesendet. Es gibt keine Zwischenserver, wie bei WeTransfer.

Files over Miles