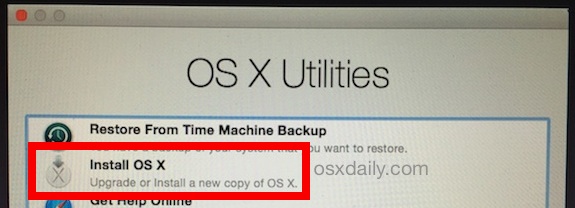
In some rare situations, reinstalling OS X on a Mac may be required. This is made fairly easy as all modern Macs include the OS X Internet Recovery feature, which lets you reinstall OS X through a netboot type of mode that is accessed from the internet rather than a local drive. This is helpful in the event you need to reinstall Mac OS X whether for fun, because something has gone truly haywire, or because you need to replace the system software for whatever other reason.
To be clear, we’re going to focus on Internet Recovery here, but there are actually two modes of system recovery; one of which is based on a local Recovery disk partition, and the other which is called Internet Recovery, the latter being triggered if the Mac does not have a Recovery partition found or if booted directly into as shown in this walkthrough. Both of the recovery modes let you re-install OS X, but the version of OS X that is installed onto the Mac will be different depending on the type of recovery mode used. Specifically, the Recovery HD partition will re-install the most current version of OS X that is currently installed on the Mac, whereas Internet Recover will re-install the version of OS X that originally came with the Mac. That difference in how the two features works means you could theoretically use Internet Recovery to downgrade OS X to the version that shipped with the Mac, though there are better ways to do that if you have a Time Machine backup from the prior OS X release handy.
Note: Re-installing OS X is typically only necessary when something is seriously wrong with the Mac system software and the computer is not functioning as it should. Do not attempt to use recovery mode for reinstalling unless you have made a thorough backup of your important files beforehand, doing so without a backup may result in irreversible file loss. You can always start a backup with Time Machine before if you need to. This guide is simply going to cover how to start a reinstallation of OS X with Recovery mode, and not the other options available when booted into recovery.
ReInstall OS X on a Mac Using Internet Recovery
Internet Recovery requires internet access, that may be slightly obvious but it’s worth mentioning because if the Mac is unable to connect to a network then it will not be able to download the operating system. Whenever possible, you should back up the Mac with Time Machine before attempting this.
You can start the internet recovery reinstall process from either a shutdown Mac, or by rebooting the Mac. This process will be the same on any new Mac, be it an iMac, MacBook Pro, MacBook Air, etc:
- Immediately after hearing the Mac boot chime, hold down Command+Option+R – if you see the Apple logo you waited too long and need to reboot and try again*
- OPTIONAL: You may or may not see an option to join a wi-fi network, this depends on whether the Mac can access any saved networks from OS X or not
- When you see a spinning globe icon, Internet Recovery mode has been entered with a message saying it can take a while, a progress bar appears as the recovery functions are downloaded

- When finished downloading, you’ll see the familiar “OS X Utilities” screen, choose “Reinstall OS X” to begin the re-installation process of the Mac operating system

- Select the destination and complete the re-installation (or installation) of OS X as usual
You’ll notice the version of OS X that can be reinstalled this way is shown in the icon or listed under the “Reinstall OS X” option, and that version will match whatever version of OS X came preinstalled on the Mac. For example, if the Mac shipped with OS X Mavericks but is now running OS X Yosemite, then OS X Mavericks would be the version that reinstalls through the Internet Recovery reinstall process.
For Macs that do not currently have an operating system found or installed, the option will show as “Install OS X” rather than “Reinstall OS X”.
Installing and re-installing OS X through Internet Recovery is pretty easy, but do be aware that because everything is coming from Apple servers, it can take quite a while as the system restore features are downloaded locally, and then the version of OS X to install are also downloaded locally as well.
When OS X has finished installing on the Mac, it will boot into a fresh install of OS X system software.
Do note that if you are reinstalling OS X to try and repair some greatly messed up operating system install, you’d likely be better off performing a true clean install of the system software by formatting the drive and then installing OS X onto it (or another drive). If interested in going that route, you can learn about clean installing OS X Yosemite, or clean installing OS X Mavericks, both of which are best performed from a separate boot drive or bootable USB installer.
* You can also use Command+R to boot into Recovery mode, older Mac models that do not support Internet Recovery will need to do that. Note that newer Macs that have both options can choose either, or they can can skip the recovery drive and go directly into Internet Recovery by using the Command+Option+R boot shortcut.


